
How to Make Stickers with Cricut
Did you know that you can make professional stickers right at home with your Cricut? All you need is a cutting machine and inkjet printer. Today, I will show you how to make stickers with Cricut using the print then cut feature.

Stickers are great for decorating notebooks, planners, water bottles, etc. When you use a high-quality printable vinyl, you can create waterproof stickers that last. And the best part is, they don’t leave behind a sticky residue, so they are safe for laptops, walls and other surfaces as well.
Best Sticker Paper for Cricut
The quality of your sticker paper matters when it comes to making stickers with your Cricut!
If you plan to make stickers for water bottles, having a waterproof vinyl is a must. I love this waterproof, glossy printable vinyl. It holds great, is waterproof and won’t leave behind a sticky residue when you take it off. This is one of the vinyl’s that I will be using in this tutorial.

If you prefer a matte vinyl, I recommend either this matte self-adhesive printable vinyl or the Hobby Lobby brand. Both are high-quality and will not leave behind a sticky residue. I will be using the Hobby Lobby brand in this tutorial. Keep in mind that matte vinyl is not waterproof. However, you can add contact paper on top for extra protection and to make the sticker waterproof if you prefer.
Sticker Ideas for Cricut
Use Designs from Cricut Access
If you do not want to design your own stickers, Cricut Design Space has a full library of designs that you can use. In order to access most of them (without paying for each one), you will need to have a Cricut Access subscription. This subscription includes access to free fonts, graphics, ready to make projects, discounts and more! You can learn more about the Cricut Access subscription here.
Create Your Own Sticker Designs
You can easily create your own sticker designs in Cricut Design Space! If you are not familiar with designing in Cricut Design Space, then you may want to check out my Cricut Design Space Guide here. It’s a giant collection of easy-to-follow instructions so you can feel confident navigating Design Space.
Get Free Sticker SVG Files Here!
Browse my library of over 600 free SVG Files! These are all true SVG designs so they can easily be modified as needed. You can find the sticker SVG files for the sticker designs in this tutorial, plus more, here:
- Boba Tea SVG
- Fries Before Guys SVG
- Axolotl SVG
- Good Vibes SVG
- Donut Heart SVG
- Pointe Shoes SVG
- Bubblegum SVG
- 18 Christmas Sticker Designs
- 20 Halloween Sticker Designs
- Cross Country Sticker Bundle
How to Make Stickers with Cricut
We will be making both cut out stickers and sticker sheets. I typically prefer the cut-out stickers because you can easily store them in baggies, give to friends or even sell the stickers this way. But, if you are creating a page of the same design, sticker sheets can be the better solutions.

Watch the full step-by-step video tutorial on how to make stickers with a Cricut.

How to Print and Cut Stickers on Cricut
Upload, Design or Modify Your Sticker Designs
Whether you are designing or uploading images, you will need to go ahead and get these ready. If you are using the same designs from my blog, you’ll notice how I deleted some text/layers from some of the designs. To do this, just select the layer you don’t need and then delete. To select more than one layer at a time, hold down shift as you select them.

Use Patterns for Fun Sticker Designs
When you change your image to a print then cut image, you get additional color fill options in Cricut Design Space… like patterns! When converting a design to a print then cut image, this will flatten your design and make it one layer.
To change your cut image to a print then cut image, select your image and in the Operation Menu change this from Basic Cut to Print Then Cut.

Once your image is converted to a Print Then Cut image, select your color fill option again and you will have the choice between Color and Pattern. Select Pattern. Search through the patterns until you find one that you like. You can use the Filter button to search by a certain color.

Select your pattern and see how your design changes! Note: Patterns are only available on the desktop version of Cricut Design Space.

Add a Background/Border Around Your Images
Have you ever wondered how people get a border around an image or text? Or how your Cricut knows how to leave a padding around your stickers when cutting? This is all done using the offset tool!
If you look at the “Best Teas” graphic, notice how the letters don’t touch. If you were to send this to print then cut as it is, your Cricut will cut around each letter and individual item that is not touching in the image. To fix this, you need to add a background to your sticker using the offset tool. Select your image and then select the Offset option. Drag the slider to the size that you want your border and then select apply.

With some graphics, you may notice that the offset doesn’t fill in all the way. Your Cricut will cut out the blank spots in the sticker. To fix this, select your offset layer and select the contour tool.

You can either select all of the layers with the cutouts or select “hide all contours”. Click the “x” to close out of the screen.

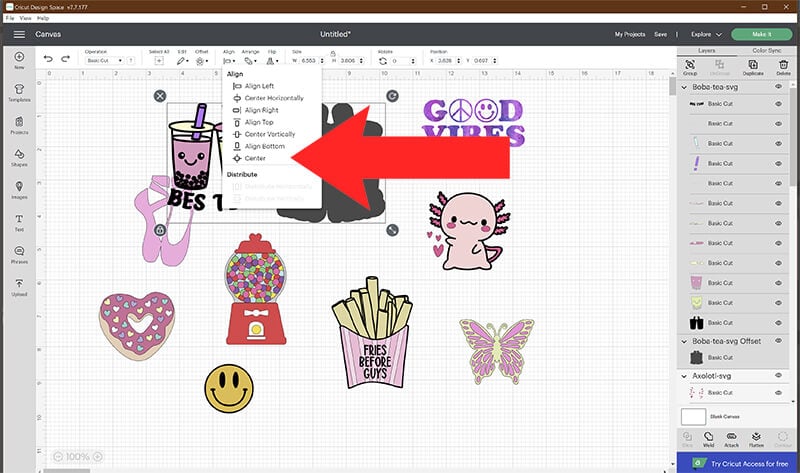
Your background will now be filled in. To re-align your offset and graphic, select both of them together and in the Align Menu, select Center. You can use the color fill to change the color of your offset to any color. I prefer a white offset when making stickers.
Convert Your Stickers to Print Then Cut
For your Cricut to print then cut your stickers, you need to flatten your images. Select your offset layer and image together, and then select “Flatten”

Repeat these steps to add an offset and to flatten your image to each design. When you are done, all of your image layers should say “Print Then Cut”.
Resize your stickers as needed and then click “Make It” to begin the cutting process.
Note: Anywhere from 2-4 inches is the recommended size for making stickers.

Print Then Cut Your Stickers
Your preview should show a black border around your images. The Cricut only supports a 6.75″ x 9.25″ size when using the print then cut feature. If your images exceed this size, your designs will be split on multiple pages. Click continue.

This will bring up the Print setup menu.
- Select your printer.
- Select the number of copies you want to print.
- It is recommended to add the bleed (and I always do). This will add a small border around your image to allow for more precise cutting.
- Select Use System Dialog. When you hit “Print”, this will open up your printer settings instead of setting this directly to the printer. Make sure that the quality of your print is set to “Best.” Then print your designs.
Note: Any high-quality full-color inkjet printer will work for Print Then Cut stickers. You do need an inkjet printer.

Once you print your stickers, you can either cut them as a sticker sheet or as individual stickers.
How to Make Sticker Sheets with Cricut
If you want to make sticker sheets instead of individual stickers, you will need to cut your stickers using the “Printable Sticker Paper” setting. To find this setting, select “Browse all Materials” (if you are using an Explore series, turn your dial to Custom to get this setting). Type in Printable in the search field and then select the printable sticker paper setting. I always select the option to add more pressure.
Place your printed sticker sheet on your mat and follow the prompts on your Cricut to cut your stickers. Before cutting, your Cricut will scan your images.
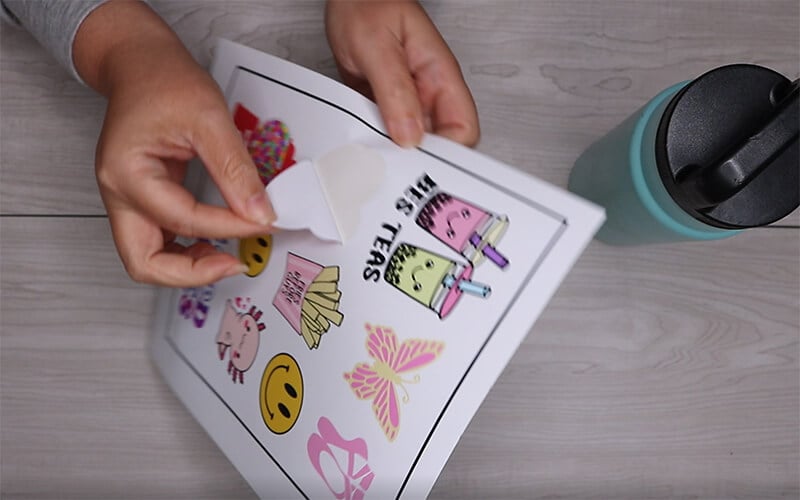
With the printable sticker paper setting, you will easily be able to remove the stickers from the sheet.
How to Make a Cut Out Sticker with Cricut
If you want to create individual stickers, then you will need to use a setting with a deeper cut because this needs to cut through the sticker and paper layer. Depending on your paper, you may need to play around with the settings. But I find that the glitter iron on vinyl setting with more pressure turned on works great for this.
When your Cricut is done cutting around your stickers, they should easily pop out of the paper. If they do not, you need to add more pressure or go up a setting.

How to Make Waterproof Stickers with Cricut
You can make waterproof stickers by using a glossy, waterproof printable vinyl. This waterproof, glossy printable vinyl is my go-to vinyl for making stickers.
If you want to create premium stickers to sell, or want to turn a matte printable vinyl waterproof, then you can add this contact paper to your stickers. You will apply the contact before cutting your stickers. You may need to adjust your cut settings if you add this.
If you have issues with your stickers smudging, adding contact paper on top, will add a layer of protection to prevent this from happening as well.
How to Make Stickers with the Munbyn Bluetooth Label Printer
If you make a lot of stickers, then the Munbyn Bluetooth Label Printer is going to be a much better cost and time efficient option. This printer prints 1 sticker per second, saving so much time. And no need to cut them after since the labels already come in a variety of shapes and sizes. The Munbyn label printer is a thermal printer which means that it prints directly on the material using heat instead of ink. So you never have to worry about purchasing a bunch of ink or toner when printing stickers.
To print stickers using the Munbyn Bluetooth label printer, first, you’ll need to download the Munbyn Print app. Once you open the app, you can either design your own labels using the app, choose from the large library of pre-designed labels or upload an image. You can find step-by-step directions on using the Munbyn Print app in my blog post here. Once the sticker design is ready, easily connect the Munbyn printer using the Bluetooth connection. Or use the USB cord if needed. The stickers print out just as they look on the app. And since they print 1 sticker per second, you can design and print a roll of labels in just a couple minutes. Making this so much quicker than using your Cricut.

The Munbyn Bluetooth Label Printer is great for printing stickers to personalize favor boxes, like these easy treat box templates. You can easily turn a basic box into favors for birthdays, showers and more! Or print stickers for teachers, events, promotional materials, to help with organizing, to share QR codes and so much more. With the variety of custom labels available, you can can print stickers for any occasion. These stickers pair perfect with a lot of my free box templates for Cricut as well.
More Cricut Ideas
If you love crafting with your Cricut, you may be interested in some of these related projects and tutorials:
Pin this post on How to Make Stickers with Cricut to refer back to as needed!
