
Cricut Thanksgiving Wreath
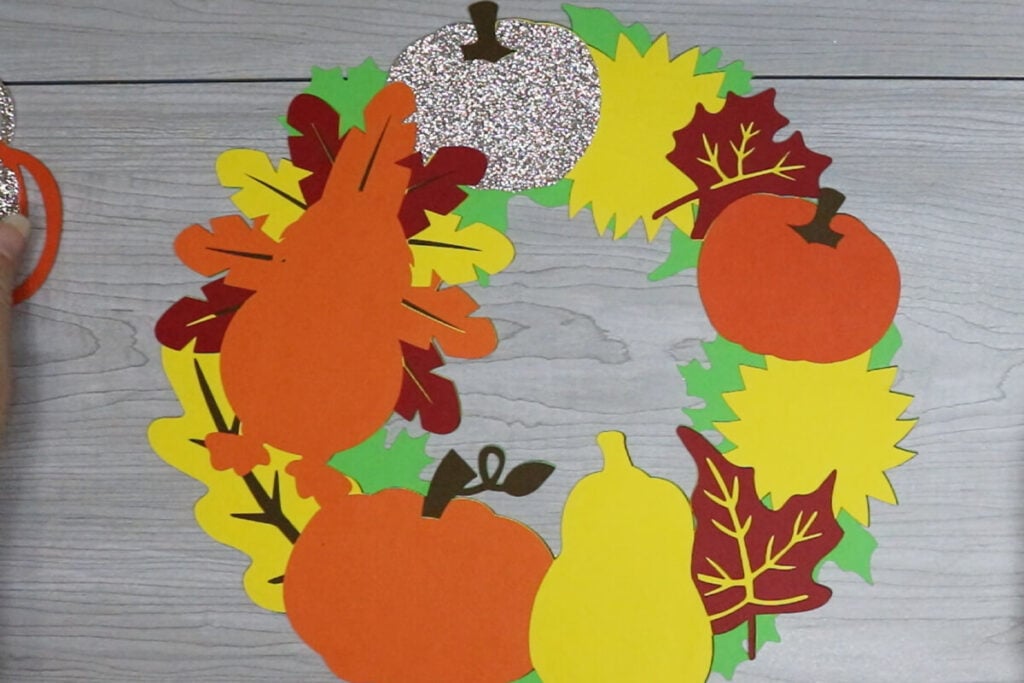
After seeing how popular my Cricut Halloween wreath instantly became, I knew that I needed to create a Thanksgiving wreath as well. And I’m so happy with the way this Cricut Thanksgiving wreath turned out with the layers and colors. It’s perfect for adding Thanksgiving decor to your house, classroom or office.
If you are looking for more Cricut Thanksgiving craft ideas, then make sure to check out my most popular Thanksgiving designs while you’re here.

Cricut Thanksgiving Wreath
This layered Thanksgiving wreath comes with 2 different files giving you more options over the size and machine. There is a standard 11.5″ design that will perfectly cut on 12×12 cardstock. Or use the other file to create a 16″ wreath and have the ability to use letter size paper which is great if you have a machine that like the Cricut Joy Xtra.

Supplies Needed:
This post contains some affiliate links for your convenience (which means if you make a purchase after clicking a link I will earn a small commission but it won’t cost you a penny more)! Read my full disclosure policy.
To make this Thanksgiving wreath, you will need:
- For the 12×12 design, I recommend this 90lb weight variety cardstock which has all the colors you need for this project. If you want to add the glitter like I’ve done, I love this shade of gold glitter cardstock for this project.
- For the 16×16 design, you will need multiple sheets of multiple colors in either letter or 12×12 size, so I recommend ordering individual color packs for your brown and green (or pick up those sheets from a local craft store). And then this orange and yellow pack is going to give you all the rest of the colors that you need for this Thanksgiving wreath.
- Cricut Maker or Explore Cutting Machine and your standard cutting mat.
- A glue with a fine point to it – This Bearly Art craft glue is what I am using.
- Scoring Stylus (which is what I will be using in this tutorial) or Scoring Wheel (Maker only). If your cutting machine doesn’t have the scoring feature, this scoring board and stylus is great to use.
- Foam Dots or Tape – I recommend these black foam squares as the color blends better with the design.
- String for hanging your wreath. I recommend using something very skinny like clear fishing string.
- Thanksgiving Wreath SVG
Download the Free Thanksgiving Wreath SVG
To get this free Cricut Thanksgiving Wreath SVG, enter your name and email into the form below and then click the “Get It Now!” button! If you have any issues with the form, then click here to open the form in a new window.
Please remember these are for personal use only. If you’re looking to sell products using these designs, please purchase a Commercial Use License here.
Save for Later!
Make sure to share this on Pinterest so you can come back to it anytime! Plus, it makes a HUGE impact to keep SVG Nation’s designs free to you. Just hover over the graphic and click the pin icon.

Cricut Thanksgiving Wreath Step-by-Step Tutorial
Watch the full step-by-step video tutorial here to learn how to make this Thanksgiving wreath with your Cricut here:

Cricut Design Space Instructions
This Thanksgiving wreath SVG is super simple to use. If you are using the 12×12 inch version, no modifications are needed. Just upload the SVG file and cut out all of your pieces.
For the 16,x16 inch version, there are just a few lines that you need to modify. You need to change the operation from cut to score on the 4 lines that you see on the green wreath layer and then attach them. If you are using a machine like the Cricut Joy Xtra that doesn’t support the scoring feature, or don’t have a scoring tool, then delete these lines instead. These score lines are guides for gluing, so they aren’t necessary but are helpful with assembling the wreath.
Note: Before you can modify the score lines, you first need to click “ungroup” to ungroup your layers.

How to Assemble the Wreath Base
Start by typing your string through the holes of your wreath. Make sure that the knot is facing the back of your wreath since this is what you will be hanging your wreath with. To determine the back, the turkey should be facing your left when it is facing the right way.
I recommend using a very thin string for this to keep from adding bulk to the front of your design. Clear fishing string works perfect. But I find that knots don’t stay well using this type of string, so I added just a drop of hot glue to the knot to keep it in place. Make sure your glue fully dries before moving on to the next step if you are using glue.

Flip your wreath over so the front is facing up. Glue the brown layer on top of the green layer, and then the yellow on top of the brown.

If you are using the 16in design (even if you adjusted the size), you will first need to piece your wreath pieces together. Starting with your bottom layer (green), use the score lines to line up each piece to glue them together. And then add your string through the holes and tie it so the knot is facing the back of your wreath.

Next, line up your brown layer and glue this layer on top. And then repeat with the yellow layer. Don’t worry about the lines that you see because these will be covered by the time the wreath is assembled.

Glue down the next layer of designs. Before gluing these down, make sure to line them up so you know which side to add glue to. The next layer of designs are:
- Turkey Base (orange)
- Turkey Feathers (red)
- 2 pumpkins (orange)
- Glitter Pumpkin
- 2 leaves (red)
And then glue the next layer of designs which include:
- Glitter outlines for your pumpkin and gourd
- Orange outline for the pumpkin

Assembling the Turkey
To assemble the turkey, layer your turkey pieces by gluing the lighter brown turkey layer on top of the darker brown layer. Then attach the hat and hat accessories. Then the eyes, nose and wattle (red piece) and then the feet.
Line up the wing pieces so you know which way they face and glue the darker piece on top of the lighter. Use foam dots to attach these to your turkey.
And then use foam dots or tape to attach the turkey to the wreath. You can also use glue if you don’t want the added dimension, but the 3d looks really great with this wreath design so I do recommend using the foam dots.

Assembling the Sunflowers
The last step is to assemble and attach the sunflowers. Start by gluing the brown middle to your sunflower. The sunflowers are different sizes so make sure to measure to see which brown piece goes with which sunflower.
Then apply foam dots to the back of your sunflower near the middle. I like to keep the petals free so I can curve them. And attach the sunflower to your wreath. The larger sunflower goes up top, but they are so close in size that you won’t notice if you place it in the wrong place.
And then if you want to give your sunflower a little more dimension, use a pen or something similar to roll the petals up.

Since this wreath has a hanging hook added in and it’s very light, it’s super easy to hang. I hang mine using one of these Command Indoor Mini Light Clips, but you could also use a small nail.
More Cricut Holiday Crafts You’ll Love!
If you love this Cricut Thanksgiving Wreath, then make sure to check out these other fun holiday crafts that you can make with your Cricut: