
How to Make a Pop Up Box Card
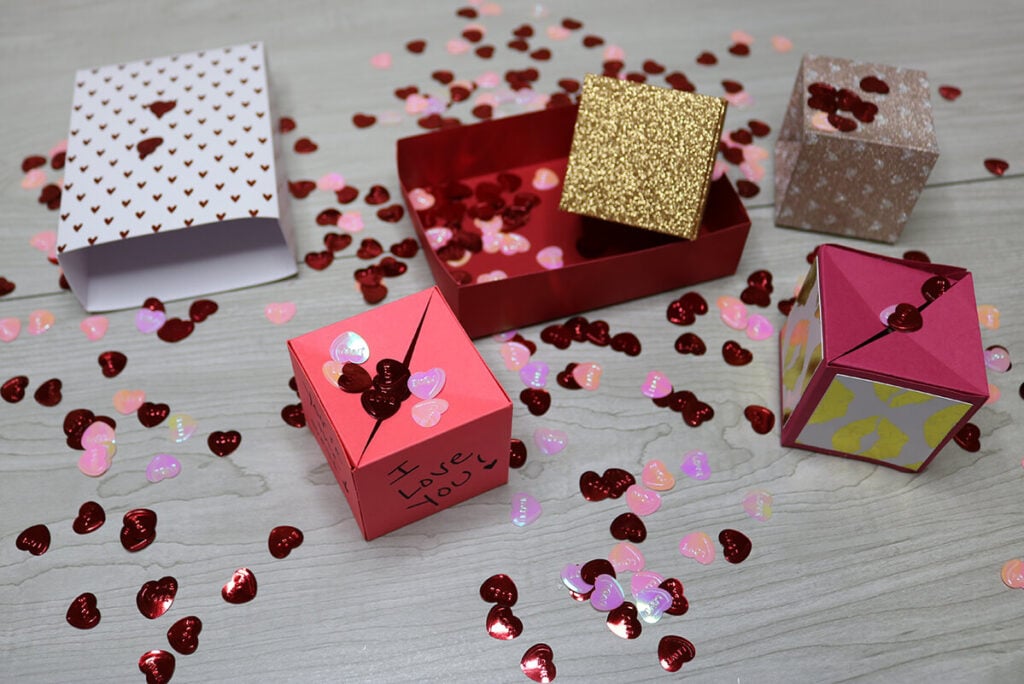
If you’ve taken a look through my paper crafts, then you know that I love explosion boxes. But, this pop up box card might be my new favorite. While explosion boxes just fall open, this pop up box card actually explodes confetti and boxes when you open it. And today you’re going to learn how to make this amazing pop up box card with this step-by-step tutorial.
One of the great things about this pop up box is that it can be used for so many different holidays and occasions. This is perfect for giving gifts for birthdays, Christmas, showers, Valentine’s Day, etc. You can also add cash and gift cards to explode with your confetti.
Make sure to watch the video tutorial here to see just how awesome this exploding box is!

I usually only provide SVG and DXF files for cutting machines, but I’ve added a PDF template as well so you can make this amazing pop up box card even if you don’t have a Cricut. But, if you love this project, then you should probably consider getting a Cricut because it will be right up your ally. Make sure to check out this Cricut comparison to see which one is right for you.
And although I only provide Cricut specific instructions, you can also follow along if you are using a Silhouette or similar type cutting machines that are compatible with SVG or DXF files.

Pop Up Box Card Supplies
This post contains some affiliate links for your convenience (which means if you make a purchase after clicking a link I will earn a small commission but it won’t cost you a penny more)! Read my full disclosure policy.
To make this pop up card box, you will need a mixture of different cardstock which I will detail for you below:
- 65lb weight cardstock for making the small pop up boxes. You’ll be able to use either letter size or 12×12 inch cardstock for this. I recommend this variety pack because the solid core colors are always going to give the best results when crafting with paper.
- For the box base and lid, you’ll get the best results if you use a heavy weight cardstock. I am using this 90lb weight cardstock for this and a holiday print cardstock that I found at Hobby Lobby.
- You’ll also want heavy weight cardstock or glitter cardstock (which I am using) for the bow.
- You can also use decorative scrapbook paper for accents, but this step is optional.
- 1.5 inch rubber bands
- A glue with a fine point to it – This Bearly Art craft glue is what I am using.
- Hot Glue and Glue Gun (this is optional, but there are some parts that I prefer using hot glue and others the craft glue)
- Scoring Stylus (which is what I will be using in this tutorial) or Scoring Wheel (Maker only). If you don’t have a cutting machine, then this scoring board and stylus is great to use.
- Pop Up Box Card Template
Download the Free Pop Up Box Card Template
To get this free Pop up box card template, enter your name and email into the form below and then click the “Get It Now!” button! If you have any issues with the form, then click here to open the form in a new window.
Please remember these are for personal use only. If you’re looking to sell products using these designs, please purchase a Commercial Use License here.
Save this Tutorial for Later!
Make sure to share this on Pinterest so you can come back to it anytime! Plus, it makes a HUGE impact to keep SVG Nation’s designs free to you. Just hover over the graphic and click the pin icon.

Pop Up Box Card Video Tutorial
Watch the full step-by-step video tutorial here to learn how to make this pop up box card here:
Cricut Design Space Instructions
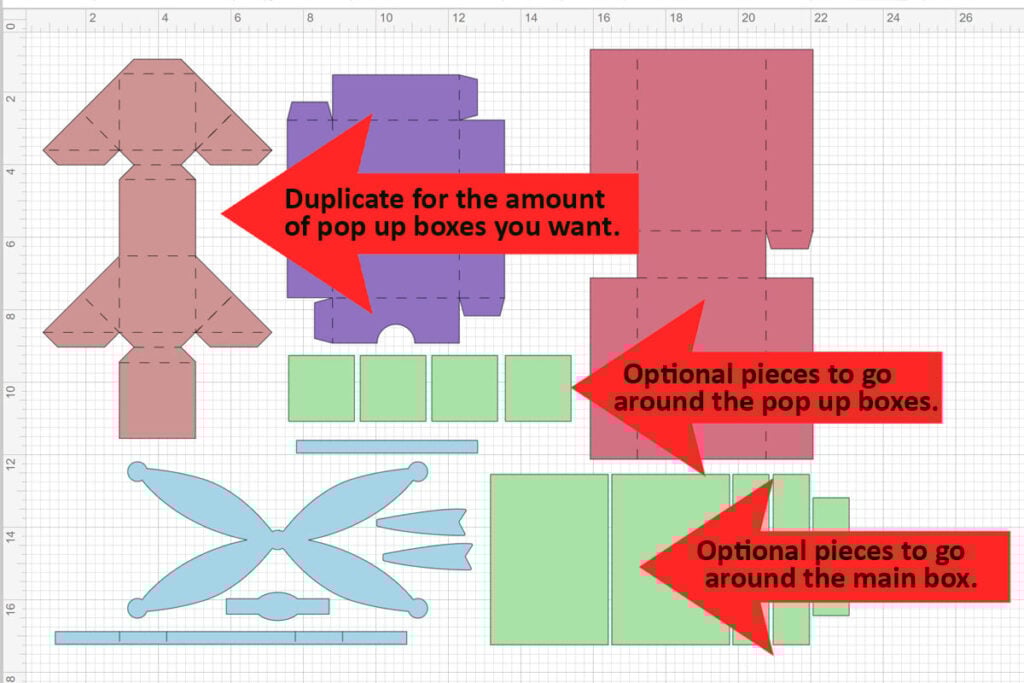
If you’re using a Cricut, here are some ways that you need to modify the design so that the score lines work properly. You will notice that there are 2 files. They are exactly the same, except the letter size one, has 2 pieces for the outside box. You will have to attach those pieces together (see image below), but this way you can still use this file if you have the Cricut Joy Xtra or only letter size cardstock on hand.

Once you upload your design to Cricut Design Space, with the image selected, click on “ungroup” to ungroup your layers. And then change the operation of all of the lines that you see from “cut” to “score”. The lines are all grouped together for each element, so just click the group of lines and change those. Then click the layer above it to attach the score lines to the correct layer. See the image below to see which layers you need to adjust.
Note: If you don’t have a scoring tool, you will delete these layers instead. However, I HIGHLY recommend using a scoring tool so that everything lines up properly. I am using this scoring stylus with my Cricut Explore 2 (which really is a must have item if you plan to do a lot of paper crafting), but the scoring wheel will also work with the Maker.

Next, you need to duplicate the pop up box for the amount that you want to make. I recommend making 4-6. Any less than 4 will not give you the desired pop effect. And anymore than 6 will overfill the box.
Note: The green squares are decorative pieces for your pop up boxes, so you will need to duplicate those as well if you are using them. Or delete them if you don’t need them.
How to Make the Exploding Box Cubes
The exploding boxes are the card aspect of your box, so you want to get creative and personal with these. You can use your Cricut to write on these, write on them yourself or glue photos or decorative pieces to the outside. If you rotate the text 90 degrees counter clockwise before attaching it to your box, this will line it up so the text all faces up and in the same direction.
Note: I tested a variety of paper and found that regular 65lb cardstock works the best for these boxes. Anything lighter didn’t hold up well and anything heavier (including glitter cardstock) didn’t give as much of an explosion.

Once you have the boxes decorated, it’s time to assemble them. Start by folding in on all of your score lines so that the writing or decorative pieces are laying down on your work surface and you are folding up.
For the side pieces, fold the bottom tab up and then fold all the way over, skipping a score line. Then fold up on the score line in the middle. So it will look kind of like an elf hat when you are done.

Pull your rubber band where it indents on the sides on the short side first. Then pull the rectangle piece through the rubber band until it stops where it indents on the sides.

Pull the pieces out so it lays flat. As you pull it, the tab pieces will naturally fold on top of the rubber band. Make sure the side flaps are above the rubber band.

Place something heavy on top of the side that has the rectangle on the end to help hold it in place. Add glue down the outside of the rubber band on both sides. And then fold the top piece over at the fold line and attach it to the glue.
Note: In my opinion, hot glue is the best option for assembling the box cards because it holds and dries quick. If you use a regular craft glue, you will need to hold each piece down until it dries or place something on top.

Repeat this to attach the other side and add glue to the tab piece to close the box together. Hold in place for a minute while in dries. When you let go, it should come flying up. If it doesn’t and it stays closed, then some of the glue seeped through and closed the box together. If this happens, you should be able to pry it open in that area.

Assembling the Box Frame and Bow
The boxes are pretty standard so this part of the tutorial is quick and easy. To assemble the bottom box, fold in on all of your score lines. Then glue the tab pieces to the inside of each side to create your box.
Note: This will work best when you use a heavy weight cardstock for the box and box lid.
For the outside of the box, fold in on all of your score lines. Then fold up on the side with the tab pieces and glue the tab pieces to the middle section of the lid. Fold this over and glue the sides on top of the bottom layer.

For the bow, use the circles as your guide to glue each side down. It doesn’t matter the order that you go in. Start with adding glue to the middle circle and then bring one of the sides in to attach to the center. Continue to repeat this, layering all sides on top of each other. Then glue on the piece that goes around the middle.

Wrap the long skinny rectangle around the box top and glue it down. Add the other piece down the front of your box. Glue the 2 ribbon pieces to your box and glue the bow on top. The bow is optional, but it adds so much to the box.

Make the Box Explode!
Now that you’ve assembled all the pieces of your pop up box card, it’s time to put it all together! The small boxes flatten pretty easily. Just squeeze on the corners of the opposite ends to flatten it. If it doesn’t flatten easily, then switch to the other 2 corners because it only works on one side. When looking at the boxes, you’ll see lines where it folds in to flatten so that’s how you can determine which way to fold in.
You’re just going to flatten each of your box card pieces and layer them on top of each other to place inside your box. It helps to have the box already in the box lid, but slid out. And then close your box.
Note: Layer confetti (or glitter if you’re feeling mischievous) on top of each box card for a confetti explosion! You can also layer money and gift cards for a complete gift idea.

Just slide the box out for a fun explosive surprise! As you pull the box out, the small box card pieces are automatically going pop right out of the box, causing the confetti and any other items layered in there to fly everywhere.
This is such a fun project and I absolutely love seeing your results. So feel free to share them on social media and tag me if you’re using Facebook or Instagram!
If you’re looking for other paper crafts then make sure to check out my super popular candy holder crafts.