How to Use Pens to Write with Cricut
I’ve been posting a lot of paper crafts and tutorials lately that use Cricut pens. So, I wanted to go ahead and create a detailed post on how to write with Cricut. Writing with my Cricut felt overwhelming at first. But, once I did my first project, I was in love! So today I’ll be sharing all the different ways that you can use pens (and other writing tools) to write with your Cricut. Plus, all the best free writing fonts and where to find them.

What are Cricut Pens Used For
There are so many different ways that you can use pens with your Cricut. You can use Cricut pens to:
- Write on Envelopes with Cricut
- Create Name Tags
- Use Infusible Ink Pens to Draw or Write on Fabric
- Draw Shapes or Images
- Write on a Card with Cricut
- Personalize Gift Tags
- Creating Labels
- Scrapbooking Projects
- Creating Signs
Types of Cricut Pens & Markers
Cricut pens can be used on Cricut Explore, Maker and Joy series. If you have the Explore One, you will need to purchase this accessory adapter to use Cricut pens. If you have the Cricut Joy, make sure that you purchase pens specific for the Joy machine.
There is a variety of different Cricut pens and markers. According to Cricut’s pen description, all pens (except the glitter gel) are permanent after dry. And are meant to be used on paper and non-coated materials.

Cricut also offers infusible ink pens to use on fabric and pen adapters so that you can use sharpies or other pens/markers that you already have.
There are so many different pens, finishes and features to choose from. So, I’m going to break down each pen/marker and what they are best for.

Extra Fine Point Pen 0.3 mm
Extra fine point pens are great for projects with intricate designs. Use these pens for delicate lettering to intricate flower designs. The body of this pen is transparent.
Fine Point Pen 0.4 mm
Fine point pens are the most common Cricut pens. You can find these pens in just about any color you can think of. These are great for writing on cards, envelopes, making coloring pages, invitations, gift tags, labels, etc. You can easily tell which pens are fine point pens because they have a white body.
You can learn how to make and write on envelopes with your Cricut with this helpful tutorial.
Glitter Gel Pens 0.8 mm
Glitter Gel Pens write smooth and have a beautiful glittery finish. They are perfect for vibrant invitations, decorations or adding a message to any project. This pen has a transparent body with a glittery top.
Make and personalize your own custom cards with your Cricut with these card templates.
Gel Pens 1 mm
Gel pens are silky and smooth and write vibrant and bold. These medium point pens are perfect for personalizing gift tags, invitations and decorations. You can easily find these Cricut pens in a variety of colors.
Metallic Markers 1 mm
Metallic markers are great for embellishing cards or other paper crafts. These write smooth and have a fun, metallic finish to them.
Calligraphy Pens 2mm and 2.5mm
Calligraphy pens are perfect for addressing formal invitations or for formal events. These pens will work best with the Cricut writing fonts. You will only find these pens in black and metallic colors.
IMPORTANT: Calligraphy pens should be used on a 45° angle. So, it is important that when you install this pen, that you match the triangle.
Infusible Ink Pens
Transfer your designs to fabric with infusible ink pens. With these pens, you will write your design on plain laser copy paper using your Cricut and then use heat to infuse your design into your material. Infusible ink pens are available in a variety of colors and sizes:
Cricut Joy Pens
Cricut pens are compatible with the Cricut Joy, however you do need to purchase Joy pens specifically. Almost all pen types are available with the Cricut Joy. The pen types available are:
- Extra Fine Pen 0.3
- Fine Pen 0.4
- Glitter Gel Pen 0.8
- Gel Pen 1.0
- Marker 1.0
- Infusible Ink Pen 0.4
- Infusible Ink Marker 1.0
The only different with the Cricut Joy pens is the size. All of the steps to write and draw are the same as with the Explore or Maker series.
How to Write with Cricut
Writing with your Cricut can be a lot of fun! I don’t have the best handwriting, so I love that I can create handwritten labels, notes, etc… but with pretty handwriting (and straight lines!) This tutorial does build with each step, so I recommend that you go through this tutorial in order. But, before we get started, here are a few tips for you:
- Your Cricut pens should be stored point down so the cap is at the bottom. This will help the ink flow continuously when writing with your Cricut.
- Test your pens before using them with your Cricut to make sure that the ink is coming out. This is especially important with glitter and gel pens.
How to Install Cricut Pens
Installing pens is very easy to do. The pens always go in the Clamp A of your Cricut machine. To install the pen, just open the clamp and insert the pen with the arrows pointing towards each other. You will need to press down lightly until you hear a click. Once the pen clicks, you can close the clamp.
All pens may not have the arrow and that’s OK. Lining up the arrows is really only important for the Calligraphy pens.
Note: If you have the Cricut Explore One, you will need to purchase this accessory adapter to use Cricut pens.

How to Tell your Cricut to Write and Draw
Whenever you add shapes or text to Cricut Design Space, it is set to cut. If you want your Cricut to draw or write, then you need to change this to “Pen”. To do this, go into your operation menu and select “Pen”.

Next, you will need to select your pen type and color. For this example, both squares will be the same color (I’ll show you how to write with multiple colors next). Select your pen layer and then select the color fill option. Use the drop-down menu to find your pen type and then select the color.
Note: All pens may not be available to select. If this is the case, then select something similar. The main objective to selecting your pen/colors is to see the thickness of the line, how the color looks (especially when having other design elements to coordinate) and for using multiple colors.
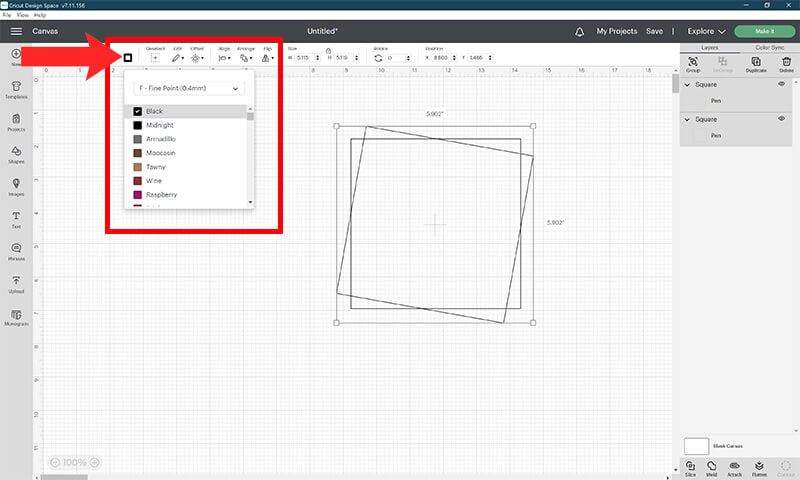
If you were to click on “Make It”, to send your design to your Cricut, you’ll notice that the squares do not overlap like they do in your design space canvas.
Keep in mind, that the way they look in the mat preview, is how your Cricut will draw them.

If you want your squares to overlap when you draw them (as they are in your Canvas), then you need to make sure that you attach them together. To do this, select both of your square layers together by holding down shift as you select them. Then, select “Attach”.

Now that your layers are attached, they should look the same in your mat preview as they do on your Canvas. Also note that the project type shows Pen. So, you know that you are using your Pen for this project and your Cricut will draw this exactly as it shows in the mat preview.

Writing with Fonts
Now that you know how to draw shapes, we’ll learn how to write with your Cricut. And then later, we’ll combine these together so you can start making some pretty cool writing projects.
Outline Text Vs Single Line Text
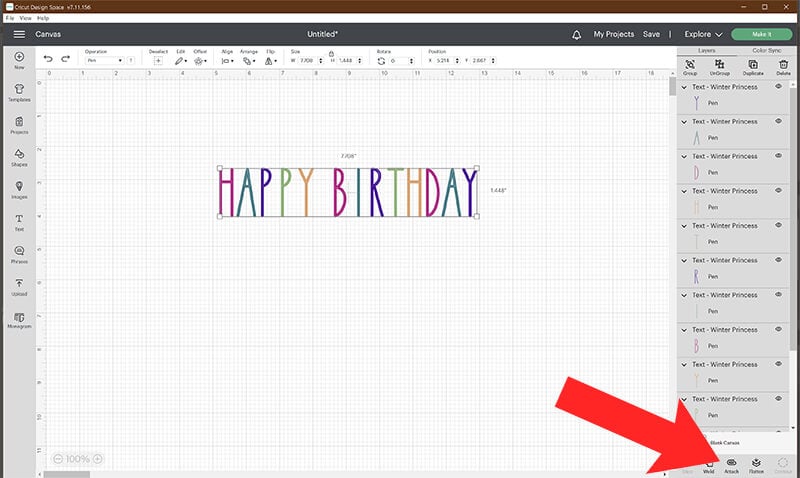
You are able to use fonts that are already installed on your computer to write with your Cricut. To do this, select your text tool and create your text. Select your font and then change your operation from “Cut” to “Pen” just as we did with the shapes.

Using the color fill option, select your pen type and color.
You will notice that your words are now outlined. This is because the pen tools works just like the cut tool. It will write around the text, just as it would cut around the text. In order to fix this, you need to use a single line or monoline font.

Fixing Cursive Fonts to use with Cricut Pens
When you use your own cursive fonts to write with, you’ll notice that the outlines overlap. To fix this, all you have to do is select your text and select “Weld.”

Cricut Writing Fonts
Cricut Design Space has a full selection of writing fonts available to use. To find these, go into your fonts, select Filter and check “Writing”.

Once you select your font, you need to make sure that your operation says “pen” and style says “writing”. Sometimes they will adjust automatically, but other times it doesn’t. So, it’s a good idea to always check these.
With Cricut writing fonts, you’ll notice that you do get the single line fonts instead of the outline. The only downside to this is that you do need a Cricut Access subscription to use these, or you’ll need to pay for them.

Free Single Line Writing Fonts
If you don’t have a Cricut Access subscription, there are free fonts that you can download so that you can write in a single line instead of outline. Cricut is still going to convert these fonts into an outline when you switch them to pen. However, these fonts are thin enough that you will barely notice. If you use a thicker pen, like the 1mm gel pens, you won’t even see the outline at all.

Note: After installing your fonts, make sure to restart Cricut Design Space. You will then be able to locate these fonts under “System” when searching for fonts.
- Always Here
- Christmas Wish
- Cutlyle Monoline Script
- Gingar Bread
- Rainbow Saturday
- Tall Films Fine
- Valencia
- Winter Princess
- Wire One
- ZnikoSLSV
Writing with Multiple Colors
You are able to write with multiple colors with your Cricut. To do this, assign your layers different pens using the color fill option. You can only assign one pen to each layer, so you will need to separate your layers for the different colored pens.

Once all of your pens are selected, make sure to attach your layers together.
When you are ready to make your project, you will need to follow the prompts in design space. For this project, design space says to load the pink pen into clamp A. Once you have added this pen, click on the flashing Cricut button.
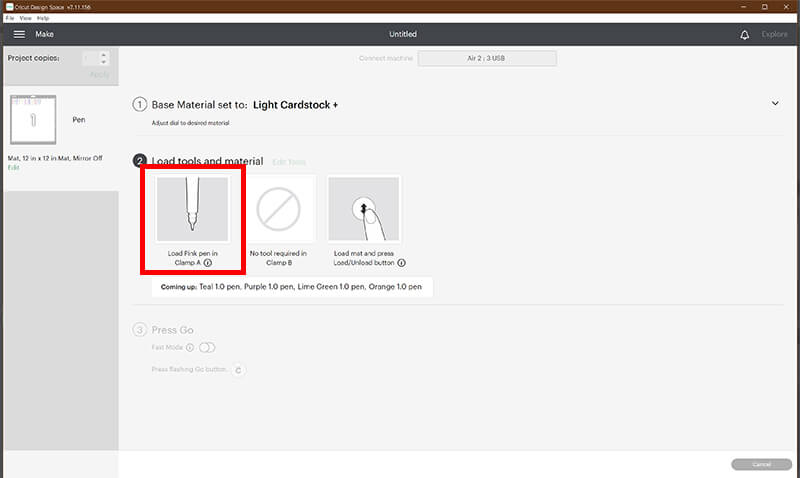
Once your Cricut is done with the pink pen, it will stop, and you will get a new prompt. Replace your pen with the new pen color and click on the flashing Cricut pen to continue writing.
Note: You will not unload your material until your Cricut is finished with all the writing.
How to Tell Your Cricut Where to Write
If you want to write on a specific area of the paper, there is a way to do this. This is useful if you want to write inside a card, address an envelope or write on a specific area of the paper.
To do this, all you need to do is place your material on your mat. Then, in the mat preview screen, move your text to the spot on your mat where you need it to write. You can easily drag this by clicking on it.

How to Write and Cut with Your Cricut
There are situations where you will want to write and cut with your Cricut in the same project. This is useful when making crafts like gift tags or labels. To do this, you just need to attach your text to your design.
So, to make gift tags, just attach the name and the gift tag together.

You can quickly and easily make gift tags for any holiday or occasion.

I hope you found this tutorial on writing with Cricut pens helpful! There are so many different fun projects you can make using Cricut pens. Here are just a few:
Don’t forget to save and share this post for later!