
Strawberry Paper Box Template
This strawberry paper box craft is just too cute to not try! The strawberries easily open up to reveal a sweet gift that you put inside. Fill the strawberry basket and give this sweet treat as a gift. Or use the strawberry SVG file to create a strawberry garland or other cute decorations for a strawberry themed party.
Follow along with the step-by-step tutorial to learn how to put together these strawberry boxes with the strawberry paper box holder. You can also find other fun strawberry SVG files here.

Strawberry Paper Box
You’ll easily be able to put these cute strawberry boxes together with your Cricut. Your Cricut will draw the seeds and cut these right out for you.
Place these boxes out filled with strawberry treats for a cute party favor or fill the basket for a fun gift. You’ll have just as much fun making these cute treat boxes as your guests will opening them.

Supplies Needed:
This post contains some affiliate links for your convenience (which means if you make a purchase after clicking a link I will earn a small commission but it won’t cost you a penny more)! Read my full disclosure policy.
To make this strawberry paper box with a Cricut, you will need:
- Light or Medium weight Cardstock/Paper – this is a great variety pack that has both red and green for these strawberries.
- Cricut Maker or Explore Cutting Machine and your standard cutting mat.
- 1.0 tip black Cricut marker which you can find in this set.
- Decorative twine
- Glue – This Bearly Art craft glue is my favorite glue for paper crafts.
- Scoring Stylus (which is what I will be using in this tutorial) or Scoring Wheel (Maker only). If your cutting machine doesn’t have the scoring feature, this scoring board and stylus is great to use.
- Strawberry Paper Box Template
Download the Free Strawberry Paper Box Template
To get this Strawberry Box Template, enter your name and email into the form below and then click the “Get It Now!” button! If you have any issues with the form, then click here to open the form in a new window.
Please remember these are for personal use only. If you’re looking to sell products using these designs, please purchase a Commercial Use License here
Save for Later!
Make sure to share this on Pinterest so you can come back to it anytime! Plus, it makes a HUGE impact to keep SVG Nation’s designs free to you. Just hover over the graphic and click the pin icon.

Strawberry Paper Box Step-by-Step Tutorial
Watch the full step-by-step video tutorial to learn how to make these strawberry boxes and container:

Create a new project in Cricut Design Space and then upload the paper strawberry box template and add it to your canvas. Click on your template and then select “ungroup” to ungroup your layers.
Note: You won’t be able to modify the template if you don’t first ungroup your layers!
Modify the Strawberries in Cricut Design Space
Before cutting your strawberries, you will need to change some of the lines to score lines and other designs to the pen operation. If you are not using a scoring tool or Cricut pens with your cutting machine, then you will delete each of these items.
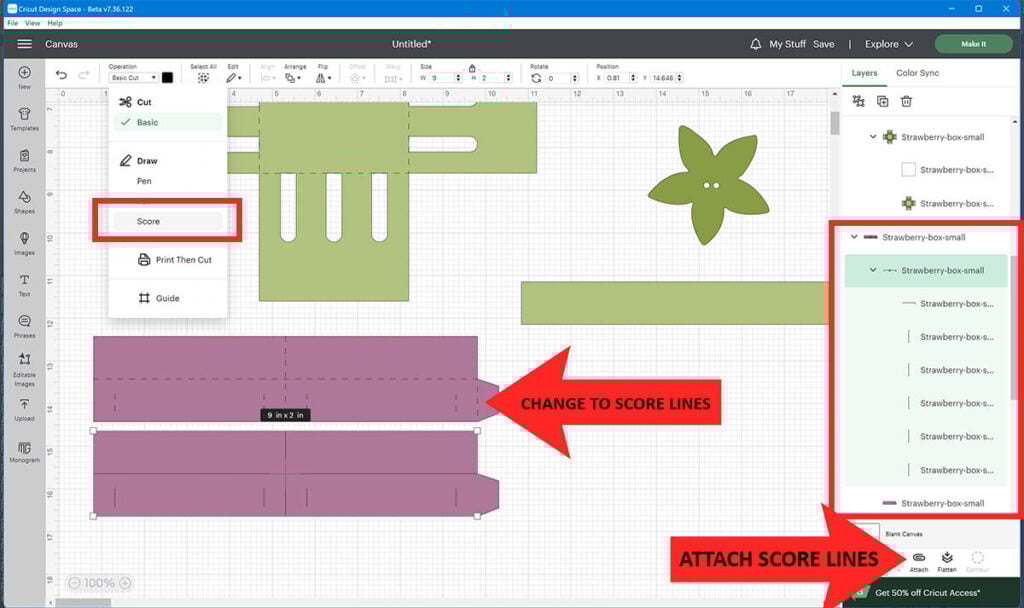
Select the square on top of your strawberry container and change the operation to “score”. Then attach the score lines to the container layer. You will do this by selecting the score lines and container layer together (hold down shift to select multiple layers together) and then select “attach”.

Then change the group of lines on the pink rectangle layer to “score”. Attach these score lines to the rectangle layer and then repeat these steps for the other pink rectangle.
Select the layer of seeds on top of your strawberry and change the operation to “Pen”. Then select your pen type and color. I highly recommend using the 1.0 tip black marker for this project because with a thinner tip pen it won’t fill in the entire seed the way the marker does.
Last, change the operation of the lines to “score” and attach both the pen and score layers to your strawberry.
Note: You can cut up to 4 strawberries on a 12×12 sheet of cardstock. Just select your strawberry and leaf layer and duplicate for as many strawberries as you want to cut.

How to Assemble the Strawberries
Flip your strawberry over so the seeds are face down. Then fold on each of the score lines, folding up. Flip your strawberry back over and add glue to the piece without seeds.

Glue this piece behind the strawberry petal on the other side to attach the strawberry together. So when it’s glued together, it should look like there are only 5 petals.
Using a pen or something that is similar, curl the leaf ends going in. Then take a piece of string and string it through each of the holes on the strawberry.

Pull the string on the strawberry to close the strawberry. If you are adding a gift or treat inside, make sure to add this first.
Then string each piece of the string through one of the holes on the leaf top. Pull the string tight until the strawberry is fully closed and then tie a bow to keep it in place. Repeat this for as many strawberry gift boxes that you want to make.

How to Assemble the Strawberry Container
First, fold on all 4 score lines on the strawberry container. Then fold down the long middle score line on the 2 rectangle pieces.
On the rectangle pieces, you will see score lines that don’t run all the way up. These are your guides for gluing down the strawberry container. Glue the first side in-between the guides. Then add glue on top so you can fold the rectangle piece over and glue it in place.
Note: Make sure that you don’t add glue to that left side so you can keep this open to attach the tab pieces.

Repeat these steps to glue the other container side down. Make sure to find the guides and glue the container within the guides. To see this done, you can watch the video tutorial here.

Once all the sides are glued down, attach the tab pieces together by gluing them to the inside of the opening.

Glue the handle to the inside of the box and then add in all your strawberries! How cute is this strawberry paper box? It makes a great gift or party favor. And you’ll be able to get your treat out by untying the strawberry.

More Cricut Paper Crafts You’ll Love!
If you love this Strawberry paper box, then make sure to check out these other fun paper crafts: