
Valentine Candy Holders
Grab these free Valentine candy holder SVG files to make these fun candy holders for Valentine’s Day! These are quick and easy to assemble and you can make these using either a Cricut or Silhouette machine.
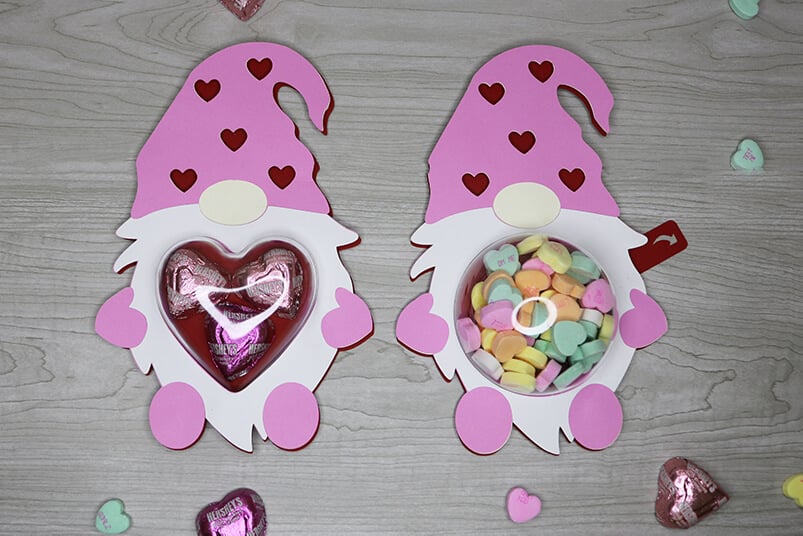
I love the way these Valentine candy holders look with the plastic heart ornaments, but you can use the circle ones as well if you already have those on hand.

Just like my other candy holder SVG designs, you have the choice to make these with the perforated back or with the closing mechanism. But the one with the closing mechanism is only available with the design with the round ornament.

How to Make Valentine Candy Holders with Your Cricut
This post contains some affiliate links for your convenience (which means if you make a purchase after clicking a link I will earn a small commission but it won’t cost you a penny more)! Read my full disclosure policy.
To make these Valentine candy holders, you will need:
- Medium or Heavy Weight Cardstock – If you don’t have cardstock on hand, you can grab this variety pack or cardstock which has all the colors you will need for these Valentine candy holder SVG files.
- Cricut Maker or Explore Cutting Machine and your standard cutting mat.
- 80mm Clear Fillable Heart Ornaments or 3.15″ Clear Fillable Round Ornaments. I linked to the ones that I use, if you use a different size, you will need to resize the SVG files accordingly.
- Adhesive foam dots or adhesive foam tape.
- Glue – This Bearly Art craft glue is my new favorite glue for paper crafts!
- Candy or other small gifts for inside.
- Valentine Candy Holder SVG (Download at the bottom of the post)
Step-by-Step Tutorial
Watch the full step-by-step video tutorial on how to make these Valentine candy holders:

Start by uploading the candy holder SVG files to Cricut Design Space. If you are using 3.15″ ornaments, then you do not need to resize the files. Only resize them if you are using a different size ornament. If you want to change any of the colors, go ahead and do this as well. And then cut all of your design elements.
Note: To learn how to resize these designs for different size candy holders or to see how I set mine up in Design Space, make sure to watch the video tutorial here.
How to Assemble Candy Holders
When you have everything cut out, you will begin to assemble your candy holders. Start by gluing the layers together, leaving just the very back layer unglued. The back layer is the layer with the perforation marks or cut out if you are making the version with the closing mechanism.
The only exception is for the frog. For the frog candy holders, you will glue the back 2 layers together as seen below.

Next, flip over the top piece of your candy holder (the piece that is assembled) and add either foam dots or foam strips. Then place your candy in your ornament and place it on top of the bottom piece of your candy holder where it goes.
If you are making the version with the closing mechanism, you can wait and add the candy when you are done. But for the version with the perforated back, you will need to add the candy before placing the top of your candy holder on.

And last, you will place the top layer on top of your candy holder. Before pressing down, make sure everything is lined up. Then press down and make sure that all of the foam dots are attached.
It will be a tight fit around the ornament, but this is so that the ornament will stay in place. So just make sure to press firmly around the ornaments.

How to Assemble the Closing Mechanism
If you are making the version with the closing mechanism, then you will need to assemble this which is super easy to do. I recommend watching the video on how to assemble this candy holder if you are unsure how to do this as it is a little difficult to write out.
First, take the piece with the arrow and place it in-between the 2 round pieces. Glue down the tabs, using just a little glue. You don’t want the glue to seep into the middle piece with the tab/arrow. This middle part should move freely.

Then glue the closing mechanism to the back up your candy holder. Line it up so that it opens and closes where the cut out is.

Then add your foam dots or foam tape to the back of your front piece and place the ornament in place.

Then attach the foam dots to the back of your candy holder and add your candy!
These Valentine candy holders are pretty easy to put together and they are a lot of fun to give! These are perfect for giving Valentine treats to friends and also teachers and classmates! And you don’t just have to put candy in these. Any small toys, bracelets, fidgets, heart erasers, etc. will go in these as well.
Before downloading these Valentine Candy Holder SVG Files, please share this design on Pinterest – it’s quick to do and makes a HUGE impact to keep SVG Nation’s designs free to you.

To get these Valentine Candy Holder SVG Files, enter your name and email into the form below and then click the “Get It Now!” button!
Please remember these are for personal use only. If you’re looking to sell products using these designs, please purchase a Commercial Use License here