
DIY Valentine Shaker Cards
Learn how to make Valentine shaker cards using your Cricut with this easy to follow tutorial.

This post contains some affiliate links for your convenience (which means if you make a purchase after clicking a link I will earn a small commission but it won’t cost you a penny more)! Read my full disclosure policy.
I Have a lot of Valentine’s Day crafts that you can easily make, like these Valentine themed candy holders or this exploding Valentine box. And now, I’m sharing my new Valentine shaker card templates!
If you don’t find the perfect Valentine card design here, then check out these Cricut Valentine Cards or these Valentine Wobble Cards for more fun designs.
Learn how to make DIY Valentine Shaker Cards!
If you’ve been obsessed with shaker cards and want to make your own for Valentine’s Day, then you’re in the right place. Because today I’m going to show you how to make 3 different Valentine shaker cards. Fill these with heart glitter and shake them for a fun, interactive Valentine’s Day card.
Watch the step-by-step video tutorial to learn how to make these Valentine’s Day shaker cards here:

To Make Valentine Shaker Cards, You Will Need:
- Medium Weight Cardstock in your favorite Valentine colors like this Valentine cardstock bundle here.
- .007 Craft plastic Sheets – these are the sheets that I am using.
- Heart Shape Glitter Sequins
- 2mm Craft Foam – you can also buy this by the sheet at most craft stores.
- A good craft glue – this Bearly Art craft glue is what I am using.
- Deep Point Blade for cutting the clear plastic and craft foam.
- Cricut Pens – optional for writing on your card.
- Scoring Stylus (which is what I will be using in this tutorial with the Explore) or
- Cricut Maker or Explore Cutting Machine and a cutting mat.
Download The Valentine Shaker Card SVG Templates
You can download these free Valentine Wobble Card SVG Templates from my members only free library (design #4 under Card Templates or search “Valentine Shaker Cards”).
Don’t have a password? Unlock my free members library here.
Share the love and easily come back to this tutorial anytime just by saving this on Pinterest… Plus this helps to keep my SVG files and Cricut tutorials free!

If you want more, here are 20 easy and adorable Valentine Crafts!
These shaker cards are not only perfect for Valentine’s Day, but would also be great for anniversary cards. And if you don’t have time to order the clear plastic to hold the glitter in, you can still make these cards by gluing the designs to a contrasting color. They’ll still look great!
Need an envelope for your shaker cards? Grab one of my free envelope templates – the A2 size fits perfect with these cards.

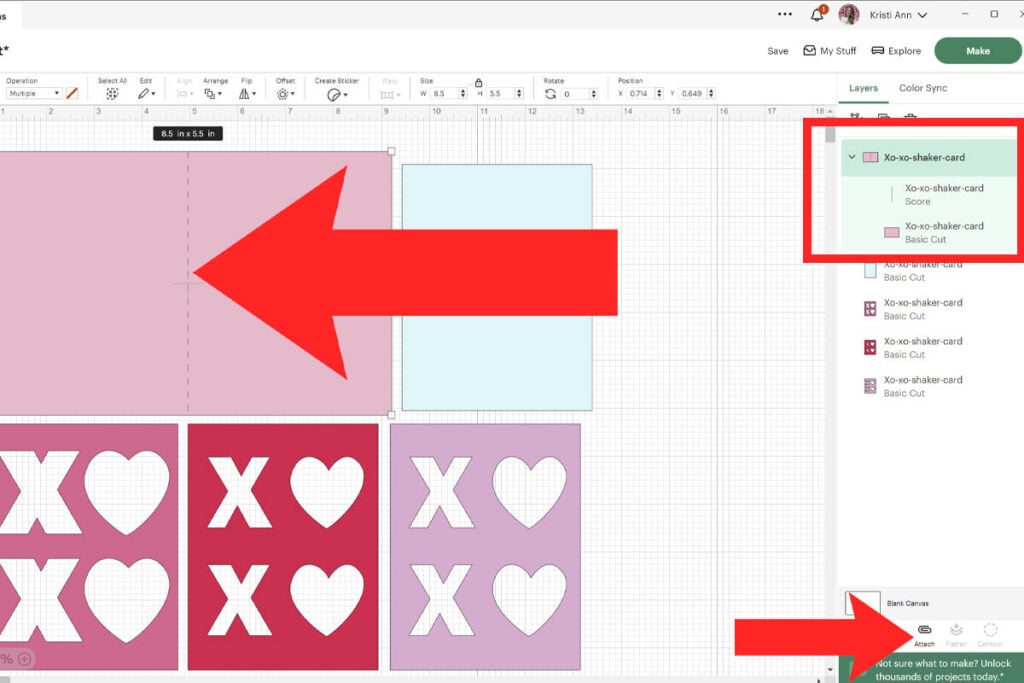
Step 1: Upload Valentine Shaker Card SVG to Cricut Design Space and Add A Score Line
Upload the SVG file to Cricut Design Space. For help with uploading SVG files, check out my tutorial here.
Click on “Ungroup” to ungroup all of your layers. For each design, there is a line going across the card. This will be your score line so change the operation to score. Select the score line and the card underneath and select “Attach” to attach the score line where it will score.
Note: If you are not using a scoring tool then you will delete the line instead.
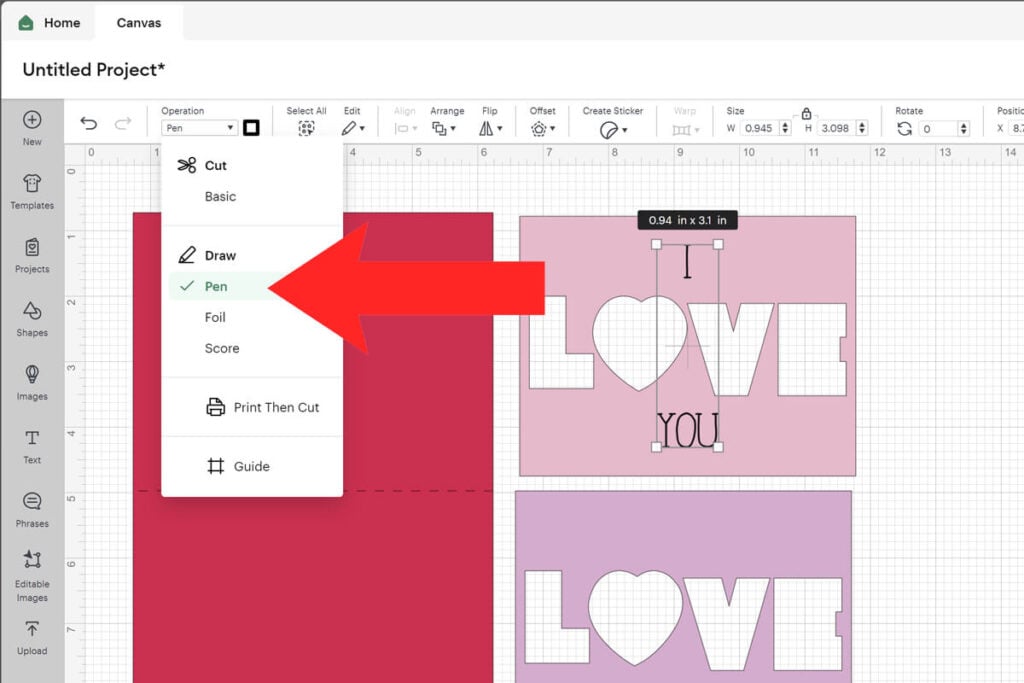
Step 2: Change Text to Pen
If you are using Cricut pens to write on the “I Love You” card, then you will need to change the operation to “Pen”. To do this, click on the layer with the text, open the operation menu and select pen. Then select the text layer and the layer behind it together and select “attach”. If you are not using your Cricut to write on the card, delete the text layer instead.
Note: You can also write a message on the inside of your card and let your Cricut write it for you! Check out this writing tutorial to learn how to do this if you are new to using Cricut pens.
Step 3: Cut Shaker Card Pieces with Cricut
Cut out your card pieces. Remember to add your scoring stylus or wheel as prompted. You will also need a deep point blade when cutting the clear plastic and craft foam.
- Cut the blue layer with the transparent plastic
- Cut the purple layer with the craft foam
Note: If the base of your card is a dark color, then duplicate the blue layer and cut this in a light cardstock color. Glue this to the inside of the card so you have an area to write on that you can easily see.
Step 4: Fold Card & Glue Craft Foam to the Front
Fold your card in half on the score line and then glue the craft foam on top to the front of the card. The foam should face the correct direction when glued down.

Step 5: Assemble the Transparency Window
Glue the 2 XOXO or Love layers (depending on which card you are making) on top of each other. With the lips design, there is only 1 layer so you don’t need to glue this to another layer. When you glue these together, you want to make sure that you see the outline of the bottom layer. And then glue the clear plastic on top.

Step 6: Fill Inside of the Foam With Glitter
Fill the cut out spaces of the foam layer with glitter and/or small heart sequins. Wipe any extra glitter off of the foam before moving to the next step.

Step 7: Add Transparency Window on Top
Glue the layer with the clear plastic on top. The clear plastic should be facing up. Wait for the glue to dry before shaking your card!

When you’re done, make sure to post these in my crafting group here or tag me if you post them on social media. I absolutely love seeing your crafts and can’t wait to see your Valentine shaker cards!