
DIY Valentine’s Day Explosion Box Card Tutorial
Make a fun Valentine explosion box card for someone special this Valentine’s Day! This is a great way to give something personal and can easily be made with your Cricut or Silhouette machine. Use my free Valentine Explosion Box Card SVG and follow along with the step-by-step tutorial to get started.

This post contains some affiliate links for your convenience (which means if you make a purchase after clicking a link I will earn a small commission but it won’t cost you a penny more)! Read my full disclosure policy.
Explosion boxes have been a big hit on my blog because they are perfect for so many occasions, like this graduation explosion box or this gingerbread house explosion box. But if you’re just looking for Valentine craft ideas, here are 20 easy and adorable Valentine Crafts!
Learn how to make a Valentine Explosion Box Card with Your Cricut!
An explosion box is a box that explodes open when you open the lid. So, with each lid that you open, you uncover a new layer of surprises. This Valentine’s Day explosion box includes places to put pictures, candy and compartments that perfectly fit gift cards, money or a sweet note. One of the best things about an explosion box is that it’s made with just paper and glue.
Watch the full step-by-step video tutorial to learn how to make this Valentine explosion box here:

To Make this Valente Explosion Box Card, You Will Need:
- Medium to Heavy Weight Cardstock – I am using a combination of patterned cardstock (found at Hobby Lobby), red cardstock and pink cardstock.
- Cricut Maker or Explore Cutting Machine and your standard cutting mat.
- Scoring Stylus
- Glue – This Bearly Art craft glue is my favorite glue for paper crafts, and I will also be using hot glue for the box lids.
If you want to add the shaker heart decoration to the top of the box, then you will also need:
- A piece of craft foam or double-sided adhesive foam tape
- Clear craft plastic – this is the craft plastic that I use
- Chunky glitter with a mixture of hearts and pinks and reds.

Download The Valentine Explosion Box Card SVG
You can download this free Valentine’s Day Explosion Box SVG Template from my members only free library (design #1 under Box Templates or search “Valentine’s Day Explosion Box SVG”).
Don’t have a password? Unlock my free members library here.
Share the love and easily come back to this tutorial anytime just by saving this on Pinterest by clicking the picture below and then hitting “Save”… Plus this helps to keep my SVG files and Cricut tutorials free!

Step 1: Upload & Modify Valentine Explosion Box Template
Upload the explosion box SVG file to Cricut Design Space. Then ungroup your layers by clicking on “ungroup”.
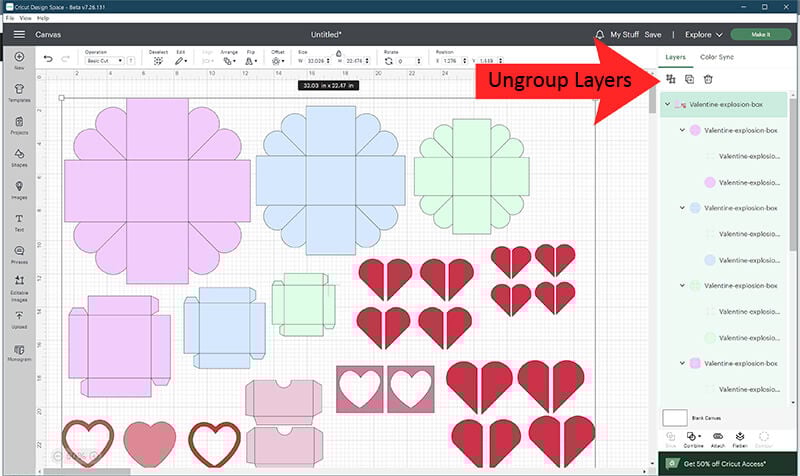
If there are any elements that you don’t want to use, then go ahead and delete those. You can see what each design element is for below:

You will then need to modify all the lines so that they are score lines. To do this, click on a layer with lines and change the operation from “basic cut” to “score”. Then, attach the score lines to the layer it is grouped with.
Repeat this for all the layers that have lines. So, you will need to adjust this on all 3 box layers and lids. As well as the 2 gift card holder designs.

If you need to change any colors, then go ahead and do this. And then click on “Make It” to cut everything out. Don’t forget to add your scoring tool first if you are using one!
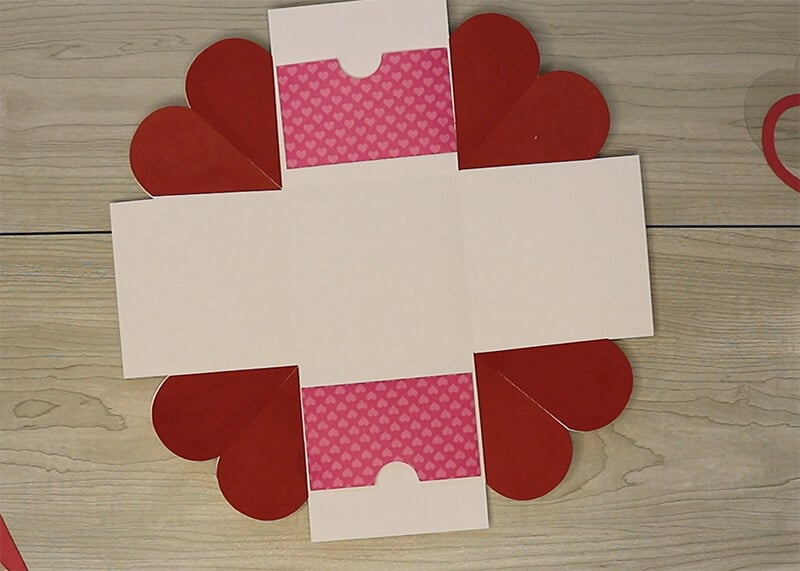
Step 2: Glue on Heart Pieces & Gift Card Holders
Once you cut everything out, you are ready to assemble your box. Start with the largest box and fold on all the score lines. Then glue on the decorative heart pieces if you are using these. Before you start gluing, make sure they are facing the right way so that everything lines up correctly.
Then, fold on all of the score lines on the gift card holders and glue these to 2 different sides of the inside of your box.
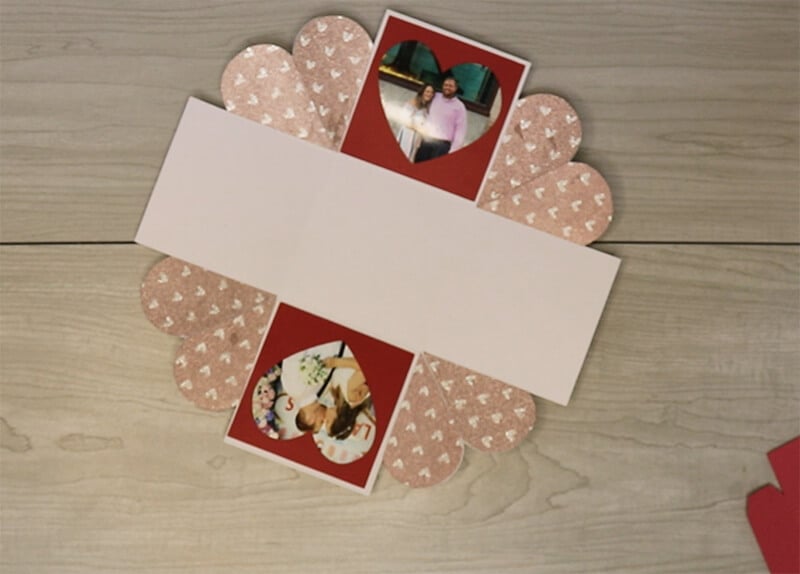
Step 3: Glue Photos & Heart Pieces to the Middle Box Layer
Then, repeat the steps with your middle box by folding on all of the score lines and adding your decorative hearts. Next, glue your photos to the sides of the inside of the box and glue your heart frame on top.
You can also use the heart frame as a decoration without the picture. Or to write a sweet message inside.
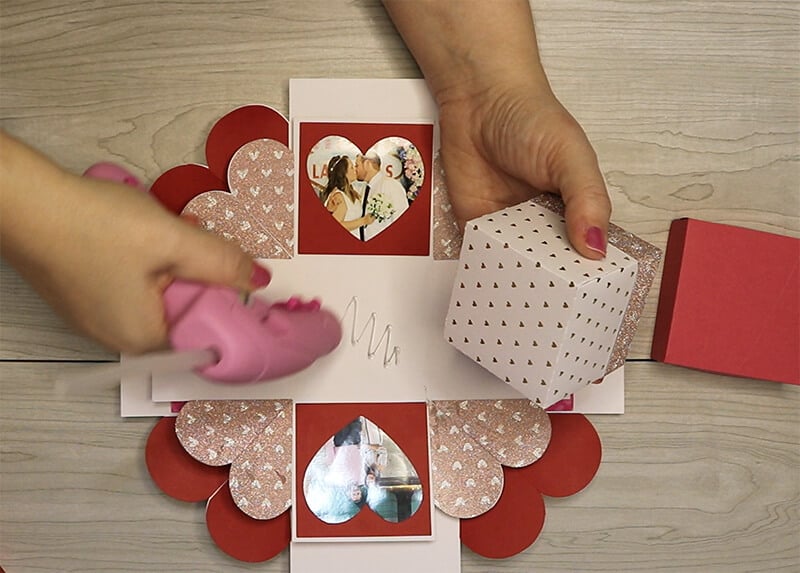
Step 4: Assemble and Attach Smallest Box
Repeat these steps again for the smallest box layer. The smallest box will only have the decorative heart pieces to glue down.
Then, assemble your box lids by folding on all of the score lines and gluing the tabs to the inside of the box. And then layer your boxes by gluing the middle box to the largest box and then the smallest box on top.
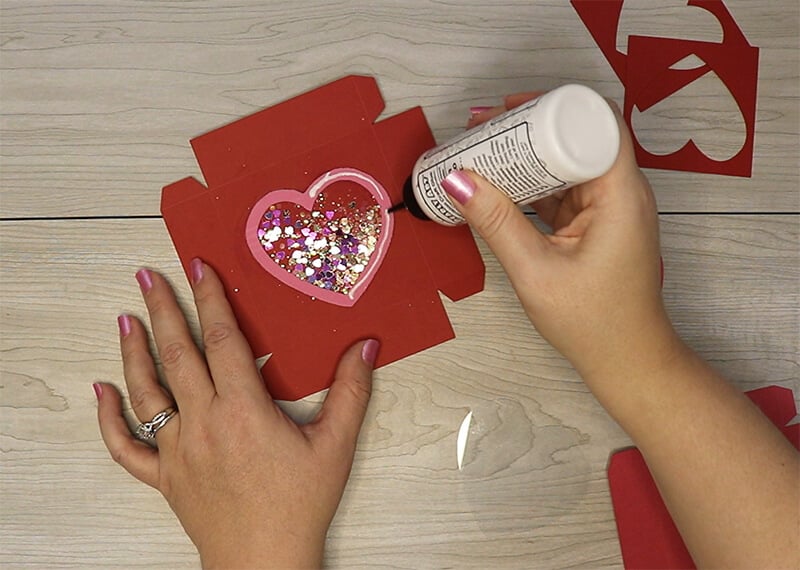
Step 5: Add Shaker Heart
To assemble the shaker heart, glue the foam heart to the top of the largest lid. When the glue is dry, add glitter to the center and then glue the clear plastic on top and then the heart outline on top of the plastic. Make sure to wait for everything to dry before shaking the glitter.
You can also use double-sided adhesive foam tape if you don’t want to use foam.
Step 6: Fill Box with Candy & Confetti
You are now ready to fill your box! To add candy to the sides, just use double-sided tape. Add your gift cards (or money or notes) to the gift card holders and all the fun surprises to your box. It’s also fun to add confetti to each layer before you close it.

You can get super creative with this Valentine explosion box and it’s a lot of fun to do a theme for all the gifts.
When you’re done, make sure to post these in my crafting group here or tag me if you post them on social media. I absolutely love seeing your crafts and can’t wait to see your Valentine’s Day explosion boxes!