
How to Slice in Cricut Design Space
The slice tool is a very important tool in Design Space. It is multi-functional so you really want to familiarize yourself with it. Here is everything you need to know for using Slice in Cricut Design Space.

The main purpose of the slice tool is to cut overlapping shapes. As simple as this sounds, there are so many different reasons you may want to slice objects! Here are some ways to use the Slice tool:
- Cutting an object or word from a shape
- Cropping or cutting an image
- To make a shape out of another shape or design
- To layer multiple layers of vinyl
Before we get started, it’s important to note that the slice tool can only be used with 2 objects at a time. If objects are grouped, you have to ungroup them first. If you want to cut multiple shapes from a shape at the same time, you will need to weld the multiple shapes together first to do this. Let’s go ahead and login to Cricut Design Space to get started!
Need more help with Design Space? The Cricut Design Space Guide has you covered!
How to Cut Words Out of Shapes Using the Slice Tool
A really cool feature of the slice tool is that it can cut words out of shapes . This is useful for making stencils or for designs. Cutting words out of shapes is done the same way that you cut shapes out of shapes.
1. First, layer your text on top of your shape.
2. Select both your shape and your text together and click Slice.
3. Then, remove the slices from your shape!
You can cut words out of shapes using stencil vinyl which is used to paint words on any surface now.

Or make fun designs for shirts and other Cricut projects!

Use the Slice Tool to Crop an Image
Another use for the slice tool is to crop images. To crop an image:
1. Place an object over the object where you want to crop it.
2. Select both objects and click Slice.
3. Then, remove the pieces you no longer need.

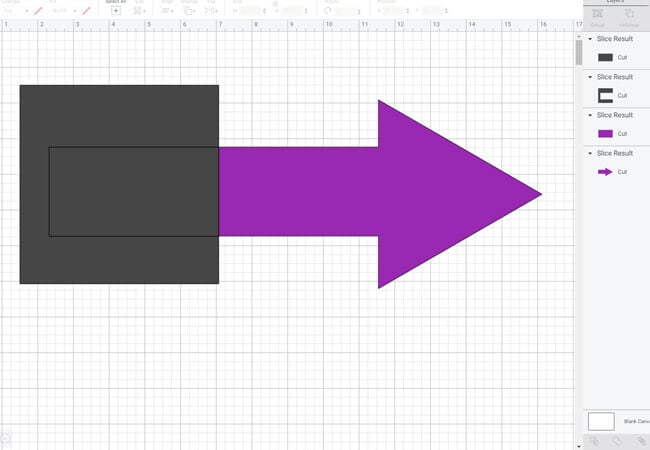
You have successfully cropped off a portion of your arrow to make it smaller. Now, remove all the pieces you no longer need!

How Crop Multiple Layers
If working with multiple images to crop, this gets a little trickier. Although, you can weld your images together to slice them together. But, if you want your images different colors, you can’t weld them together, instead you will have to crop each layer individually.
Here are the steps to take to crop a multi-layer object in half:
1. Move the seeds aside.
2. Place a square on top of the watermelon where you want to cut the watermelon in half.
3. Then, select the square and the green watermelon rind. Click Slice.
4. Select the square and the watermelon. Click Slice.
5. Then, remove the sliced pieces you no longer need.

6. Then, place a square on top of the seeds where you want to crop.
7. Select the seeds and the square. Click Slice.
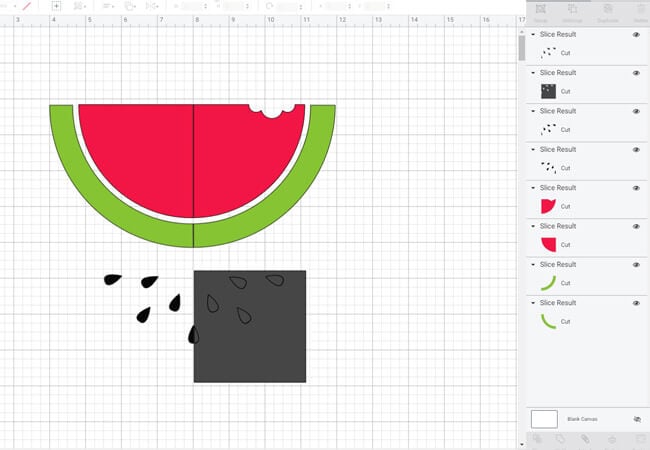
8. Remove the sliced pieces you no longer need.
9. Then, place the seeds back on the watermelon.
10. Group the watermelon pieces back together.
You now have 2 slices of watermelon, or you can delete one slice and you’ve cropped it in half.

How to Crop an Image into a Shape
One of the really cool features of the slice tool is that you can crop an image to change the size or it, but you can also crop an image to change the shape. This is a cool trick for making picture stickers or picture magnets.
1. Upload a photo.
2. Then, create a shape (like a heart) and place it over the image where you want to crop it.
3. Select both images and slice it.
4. Then, remove the pieces you no longer need.
Now you can cut personalized stickers or magnets!

Create Shapes with the Slice Tool
You can use the slice tool to manipulate shapes into shapes that aren’t available in Cricut Design Space. Here are the steps to create a crescent moon using circles:
1. Create a circle using the shapes tool.
2. Then, duplicate the circle.
3. Next, place the top circle on top of the bottom circle.
4. Position the circles so you have a crescent moon shape, then click slice.

5. Then, separate the pieces and remove any of the pieces you don’t need.

How to Slice in Cricut Design Space for Multiple Layers of Vinyl
Whenever you use more than one color vinyl in a project, this is considered layering vinyl. When using heat transfer vinyl, you don’t always want to layer vinyl on top of vinyl. Vinyl can be layered on top of vinyl, but I don’t recommend layering more than once in a project. You need to make sure your design is created so your Cricut Machine will cut out the part of design where another color needs to go. So you need to slice the smaller shape out of the larger shape.
In this example, the watermelon seeds are on top of the watermelon.

When you send this to cut, the seeds are directly on top of the watermelon vinyl. This is fine if you are using adhesive vinyl, but not something you want to do if you are using heat transfer vinyl. If you have no clue what vinyl you need, you can print out our free vinyl cheat sheet to help you with this.

So now we want to cut the seeds out of the watermelon. To do this, select both the seeds and the watermelon and select slice. I welded the seeds together first so I could cut multiple objects out at the same time since you can only slice using 2 objects.
Now you have the original seeds and a copy of the seeds sliced from the watermelon.

Now, when you cut your design, the seeds are cut for you. This allows you to iron the black seeds directly onto your surface instead of on top of the vinyl, giving your project a longer life. You can download this watermelon svg graphic from our free svg library.
Examples of Using Slice
What I just showed is just the beginning of the Slice tool. But, here are some examples of how you will use slice:
- Layering Iron-On Vinyl
- Make words into shapes
- Cut a hole for Gift Tags
- To create a cut-out in your design
As you can see, the slice tool is a tool that is essential for making different projects in Cricut Design Space. If you want to know what else you can do in Design Space, find more Cricut Design Space Tutorials here.
