
How to Use Cricut Design Space – Complete Tutorial
So, you just got your Cricut and you’re ready to learn how to use Cricut Design Space. If this is you, then you are in the right place!
In this Cricut Design Space tutorial, I cover everything you need to know so you can easily navigate Design Space. You’ll learn all about the Canvas area and what each icon and feature do. I’ll also link to my Cricut Design Space tutorials so you can see step-by-step directions to create specific designs!
Once you are through with this post, you’ll have a great understanding of the Cricut Design Space Canvas so you can start creating the crafts that you want to with your Cricut.

The Cricut Design Space Canvas is where all of the design work takes place. You can get to this screen anytime by clicking on the Menu (3 lines in the upper left-hand corner) of Cricut Design Space and selecting Canvas.
Once you are in your Canvas area, you can follow along with this tutorial and start learning how to use Cricut Design Space!
But, before we get started, I do have a couple free Cricut Cheat Sheets for you! These will help you with remembering some of the basic tasks that are used often in Design Space. So, make sure to grab those below.
How to Use Cricut Design Space – Navigating the Canvas
Left Menu of Cricut Design Space
In the first part of this Cricut Design Space tutorial, we’ll cover the left menu. You will use the left menu of the Cricut Design Space Canvas Area to:
- Create new projects
- Find templates to work with
- Search for already created projects
- Create shapes
- Insert images that are already created for you
- Insert text
- Search for already created designs with phrases
- Upload your own SVG images
- Design your own monograms

New

This will open up a blank Canvas in Cricut Design Space for you to start a new project. If you don’t want to lose your changes to your current project, make sure to click save when asked if you would like to save or replace your project. You cannot have more than one project open at a time so creating a new project replaces the project you are currently working on.
Templates

You use templates to help you visualize what your project will look like. This is great so you know exactly where you need to curve or crop your designs. There are multiple items to choose from, such as, shirts, mugs, tumblers, aprons, etc. so you can see exactly what your finished product will look like. Templates are only for viewing purposes. When you cut your project, the template will not be a part of your project.

Projects

You can easily find projects that are already created here. All you have to do is select your project and cut… or edit and then cut. You can use the navigation menu to search for specific project types, projects for your particular Cricut Machine or free projects. You will have to pay for the projects with the green “a” if you don’t have Cricut Access, but there are a lot of free ones to choose from as well.

Shapes

Shapes are used to create your own designs in Cricut Design Space. You can use the shapes as they are or edit them. The Score Line, which is found within the shapes menu, is used for scoring your materials so you can easily make folds. This tool is great for making cards or boxes.

Learn how to edit and manipulate shapes with these Cricut Design Space tutorials:
- Learn to cut words out of shapes to make your own unique designs and stencils.
- Turn words into shapes for fun project ideas with this Cricut Design Space tutorial!
Images

If you don’t have your own images to use, you can find images to use for your projects here. Some of these images are free to use and others you have to have Cricut Access to use.

Text

Whenever you want to create text, you will go here. After you type your text, you can then select it by clicking on it. When selected, you can resize it, change the font, change the color, curve the text and create tons of different text effects. You will be able to use the tools in the top menu to edit your text.

Phrases

Phrases are similar to the projects. This is where you can find projects that are already created for you with phrases. This is a great place to look for inspiration if you are looking for phrases for your Cricut projects.

Upload

This is where you can upload your own files or files you download for your Cricut projects. Image files can be jpg, gif, png, bmp, svg or dxf files. The preferred image file for Cricut projects is SVG files. SVG stands for Scalable Vector Graphics. In other words, you can resize these images without losing quality. Unlike when you try to increase the size of most other file types, you lose the quality of the image. If you don’t have your own graphics to use, download free svg files from our library.

Monogram Maker

The Monogram Maker is Design Spaces newest feature! You can easily make custom monograms in different shapes and sizes with this tool. The only downside is that you do need Cricut Access to use this feature. Don’t have Cricut Access? You can still make script monograms and circle monograms without it with these Cricut Design Space tutorials!

Top Menu – This is Your Main Editing Menu
The top menu in Cricut Design Space is where you will find most of the editing tools. This is where you can choose your fonts, change your spacing, change your alignment and so much more.

Undo/Redo

Hit the undo button to undo any changes made. If you undo too many times, hit the redo to bring back your edits.
Operation
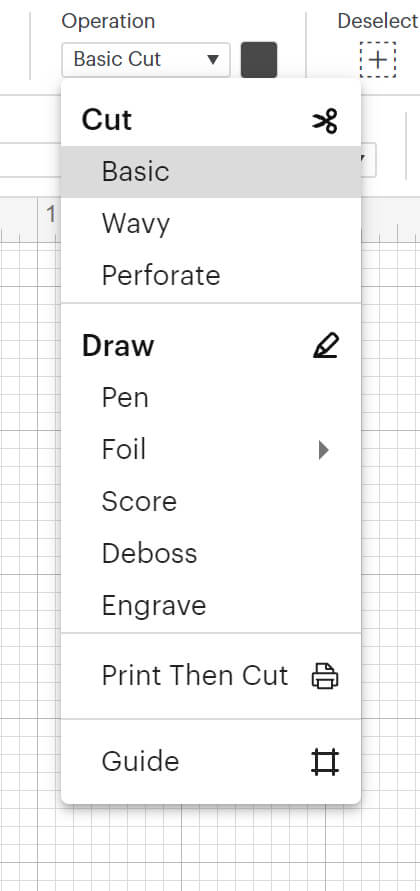
This option menu tells your Cricut Machine what type of project you are creating and what tool you will be using. If you have a Cricut Explore or Joy, you won’t have all of these options.
Cut
Basic Cut – When you select Basic Cut, your machine will cut the design on your screen when you press “make it”. This is the default setting unless you upload a PNG or JPEG to Design Space. The Materials Color option will also be available for you to use. For each color vinyl you plan to use, you will need to use the same colors here. In the example below, everything that is black will cut on the same vinyl and everything purple will cut together.
Wave Cut – This tool will create wavy effects on your final cuts instead of cutting on straight lines like with the basic cut.
Perf Cut – The Perforation Blade is a tool that allows you to cut your materials so that they can easily tear. This is perfect for making coupons, tear-out designs, etc.
Draw
Pen – This will allow you to write using your Cricut! When you use this feature with your Cricut pens, your Cricut machine will draw on your paper instead of cutting it.
Foil – This selection is used with the Cricut foil transfer kit. You’ll be able to add beautiful foil accents to your projects with this.
Score – When you change your line to score, your Cricut will score the line instead of cutting it. This is perfect for making cards, boxes or other items that you need to fold. You will need a scoring stylus or scoring wheel to use this feature.
Deboss – This tool pushes the material in to create detailed designs. Use this to add flowers, starts, etc to your boxes or cards!
Engrave – This tool turns your Cricut into an engraving machine. You can engrave names in dog tags and more!
Print Then Cut
The Print then Cut feature is a great feature. It allows you to print your designs and then cut around them. It’s great for making cute printables and stickers with your Cricut!
Guide
The guide allows you to turn any text or image into a guide. The guide won’t be cut with the rest of the project but can be used as a reference point for creating your designs.
Color Fill
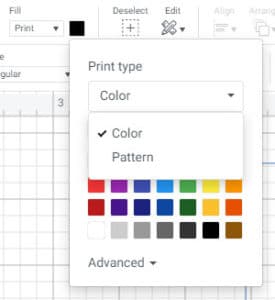
The fill option allows you to change the colors of your design. For each piece that you won’t to cut on the same color vinyl, you will need to change to the same color in your Canvas area with the color fill.
When using the Print then Cut feature, you also have the options to add fun patterns to your design with the color fill.

Select All

When you need to move your full design, you can select all of your design parts by clicking select all. If all of your design parts are not selected, then only those selected will move with you. The select all feature makes it easy to select everything.
Edit

The edit option has a drop-down menu which allows you to cut, copy or paste.
Offset

The offset tool adds a border around your text. This is great for when you want a layered text affect. By using the distance toggle bar, you can adjust the distance for your text border. Select either a rounded corner or a square corner for your offset.

Align

The Align function is something you really want to pay attention to. I use this feature a lot because it aligns your objects perfectly, just the way you want them. In the drop-down menu, you will see different items listed between Align and Distribute. Now let’s learn how to align in Cricut Design Space! In order to align, you must have at least 2 objects selected.
How to Align
- Align Left – All the items selected will align to the left together based on the design that is furthest to the left.
- Center Horizontally – This will horizontally center all the items selected together. This works great when you have rows of text or graphics that you want to be perfectly centered with each other. I use this a lot when writing names vertically to align each letter perfectly.
- Align Right – All items selected will align to the right together based on the design that is furthest to the right.
- Align Top – This will align everything that is selected to the top so that all items are aligned perfectly at the top.
- Center Vertically – This will center all the items selected together vertically. This is great when you have multiple features next to each other and want them all to be centered perfectly.
- Align Bottom – All items selected will align to the bottom. The lowest element determines where the bottom is.
- Center – This will center all items selected both horizontally and vertically. So, the items will be centered perfectly on top of each other. This is useful when placing text over an image or inserting a monogram into an image.
How to Distribute
To use the distribute feature, you have to have at least 3 items selected. This will distribute your items that are selected evenly. It can be very time consuming to try to evenly distribute the items yourself so this is a great feature.
- Distribute Horizontally – This will distribute the items selected evenly horizontally between the 2 furthest images selected. So, make sure the images on the ends are placed where you want them, and you can distribute everything in between evenly.
- Distribute Vertically – This will distribute the items selected evenly vertically between the 2 furthest images selected.
Tip: You can distribute horizontally and then vertically to make a perfect diagonal line of text or shapes. Or make a fun zig zag of text/shapes perfectly aligned.
In order to perfectly align this script monogram, first I selected all 3 letters. Next, I aligned them Center Vertically and then Distribute Horizontally. This is just one of many ways the align functions come in handy.

Arrange

Each time you create a new design element in Cricut Design Space, it is automatically placed on top. But sometimes, you want a different element to be on top or in the back. This is what the arrange feature is for. There are a few different ways to arrange your design elements. Cricut Design Space already knows where the items are located as well. So, if your item is already the front item, then this option won’t be activated for you.
- Send to Back – This moves the item that you have selected, all the way to the back.
- Move Backward – This will move the item that you have selected back one spot. So, if you have 3 items and this item was on top, it will now be in the middle.
- Move Forward – This will move the items that you have selected up one spot. So if you have 3 items and this item was in the middle, it will now be the top item.
- Send to Front – This will send your item that you have selected all the way to the front. It doesn’t matter how far back it is, this will automatically move it to the very front!
Flip

The flip feature is used when you need to reflect one of your items. There are 2 different options on how to do this in Cricut Design Space.
Flip Horizontal – This flips your image horizontally. In other words, it mirrors your image. This is great to use if you are creating an image that uses the same design on each side but flipped. So, for example, if you are creating a butterfly design that you want to be symmetrical. Just create one wing and then copy, paste it and then flip horizontally to create the second wing.

Flip Vertical – This flips your image vertically. This can be used if you want your text or an item to be upside down which is often the case when creating a shadow effect.
Size

This allows you to change the size of an item. You can also change the size with the arrow on the item itself when you click it. But it is useful to change it here when you know the exact size you want your item to be. Turn the lock on to keep your original proportions. So, if the image needs to be 4” wide, you will change the width to 4” and the height will automatically adjust. If you don’t want to keep the original proportions, you can unlock this and adjust as needed.
Rotate

This is where you can rotate your items. You can also rotate them with the rotate tool when you click on your item, but this allows you to type in the exact degree you want rotated. If you hold down shift while using the rotate arrow on the item, this does allow you to rotate in exact 45-degree proportions. But if you want a specific rotation, typing it in this field is your best option.
Position

The numbers here let you know where your graphic is positioned on the board/cutting mat. You can move your item by clicking and dragging on it by changing the number here. I don’t typically use this feature. It would be used if you need to align elements in a way that the alignment tools don’t do.
Font

You can choose your font here. If you know which font you are looking for, you can search for it with the search bar. If you are a Cricut Access member, you can use any font with a green “a” for free. Otherwise, you will be able to select and use these fonts in your design, but when you go to print, you will have to pay. If you don’t want to pay for the font, just make sure to use your system fonts. You can select “system” in the fonts feature so that only these will be available.
Style

Once you have chosen your font, you can then choose whether you want your font to be Bold, Italic or Bold and Italic. You’ll find a drop down area next to Style which lets you change this. Regular is the default setting for this.
Font Size

You can increase or decrease your font size here. You can also do this in the canvas area if you prefer that way.
Letter Space

This option lets you change the space between each of your letters. This is useful if you like your letters to be close together or if you want to space them out further.
Line Space

The Line Space is a pretty cool tool because you can adjust the spacing between multiple lines of text without having to create next text items for each line. You can adjust the lines closer together or further apart.
Alignment

This alignment is for paragraphs, unlike the other align feature which is for aligning your individual design elements. This allows you to Left Align, Right Align or Center your paragraph text.
Curve

This tool is how you curve your font! You will use the slider to curve either upward or downward. Slide the slider all the way to the right or left and your text will form a complete circle!
Advanced
 In this section, you can ungroup letters or paragraphs. Let’s dive a little deeper with each option.
- Ungroup Letters – This allows you to ungroup letters in a group so they each are on their own layer so you can edit them individually.
- Ungroup Lines – Here you can ungroup paragraph lines, so they are each on their own layer. You can edit them individually this way.
- Ungroup to Layers – You can only use this if you have a Multi-Layer font. These are your fonts that typically look like block letters or are dimensional. With the ungroup to layers function, you can remove a layer of the font that you may not want.
Top/Right Menu – This is Your Naming/Make It Area
In this section of the Cricut design space tutorial, you will learn how to save your current project, search for your projects and send your projects to be cut!

My Projects

This is where you will find all of the projects you have done in the past. If you have done a lot of projects, you can use the Ctrl+F feature to search for a specific project. You can also find already created projects to choose from using the drop menu.


To get back to your edit area, click “Canvas” in the top left.
Save

Use save to name and save your file. You will have 2 options, save or save as. Selecting save will automatically save over your existing project. If you don’t want to do this, click save as and you can create a new name to save this as.
Before you name or save your project, you will see Untitled* in the upper middle portion of your screen. Once you name your project, the project name will go here. If you see the * at the end of your project name, this means that you have changes to your project that haven’t been saved.
Explore

Here you will choose whether you have the Cricut Joy, Cricut Maker or Cricut Explore Family. If you have multiple Cricut Machines, select the one that you are currently creating the project for.
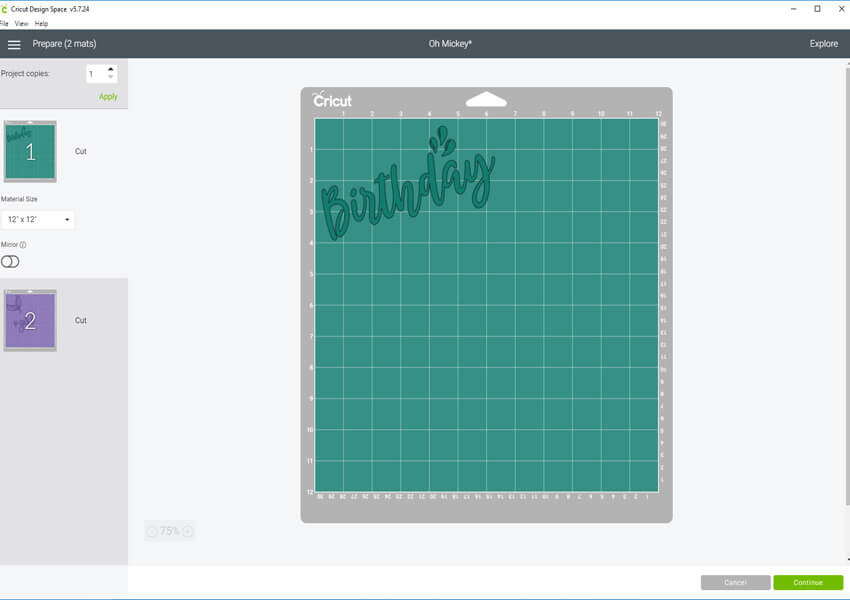
Make It

When you are ready to cut your project, just select “Make It.” This will open up a new screen with the mats for you to prepare. There is a different color mat for each color vinyl that you are using for your project. You will need to place your vinyl according to the correct mat you are cutting.
Right Menu – It’s All About Layers
This part of the Cricut design space tutorial is all about layers! So, what is a layer? Each time you create something in Cricut Design Space… text, object, etc… it becomes a different layer. The layers will automatically stack with the newest design being on top. If you don’t want it on top, this is when the send to back or send backward feature would be handy.
When your design elements are on different layers, this allows you to edit each layer separately. If you have a line of text on the same layer, you must edit this line of text together. To edit specific letters or words separately, you must have it on a different layer. This section will show you how to group and ungroup layers and why you may or may not want to do this.

Group

To group items on the same layer, just select all the items, while holding down shift, that you want grouped together and click on “group”. All the items selected will now be on the same layer and can be resized, re-positioned and edited as a group.
This is helpful when creating intricate designs. If you are working on a butterfly that you use multiple shapes to create; each element of the butterfly will be on a different layer. In order to move this, you would have to select each item to move them together. So, grouping them together is an easier option.
Ungroup

This will ungroup all the items that you have selected. If you type your name with the text feature, all the letters of your name will be on the same layer. You may decide you want the first letter in your name to be larger than the rest so then you would need to ungroup these. Now each letter is on a different layer. You can regroup the letters together that you don’t wish to edit after doing this. Then, you can resize the first letter of your name and the rest of the letters will stay the same. You can also group it back together when you are done with the changes.
Duplicate

This will duplicate all items that are on the layer that you have selected. So use this feature when you want to copy a layer or item in your Canvas area.
Delete

This will delete all items that are on the layer that you have selected. If you accidentally delete something, just use the undo feature.
Layer Visibility

On each layer, you will see a little eye. If you click on this, all items on that layer will no longer be visible. When the items are not visible, they will not be cut when you click “Make It.” If you have a design that you don’t want to edit, but don’t want to print the full design, you can just hide the layers you don’t want to print. Click on the little eye again to make it visible again.
Blank Canvas

You can change the color of your background here. When you click here, the color choices will be available on the top menu bar. This is useful when you want to see how certain colors look on a specific background color. You can also use this with the templates to change the color of the template items you are using. So, you can not only see what your design will look like on a specific item, but the color as well!
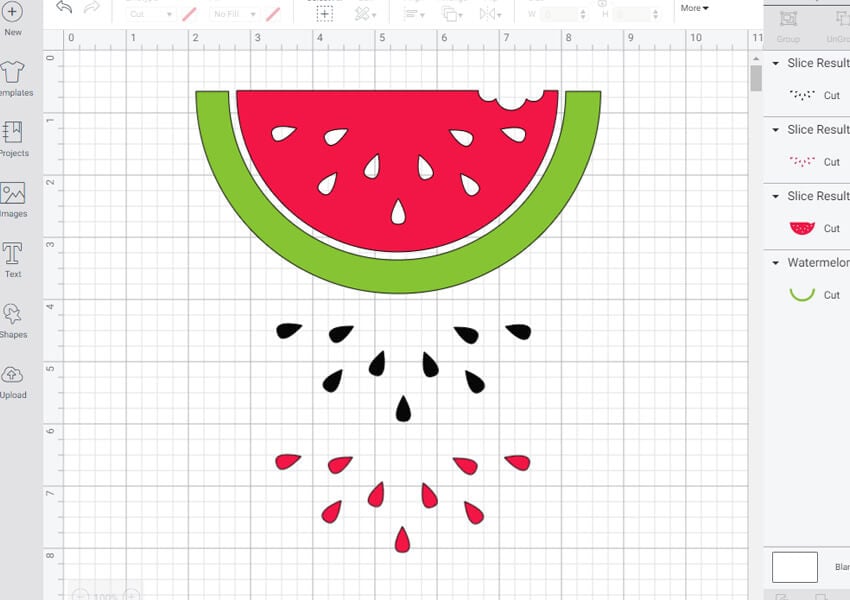
Slice

This is a great tool to use, with multiple uses! The slice tool will slice the objects where the objects overlap. Here are some examples of how to use the slice tool:
You can also use the slice tool to cut words out of shapes for stencils and unique designs with this Cricut Design Space tutorial.

The slice tool is used to cut overlapping shapes when using multiple colors for vinyl. This is important because you do not want to layer vinyl over each other. You want the pieces cut, so they line up perfectly. If only using one color, you can use the weld tool instead.
Use the slice tool to crop images in Cricut Design Space. Turn your pictures into fun shapes to create magnets or stickers using the print and cut feature on your Cricut Machine!

Weld

The weld tool combines one or more shapes into one, taking on the color of the shape that is in the back. This is useful if you are using multiple shapes to create a different object that is a single color. If you want to create a cloud, you can overlap multiple circles on top of each other until they take the shape of a cloud and then weld together to create just one image.

Use the weld tool to slice multiple layers at once. The slice tool only allows you to cut a single layer at a time. To slice multiple layers together, weld the objects together. You can’t undo this so make sure to duplicate the layers if you will need the original objects.
Attach

If you want your design to cut like it shows on the screen, you will need to attach the items together. Otherwise, your Cricut Machine will automatically place all items on the screen to use the least amount of vinyl. If you are creating a multi-color project, only attach objects using the same vinyl together. To attach, hold down shift, select all the items you want attached together and click attach.
Flatten

The flatten tool is for your print and cut projects. When you create an image and change it to print, only that one image is changed. By selecting your print object with the other cut objects together and selecting flatten, all your items will now be converted to print. You will also want to flatten all of your images together if you would like them to be cut as they are on the screen.
Contour

The contour tool allows you to hide part of your design. You can only use this feature if there are multiple elements in the design layer. This is great if you have a single layer design but want to create it with multiple colors.
Color Sync

Each color in your canvas area represents a different color of vinyl. If you have 2 different colors in your canvas area, but need them to be cut on the same color vinyl, you can drag and drop here so they will be printed together. In this example, all 3 bunnies are cut separately. If you would like the purple and yellow bunny to cut together on the same vinyl, drag the purple bunny to the yellow bunny.
Zoom

In the lower left corner of your canvas area, you will see arrows that let you zoom in or zoom out. It’s hard to see unless you hover over it. You can zoom in or out without changing the dimensions of your project here.
Phew… we made it through this step-by-step Cricut Design Space Tutorial! You should feel a lot more confident with design space and hopefully you can now create your own fun graphics and designs for your Cricut Machine.
Pin this Cricut Design Space Tutorial so you can easily refer back to it as needed!
