
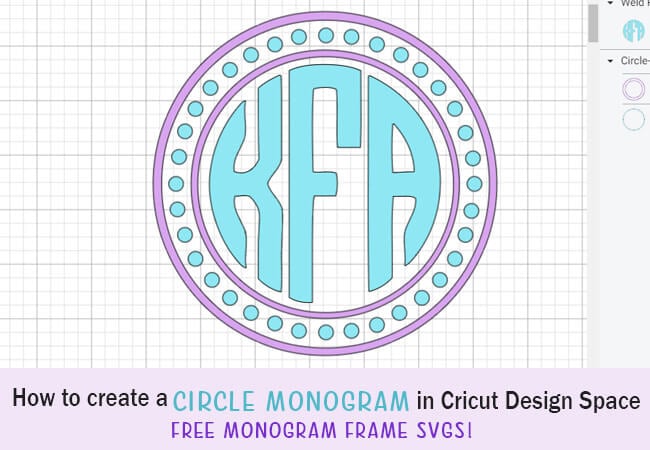
How to Make Circle Monogram on Cricut
Everyone loves monograms! If you sell or make products for others, then you’ll know that personalized crafts are always in demand. So, follow along and learn how to make circle monograms with your Cricut!
While you’re here, make sure to check out my free circle monogram SVG files to go with your circle monogram designs.
Learn how to make a Script Monogram in Cricut Design Space.
Free Circle Monogram Fonts for Cricut
In this tutorial, I am using the free Monogramos Font to create my circle monogram.
*Update – Since creating this tutorial, this new free circle monogram font has become available! Since this font is already divided, it’s much quicker and easier to use. If you use this circle monogram font, make sure to download all 3 files (left, right & center).
Free Circle Monogram SVG Files

Circle monograms are fun to customize with frames. Download all 5 of these circle monogram frames for free!
You may also like these circle monogram SVG Files to pair with your circle monogram:
- Turkey Monogram
- Ghost Monogram
- Cheer Monogram
- Pumpkin Monogram
- Turtle Monogram
- Mermaid Monogram
- Shamrock Monogram
- Baseball Monogram
- Cat in the Hat Monogram
- Christmas Monogram Templates
How to Make a Circle Monogram
Watch the full step-by-step video tutorial on how making Monogram in Cricut Design Space here:

When creating monograms, you will want your last name initial to go in the middle, with your first initial first and your middle initial last. Now, let’s open up Cricut Design Space and create a new project.
Create Your Text
Using lower case font, use the text tool to type your initials in this order: first initial, last initial and middle initial. It’s important that the text is lower case because upper case will create an outline of the font which is not what you want.
Then, with your initials selected, choose the font. If you don’t want to see all of the Cricut Access fonts, click on “System” and only the fonts on your computer will show.

When you change the font to your monogram font, you will automatically end up with 3 different text blocks which should look like the example below. If needed, go ahead and resize all of your text blocks together by selecting all.

Slice, Contour and Align
Next, we are going to slice the objects. Slicing the objects won’t change anything. We are just doing this so we are able to use the contour feature. So, select two of your letters together and slice them. Then, select two other letters and slice them. You can only slice with two objects together so you won’t be able to select all 3.

Once all the letters are sliced, click on one of the letter and choose Contour.

This will open up a new window. Click on the letters that you do not want and they will remove from your object. The letters will turn light grey when you select them. You may need to adjust the zoom percentage to see the full item. To do this, just click on the plus or minus in the left, bottom corner. Close the window when you are done.
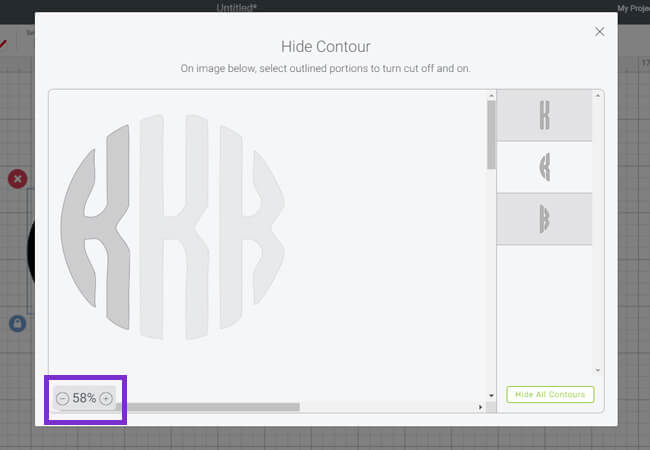
Repeat the contour step for your next two letters. Then, you will have all the letters you need to make your circle monogram.

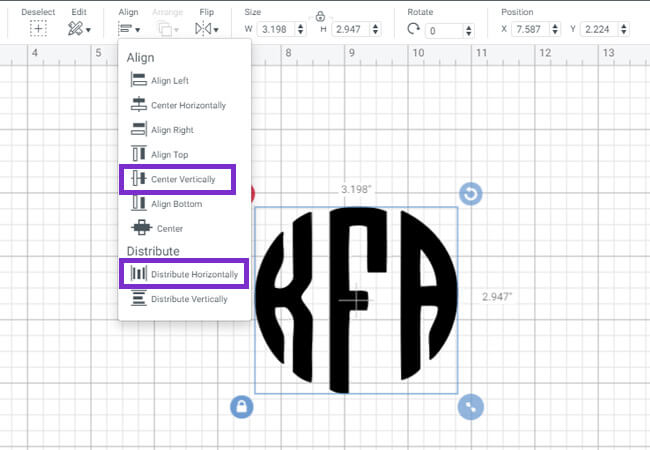
Arrange your letters so they take the shape of a circle monogram. They don’t have to be perfect. We can perfectly align and distribute them. Just select all of the letters and use the align feature to Center Vertically and then Distribute Horizontally.
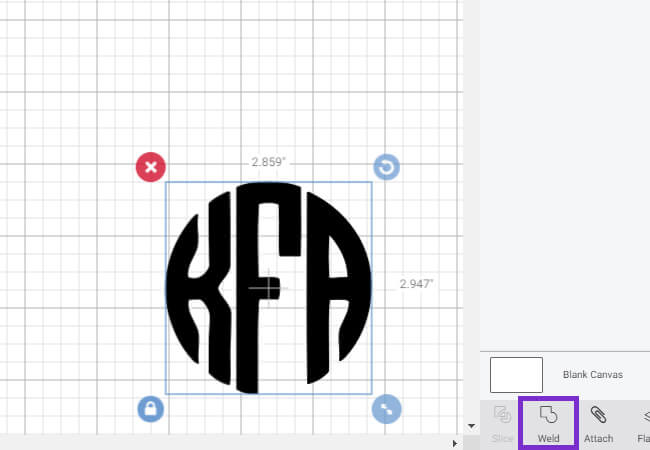
Weld your letters together to turn them into a single image. If you prefer your images to be multiple colors, change the colors and then use the Attach feature instead of weld. Now you have your perfect monogram ready to go! Keep following if you want to add a frame around your monogram.
Add a Frame to Your Monogram
If you don’t already have a frame to use for your monogram, go ahead and download a free Circle Monogram Template
Upload the SVG file and insert it into your canvas area with your circle monogram.

Size your monogram to fit the frame the best you can. This doesn’t have to be perfect. If you are using a symmetrical frame like the one below, you can perfectly center this using the align feature. Select your objects and Center Horizontally and Center Vertically.

To change your text to one of the colors in your frame, use the Color Sync option. For this, I dragged the black text to the layer with the blue dots so that the text now matches the dots.

The last thing you need to do is group your items. If you are preparing this file for a print and cut, select all objects and select Flatten. If you are preparing this to cut, select all objects and select Attach. You are now ready to make your project!
NOTE: If using Iron-on, don’t forget to MIRROR your design!

If you are new to using vinyl, you can view all of my favorite brands of vinyl for project type here.