
How to Use Flatten in Cricut Design Space
If you want to turn one of your cut files into a printable image, you can do this by using the flatten tool. So, we are going to learn how to use flatten in Cricut Design Space and some tips and tricks to make it easier to use.

The flatten tool pretty much has one use. It is to turn a multi-layer cut file into a printable image to use with Cricut’s print and cut feature. Let’s see what this means.
Print Then Cut
Print then Cut is a great feature that the Cricut can do. Once your image is ready to go, you will print it from your home computer. Then your Cricut Machine will cut around the edge of your design.
There are three ways that you can prepare your design for print and cut.
The first is to upload a JPG or PNG and save it as a print and cut file. Cricut Design Space will automatically turn this into a print and cut file for you.

The second way is to change the layer from cut to print. But you only want to do this if you only have one layer. Otherwise your image will print each layer separate.
And the third way is to use the flatten tool.
Using Flatten in Cricut Design Space
Using the flatten tool is really simple. And there are a lot of really fun projects you can make using the flatten tool and print then cut feature. I’ll show you tutorials on how to do a few and by then you’ll have the hang of it and can do any of the projects. Here are fun project ideas for using the flatten tool:
- Banners
- Confetti
- Gift Tags
- Stickers
- Custom Frame Mats
- Photo Props
Make Confetti
I’ve created an ice cream cone that has 4 different layers that I want to turn into confetti. To do this, just select all 4 layers and select Flatten.

The image is now a print and cut image.

All I need to do is resize the image much smaller and duplicate the image several times. You can duplicate multiple layers at a time so this is quick to do. When I have this ready to go, I will select “Make It”, send my design to print, prepare my Cricut mat with the printed design and Cricut will do the rest.

This is such a fun way to make personalized confetti for different occasions. I wouldn’t want to have to cut each of these out myself!
Make Stickers
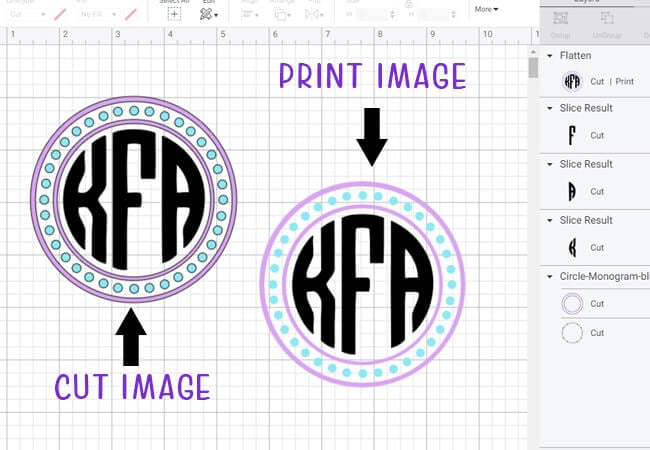
Stickers is another fun project to make with your Cricut. Design your sticker using Cricut Design Space. For this example, I created a Circle Monogram and added a frame. Learn to make your own circle monogram and download free monogram frames!
Select all of your layers and flatten. It’s easy to tell if your design is prepared for cutting or printing. The cut images will have your cut lines around them and the flatted images will not. Your layer will also say whether it is a cut image or a print then cut image. See the difference below.
Make Gift Tags
By now, you should have the hang of this. Select all layers and select flatten. It’s super easy to do! Creating custom gift tags is probably my favorite print then cut feature. I love making cute printables for different holidays and occasions and you can download all of my printables for free to use yourself! Having the Cricut to cut the tags gives me more freedom to get creative and I love it!

Looking for more tutorials? Find more Cricut and Design Space tutorials here!