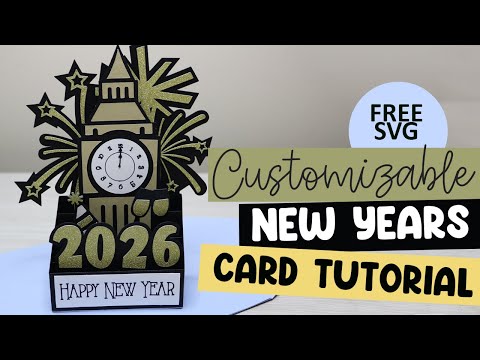
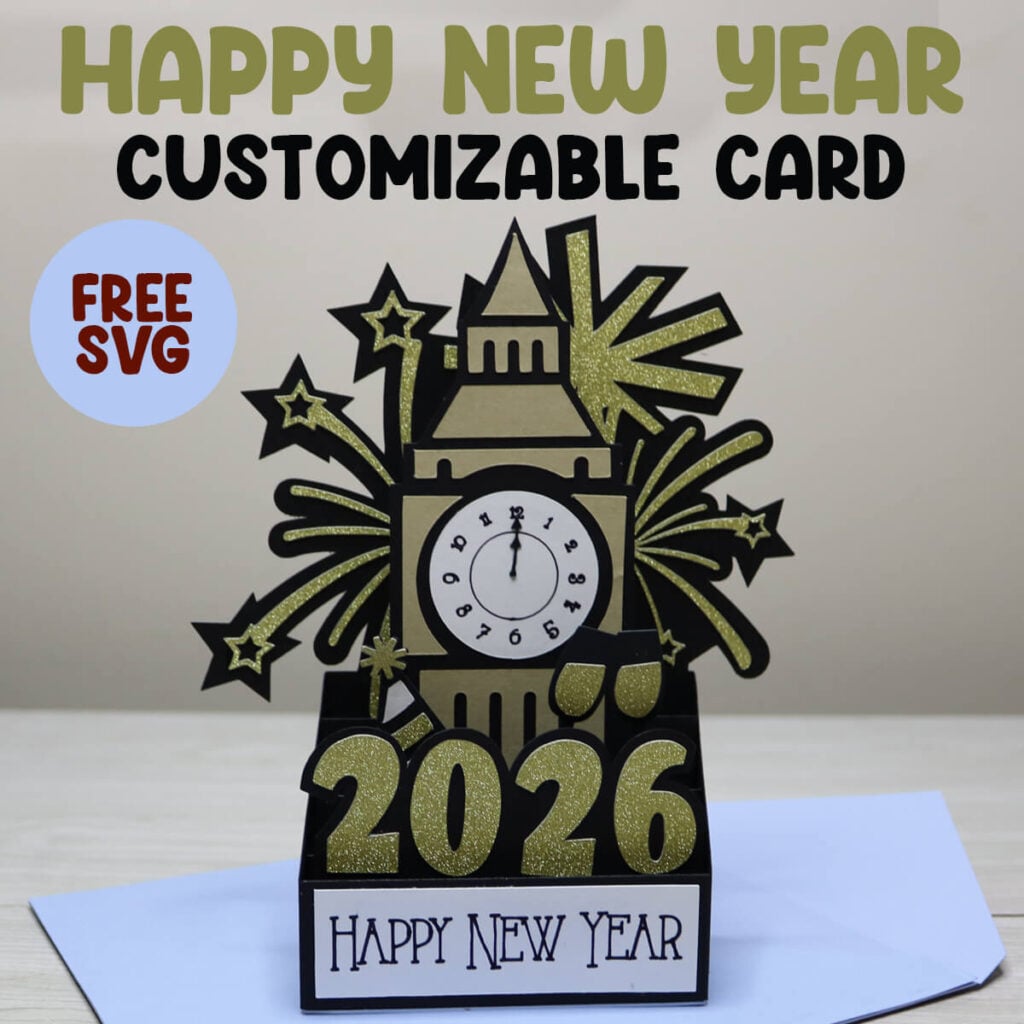
Happy New Year Card SVG {Customizable Year}
Looking for a memorable New Year’s card to make? This Happy New Year Box card is so fun to make, exciting to receive and makes a great decoration to bring in the New Year. Grab the free Happy New Year Card SVG and follow along with this step-by-step tutorial to make this.
Need more ideas to make decorations with your Cricut for your New Years celebration? Make these New Year Photo Booth Props to capture fun photos or pass out these Kiss Party Favors to the guests. For more ideas, search all of my free New Year SVG files.
To Make This New Years Card, You Will Need:
- Medium Weight Black Cardstock, you will also need scraps of white and a tan color.
- Gold or Gold Glitter Cardstock. I am using this double sided gold glitter cardstock.
- Fine Point Black Cricut Pen
- A good craft glue – I am using this Bearly Art Craft Glue.
- Scoring Stylus (which is what I will be using in this tutorial) or a Scoring Wheel (Maker only).
- Cricut Maker or Explore Cutting Machine and your standard cutting mat.
Download the Happy New Year Card SVG
You can download this free Happy New Year Card SVG from my members only free library (design #36 under Card Templates or search “Happy New Year Card SVG”).
Don’t have a password? Unlock my free members library by entering your name and email in the form below or click here.
Save this on Pinterest so you can easily find this tutorial when you need it… Plus by sharing with others, this helps to keep my SVG files and Cricut tutorials free!

Cricut Design Space Instructions
Step 1: Upload Happy New Year Card SVG to Cricut Design Space
Upload the Happy New Year card SVG to Cricut Design Space. If you need help with uploading SVG files, then check out my tutorial here. Make sure to check the size of your project and adjust if needed. Click on the image (while everything is grouped together) and the width should be 28.322″ and the height 16.379″.
After resizing your project (if needed), click on “ungroup” to ungroup your layers.

Step 2: Modify Score Lines
Start by adjusting the score lines. You will find these on the fireworks layers, clock layer, party hat layer, the rectangle and the envelope if you are using the envelope. If you do not want to make the envelope, delete the 2 purple layers instead.

To adjust the score line, click the drop down arrow for the first layer. Then click on the first layer which is the group of lines and change the operation to from “Basic” to “Score”. Then click the group that contains the score lines and the layer under it and select “Attach” to attach the layers together.

Step 3: Adjust Pen Layers
Repeat the steps above to adjust the pen layers for the clock face and Happy New Year layers. To do this, open the layer for the clock face and select the layer with the writing. Change the operation from “Cut” to “Pen”.

Then select the group with the clock face and circle underneath together and select “Attach” or the Paperclip to attach the layers together. Repeat these same steps for Happy New Year.

Step 4: Adding the Year
Delete each of the numbers that you do not need and duplicate any that you will use more than once. Line the numbers up in the year order and place them so the black is touching but none of the yellow is overlapping. Select all 4 numbers togethers, open the Align Menu and choose “Center Vertically”.

Bring the year down so it overlaps on top of the rectangle. Then resize it so the year fits within the lines on each side of the rectangle.

Select the 2 and select “ungroup”. Repeat this for the 0, other 2 and 6 (or whatever year you are using). Move the yellow layers of the year up so they are out of the way. Then click on the rectangle and select “Ungroup” to ungroup the lines from it.

Then select the rectangle layer, and each number in the year together. Open the Combine Menu and select “Weld” or “Unite”. The Weld and Unite tools are similar, but Unite keeps the layers individual still so you can undo this and edit if needed. I am using Weld since I will not need to edit this.

Then with the welded image still selected, select “Contour” and the contour window will open. On the right side, select each of the layers on the side except for the top image. This will close those small spaces in the year, making it easier to cut. Select “Apply” when you are done.

Then find the group of 2 lines that was on top of the rectangle before you ungrouped it. Change the operation to score and then right click on the layer and select “Bring to Front”.

While the score lines are still selected, hold down shift and select the rectangle layer as well. Select “Attach” to attach these together.

Step 5: Cut Everything Out
Select “Make It” to cut everything out. Before you start cutting, check your mats and make sure the pen layers are in the correct spot, as well as the score lines. If they are on a different mat, make sure you go back and attach them to the correct layer, otherwise they will not come out right.

When you cut everything out, make sure to follow the prompts in Cricut Design Space which will let you know when to add your scoring tool and your pens.
How to Assemble Happy New Years Card
Start by gluing the fireworks on to the back layer. Then fold up on the score lines and in on the smaller score lines. Flip this over and glue the shapes to each side of the card.

- Glue the clock pieces to their matching card base. Then with the clock facing up, fold back on both score lines.
- Glue the hat and champagne pieces to the matching base piece, with the hat on the left side when facing you. Then fold back on each of the tab lines.
- Then glue the year to it’s matching base pieces and fold back on the score lines.
- Fold the rectangle piece in half and glue the Happy New Year layer on top so it’s facing up when the rectangle is sitting down like a place card.

To attach the New Years card, lay the fireworks layer down with the fireworks facing up. Line the clock tower up with the bottom and the tab piece up with the score line on the firework layers. The clock layer should be facing down. Flip the tab piece up, add glue and then press it down to attach it to the fireworks layer.
Fold the clock layer over on top of the fireworks layer. Then add the hat layer, lining it up with the bottom and the fold from the clock the layer. The hat layer should be face down. Fold the tab layer up, add glue and then press it down to attach it to the fireworks layer.
Then fold the hat layer over on top of the clock layer. Place the year face down and line it up with the bottom and the fold from the hat later. Then fold the tab piece up, add glue and press it down to attach it to the fireworks layer.
Fold the year layer over on top of the hat later. Then add glue on the 3 tab pieces facing up on the right side of the card. Press the right flap over and fold to place on top of the glue. Press down and let this set.

Last, fold the Happy New Year piece on top of the 2 edge pieces in the front of the card and glue it to the side pieces to attach it.

Assemble the Envelope
To assemble the envelope, fold in on all 4 of the score lines. Then add glue to the 3 tab pieces and layer the other envelope piece on top.
Let the envelope dry before adding your card. I like to use a lighter weight paper for my envelopes. But, if you are mailing your card, then you may want to go with a medium weight cardstock instead.

Thanks so much for checking out this New Year card tutorial. When you’re done making your cards, make sure to post these in my crafting group here or tag me if you post them on social media. I absolutely love seeing your crafts and definitely want to see your New Years crafts.
Video Tutorial For Happy New Years Cards
Watch the step-by-step tutorial to learn how to make this New Years Card here: