
Candy Holders for Halloween
Candy holders have been one of my more popular crafts on my blog. And it’s easy to see why because candy holders are so cute and fun to make with your Cricut. You guys requested more Halloween candy holder SVG files and so that’s what I am sharing with you today.
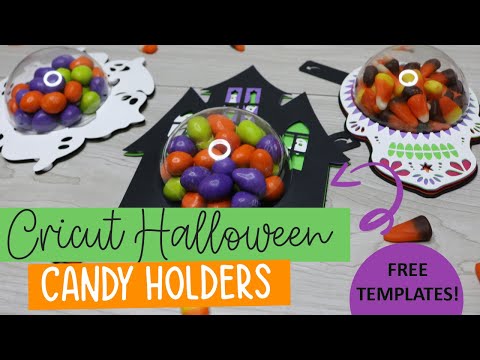
These new candy holder SVG files include flying ghosts, a haunted house and a Mexican sugar skull. These specific designs were all requested by you guys… my fabulous readers and so I hope you enjoy them. You can also check out my other Halloween candy holders here.

Cricut Candy Holders
Each of these candy holder SVG designs comes with 2 different versions: one with a closing mechanism that opens and closes and one with a perforated back that you tear to get the candy out. So, you can choose the design that is best for you.
Supplies Needed:
This post contains some affiliate links for your convenience (which means if you make a purchase after clicking a link I will earn a small commission but it won’t cost you a penny more)! Read my full disclosure policy.
To make these Halloween candy holders, you will need:
- Medium or heavy weight Cardstock/Paper – I recommend this 90lb weight variety pack which has all of the colors that I am using in this tutorial. This cardstock comes in both 12×12 and letter size. I recommend the 12×12 so you can cut more on a sheet of paper, but the letter size will work as well if you have a Cricut Joy XTRA.
- Cricut Maker or Explore Cutting Machine and your standard cutting mat.
- A glue with a fine point to it – This Bearly Art craft glue is what I am using.
- 3.15″ Clear Fillable Ornaments – these are the ornaments that I use. If you use a different size ornament, you will need to resize the SVG files accordingly.
- Foam dots or foam tape – These are the foam dots that I am using and recommend.
- Candy to fill the candy domes!
- Candy Holder SVG
Download the Free Candy Holder SVG File
To get these free candy holder SVG files, enter your name and email into the form below and then click the “Get It Now!” button! If you have any issues with the form, then click here to open the form in a new window.
Please remember these are for personal use only. If you’re looking to sell products using these designs, please purchase a Commercial Use License here.
Save for Later!
Share the love and easily come back to this tutorial anytime just by saving this on Pinterest by clicking the picture below and then hitting “Save”… Plus this helps to keep my SVG files and Cricut tutorials free 🙂

Halloween Candy Holder Step-by-Step Tutorial
Watch the full step-by-step video tutorial to learn how to make these Halloween candy holders with your Cricut here:
Cricut Design Space Instructions
Create a new project in Cricut Design Space and then upload the candy holder SVG and add it to your canvas. Decide if you are making the version with the closing mechanism or the perforated back and delete the version you don’t want. You will first need to ungroup the layers to delete this.
There are no modifications needed for these designs. However, if you are using a different size ornament than these ornaments here, then you will have to resize the files. To do this, measure the opening of your ornament and create a circle in Cricut Design Space with the same height and width.

With your elements still grouped together, resize them so the circle cut out is the same size as your circle. Make sure that you resize all the elements, including the closing mechanism together to keep the proportions.
How to Assemble the Candy Holders
Each of the candy holders come with 2 different versions. There is a version with the closing mechanism and another with the perforated back. They both are assembled mostly the same. However, the closing mechanism will take a couple extra steps.
So, first I’ll show you how to assemble the closing mechanism and then how to layer each of the designs.
Assembling the Closing Mechanism
- Layer your 3 closing mechanism pieces over the cut out on the back of your candy holder. You will layer them with the round piece closest to your candy holder, then the piece with the pull lever and then the piece with the tabs. Make sure the arrow is pointing down for your pull lever and that the tab opening is where you will pull this down.
- Flip the pieces over, keeping them in order and place them on your work surface. Add a small amount of glue to the edge of the tag piece and fold it over to attach to the other side. It’s important to use a small amount of glue as you don’t want any glue seeping in, causing the pieces to get stuck together. The middle lever should move freely inside.
- Flip the closing mechanism back around and glue it to the back side of your candy holder, covering the opening.
- You should easily be able to pull the lever up and down to open and close your candy holder.

Haunted House Candy Holder
First, line up all of your candy holder pieces and make sure each piece is turned the right way, so they match up perfectly. Then separate your bottom 2 layers from the top 2 layers. Glue the bottom 2 layers together with the green on top of the black. Then glue the top 2 layers together with the black on top of the purple.
You can either glue the ghosts to the front of your candy holder, or glue them behind the purple layer so they are floating behind the window like they are in my candy holders.

Flip the front piece over and place foam dots all around the back. You can also cut strips of foam tape. Place your ornament over the circle opening of your haunted house. If you are making the version with the perforated back, make sure to place your candy inside the dome before placing the top piece on.
Then place your top piece on and press down to attach the foam dots to the bottom layer.

If you are making the version with the closing mechanism, make sure to glue this to the back and then add your candy.
Note: You can also glue these down instead of using the foam dots. But you will also need to glue the ornament down as well. The depth of the foam dots is what keep the ornament in place.

Sugar Skull Candy Holder
First, line up all of your candy holder pieces and make sure each piece is turned the right way, so they match up perfectly. Then separate your bottom 2 layers from the rest of the layers. Glue the bottom 2 layers together with the orange on top of the black. Then glue the rest of the layers together in this order starting from the bottom: pink, purple, green and then white.

Flip the front piece over and place foam dots all around the back. You can also cut strips of foam tape. Place your ornament over the circle opening of your sugar skull. If you are making the version with the perforated back, make sure to place your candy inside the dome before placing the top piece on.
Then place your top piece on and press down to attach the foam dots to the bottom layer.

If you are making the version with the closing mechanism, make sure to glue this to the back and then add your candy.
Note: You can also glue these down instead of using the foam dots. But you will also need to glue the ornament down as well. The depth of the foam dots is what keep the ornament in place.

Floating Ghosts Candy Holder
First, line up all of your candy holder pieces and make sure each piece is turned the right way, so they match up perfectly. Then separate your bottom 2 layers from the top layer. Glue the bottom 2 layers together with the black on top of the white.

Flip the front piece over and place foam dots all around the back. You can also cut strips of foam tape. Place your ornament over the circle opening of your ghosts. If you are making the version with the perforated back, make sure to place your candy inside the dome before placing the top piece on.
Then place your top piece on and press down to attach the foam dots to the bottom layer.

If you are making the version with the closing mechanism, make sure to glue this to the back and then add your candy.
Note: You can also glue these down instead of using the foam dots. But you will also need to glue the ornament down as well. The depth of the foam dots is what keep the ornament in place.
