How to Print and Cut with Your Cricut
In this Design Space tutorial, you are going to learn everything you need to know on how to print and cut with Your Cricut. You will be able to use this feature with both the Explore and Maker series.
Print and Cut is a function that allows you to print your images, then cut around them. When you format your images for the print and cut feature, you will print your design through Cricut Design Space and then your Cricut will cut perfectly around the image or images.
This is such a great feature to learn how to use because you can create stickers, cards, boxes, printed decals, printed vinyl and so much more!
Don’t have a Cricut, but want to make your own stickers and designs? Find out which Cricut Machine is the best fit for your needs.
What Materials Can You Use For Print then Cut?
The main ways people use the Cricut print and cut function is to make stickers or cut out printables (banners, cards, cake toppers, confetti, etc). Any material that your printer can print on, the Cricut will cut:
White Cardstock – I use this Astrobrights White Cardstock for printables and cards.
Colored Cardstock – This heavy weight colored cardstock and glitter cardstock work great for banners, cake toppers and confetti.
Sticker Paper – Sticker paper is used for creating stickers that are permanent. These will leave a sticky residue behind when removed, so use cautiously. Sticker paper is great to use when creating stickers to apply to paper or labeling envelopes. This is the recommended sticker paper to use.
Printable Adhesive Vinyl – This is the material you want to use when creating stickers for water bottles, laptops, wall decals, etc. This material is water proof and will not leave a sticky residue when removed. Available in both matte and glossy finish. This is my favorite glossy printable adhesive vinyl to use and my favorite matte printable adhesive vinyl.
Transparent Printable Vinyl – Use this when you want to create stickers or labels with a clear background. This clear printable vinyl is waterproof and works great.
Waterslide Decal Paper – This material is great for using with ceramic. Create stunning custom mugs or decorative plates using waterslide decal paper.
Printable Iron-on Vinyl – Use this when you have multiple layers for your shirt design. Instead of layering multiple layers of vinyl, iron on one image with this printable iron-on vinyl.
Print Then Cut Design Space Tutorial
In this tutorial, we will cover how to turn your images into print and cut images, the cutting process, how to add borders to your images and other tips and tricks that will allow you to cut patterned images when your Cricut can’t recognize them.
Uploading Images
When uploading images for print and cut, you will need to change your settings depending on what file type you are uploading.
Uploading a JPG or PNG File for Print and Cut
When uploading a jpg or png file, follow the steps below:
- From your Canvas, select Upload.
- Next, select Upload Image.
- Select Browse and locate your file. Select Open.
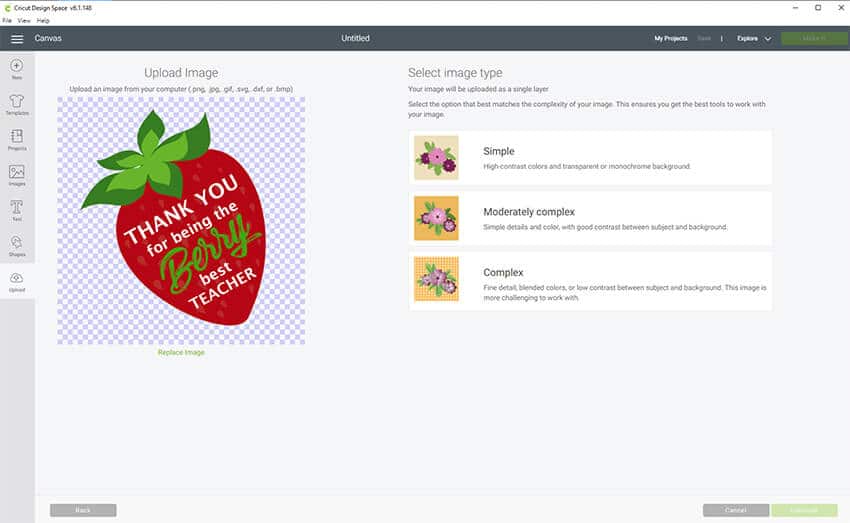
If this is your first time uploading a jpg or png image, you will notice that you get a different screen then when uploading svg files. From here, you will select “complex” and select “continue.”
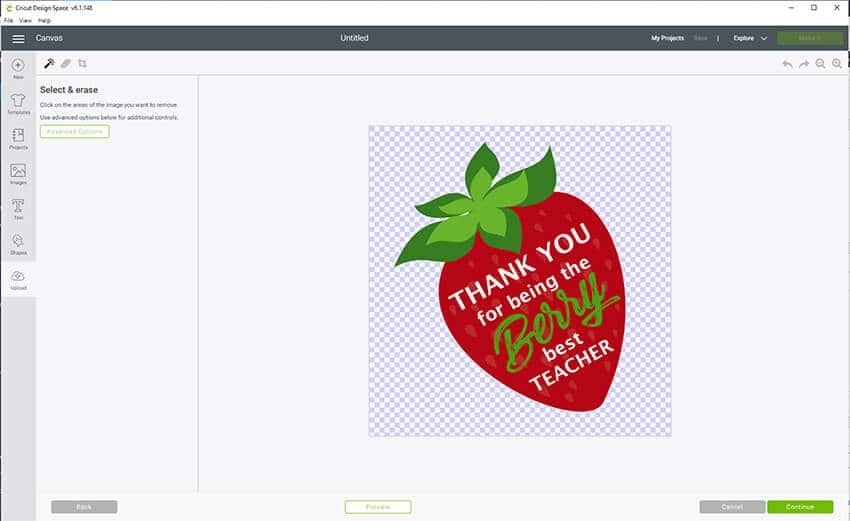
In this next screen, you have the option to crop your image, erase part of the image or erase the background. If you are uploading an image with a background and you don’t want the background to be part of the cut image, you can erase the background here. Just select the eraser and click on the areas you want removed. Once you are happy with your design, click “continue”.
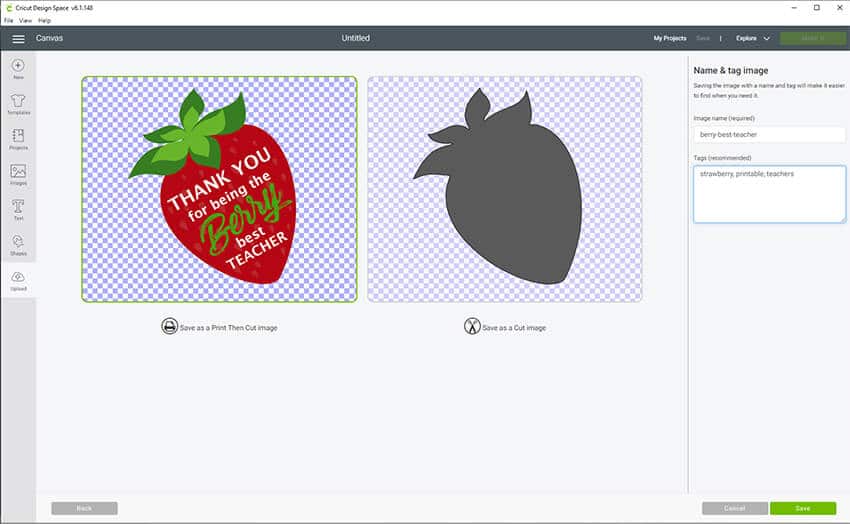
Select the option to Save as a Print Then Cut Image, enter your tags and click “Save.” Note: Tags are used to search for your images so you don’t have to upload the same image again. Use tags that will help you easily find your image.
Select your image and click on “Insert Images”. The file is now uploaded and ready to print and cut! If you would like to cut multiple images on the same page, duplicate your item until your page is full.
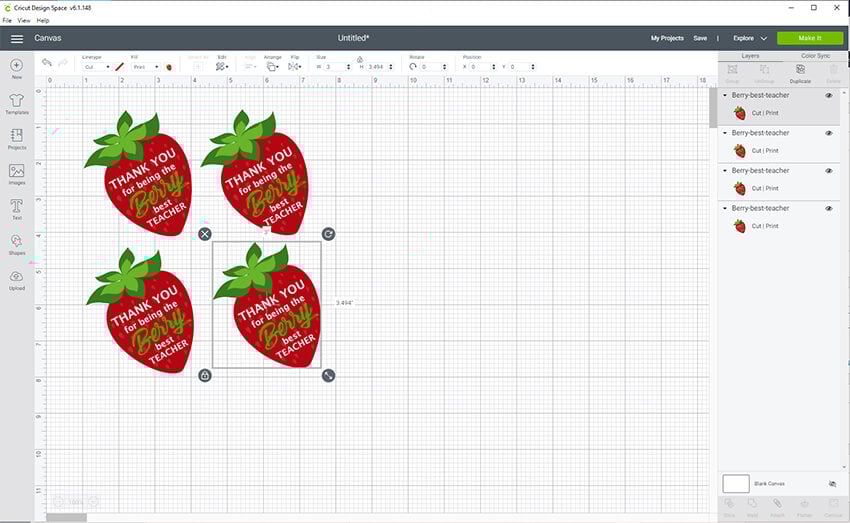
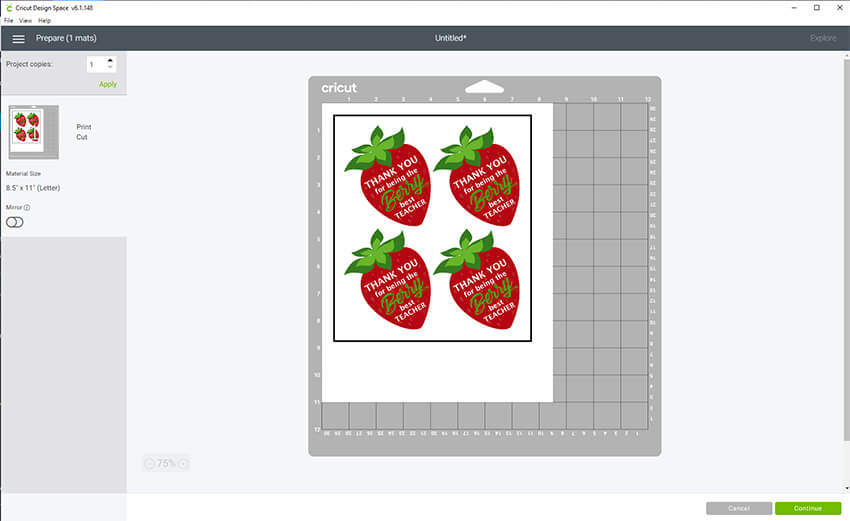
Note: You can only print on 8.5″ x 11″ paper/vinyl. But, your Cricut (both models) can only support a print and cut image of 6.75″ x 9.25″. So, you will need to make sure your image(s) fit within these dimensions.
When you click on “Make It”, you will be able to preview your image(s) to make sure it fits within the print and cut dimensions.
Uploading an SVG File for Print and Cut
Uploading an SVG file is similar to uploading a JPG or PNG file. The only difference is that you won’t get the option to choose to Save as a Print Then Cut Image. SVG images are automatically uploaded as cut files, but you can change the settings in design space by flattening your image once it is uploaded.
If this is your first time uploading an SVG File, you will want to check out this step by step tutorial (with pictures) on how to upload svg files in Cricut Design Space.
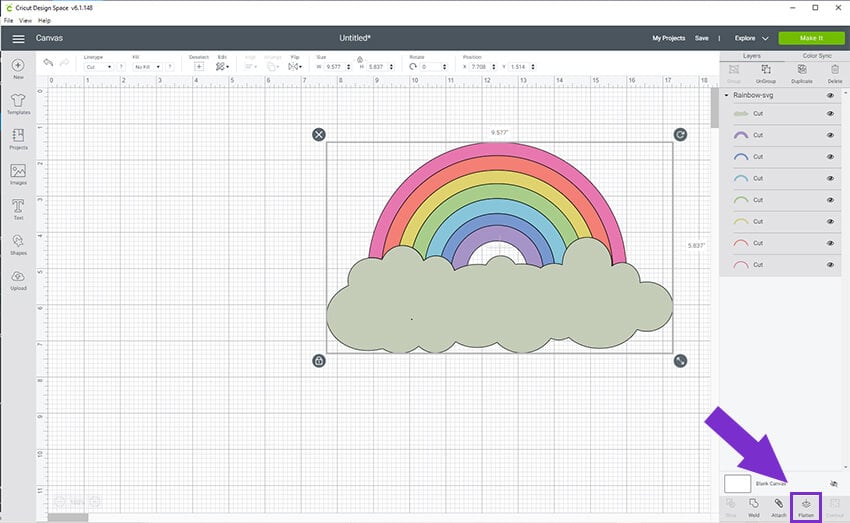
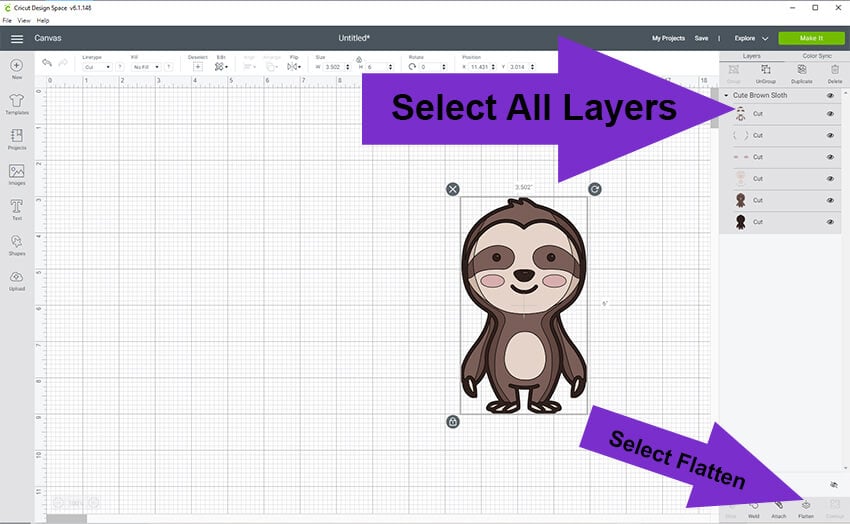
Now that your image is uploaded, you will want to select all layers of your image and select “Flatten”.
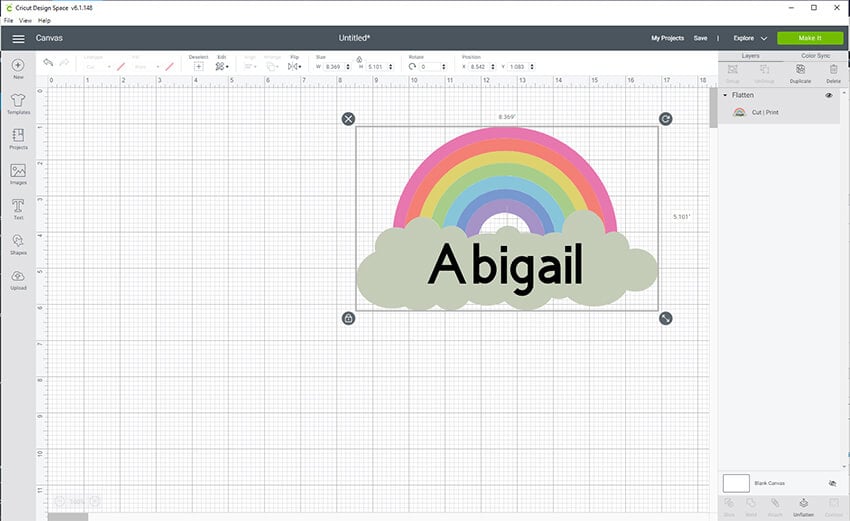
Note: You can download this free rainbow svg file to use. This rainbow svg is great for stickers or as a wall decal. Use the font feature to personalize the cloud with your name before flattening.
Once you flatten your image, it’s ready to use the cricut print and cut feature. Resize your image as needed, making sure it stays within the 6.75″ x 9.25″ dimensions and then select “Make It”. You can unflatten your image to make changes to your design if needed.
Designing Images for Print Then Cut
You can easily design your own images in Cricut Design Space. Visit our Cricut Design Space Guide if you need more help navigating design space and all the design tools. When you are finished designing your image, just make sure to flatten all the layers together to create your print and cut image.
Using Images From Cricut Access
If you have Cricut Access, then you have a full library of images to use. To find these, click on Images on the left side of your Canvas Area. You can easily search images using the search bar or categories.
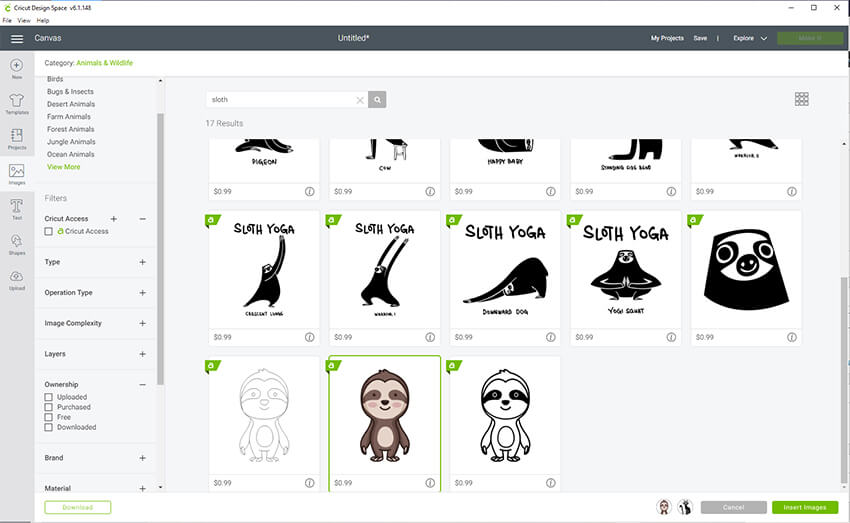
Some of these images are already made for print and cut so you don’t have to do anything to them. If they aren’t made to print then cut, just make sure you use the Flatten tool to change their format.
Adding a Background or Border to Your Images
When creating stickers, or other fun projects with your Cricut, you will sometimes need to add a background or border to your image. If you look at the image below, you can compare 2 different graphics to see how your image will print and cut with and without a border or background.
Note: You can download this Valentine’s Day Panda SVG File here.
How to Add a Background to Your Print and Cut Image
When using the print and cut feature with text, you will want to add a background if you don’t want the text to cut separately with each individual letter. You can easily do this by inserting a shape in design space.
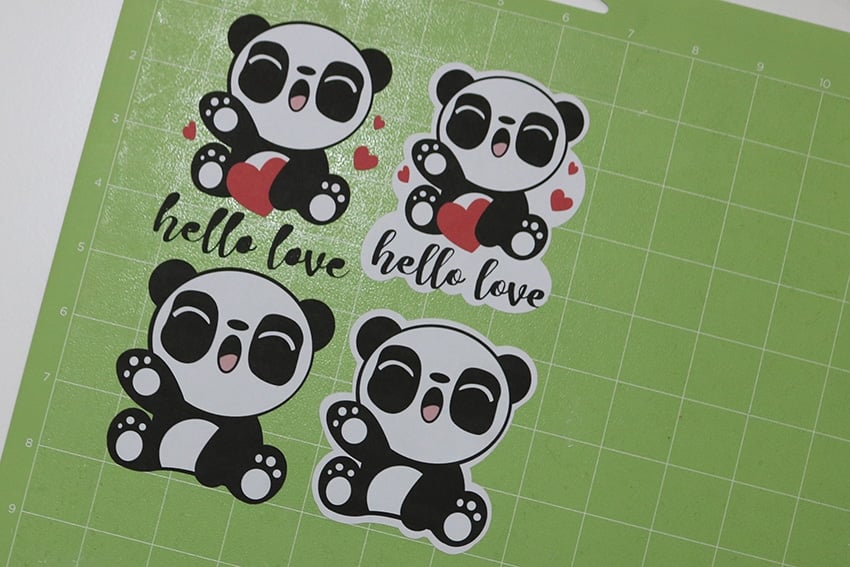
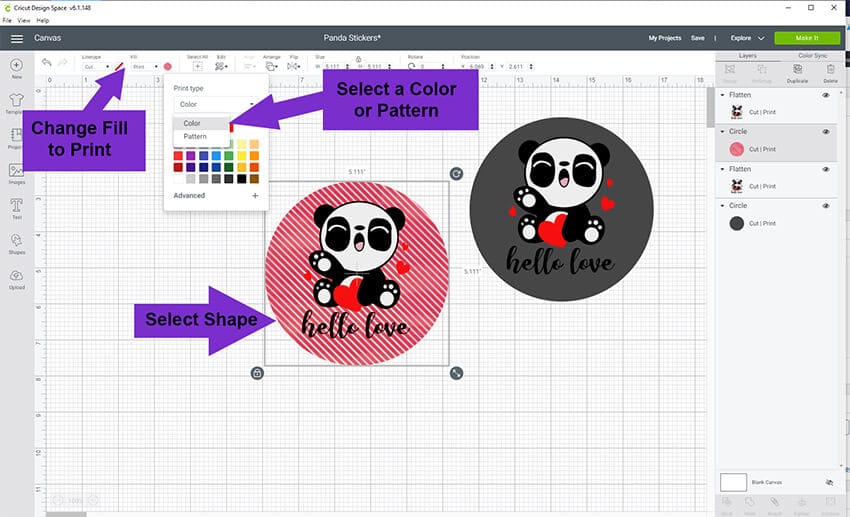
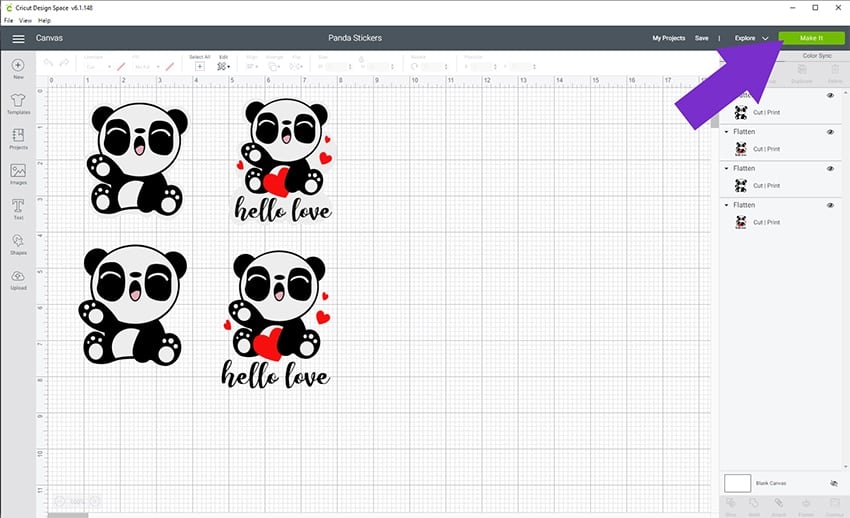
For example: In the image below, anything that isn’t attached (hello love and hearts), will cut separately. To make sure all of the image is cut on the same design, you will add a background to your image. Select the shape tool and create any shape you would like for your design.
Place the shape behind your image. To do this, you can select your shape, right click and select “send to back”. Or, drag the circle layer below your panda layer in your layers panel.
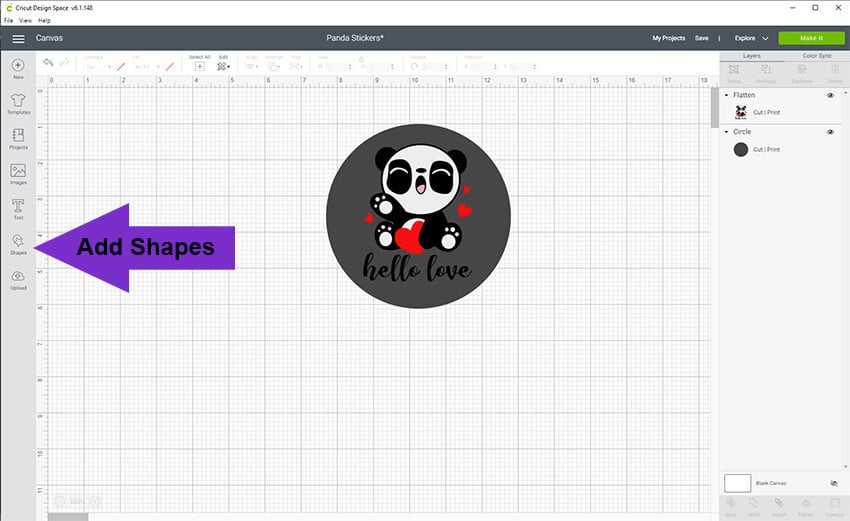
Make sure to change the color of the shape to the color you want the background to print. To do this, you will need to change the Fill option to Print. Then, click on the color next to Print to search through different colors or patterns to use for your background.
Once you are happy with your design, select all layers and select Flatten.
How to Add a Border to Your Print and Cut Image
If you prefer to add a border to your image instead of a background, there are a couple ways you can do this.
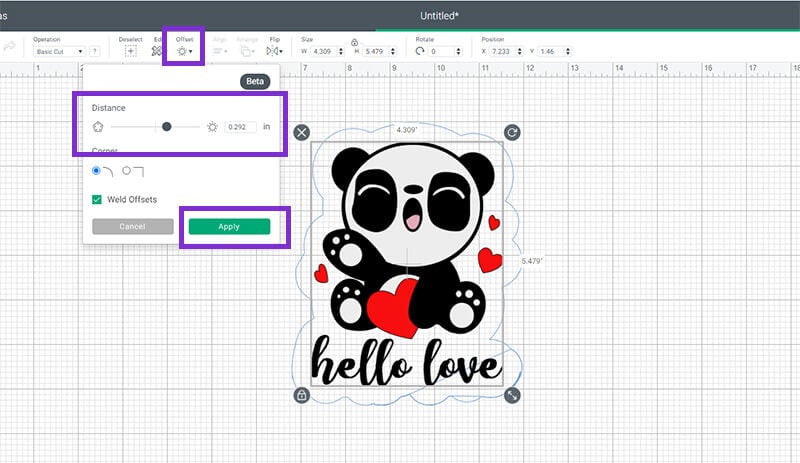
**UPDATE** The new Offset feature that Cricut just added, makes adding a background so much easier! If you don’t have the Offset feature, keep reading below for a way to add a background or border to your picture. Otherwise, just use the Offset feature to add borders and backgrounds to any image!
How To Add a Border Using Offset
First, click on your image. If you have multiple layers, make sure they are grouped together first. Then, click on Offset. Use the slider to control how much of a border you want to add to your image. Once you are done, click Apply. You can use the Offset feature again to add a second and third (and more) backgrounds to the same image!
How To Add a Border if You Don’t Have Offset
If your image is symmetrical, you can add a border by duplicating your image, resizing it just a little larger and placing it behind your text.
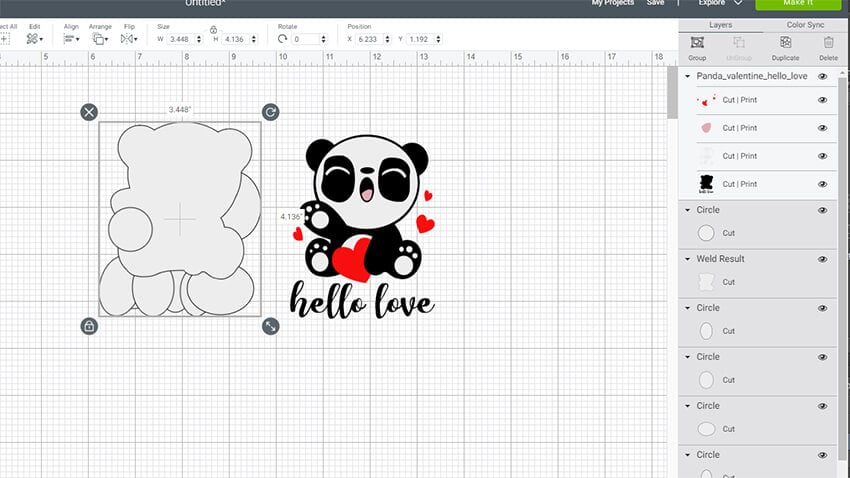
However, if your image is not symmetrical, this takes a little more work. You can duplicate your image, resize it just a little larger and use a portion of this as your border. However, this won’t fit perfectly, so you will need to use shapes to fill in the extra spaces. It’s easiest to have your design in front of the shapes you are creating so you know what size to create them and where to place them. Once you have a big blob of shapes that border your image perfectly, you will want to weld them together.
Before welding the shapes:
After welding the shapes:
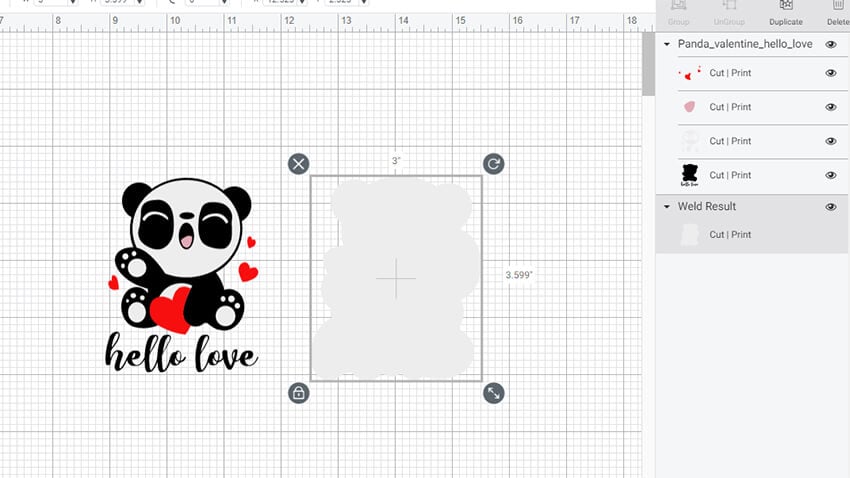
Just place your image over your new welded image. Select all layers and select Flatten. Your image is now ready to print and cut. Your Cricut will automatically know to cut around the border of the image… it’s pretty genius like that!

Using Photos as Stickers
Creating stickers with your own photos is really easy to do in Cricut Design Space. First, upload your photo using the instructions above on uploading a JPG image for print and cut.
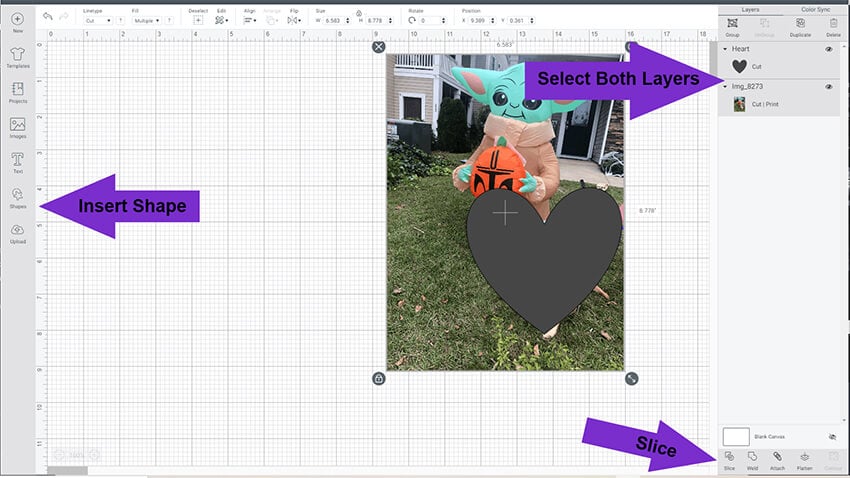
When your photo uploads, it is already set as a print and cut image and is ready to go. You can use the steps above to create a border for your picture. Or, you can change the shape of your photo by slicing your image.
- Insert a shape on top of your image where you would like to crop it.
- Select both of your layers (shape and image) and select Slice. Note: You can only slice using 2 layers at a time. Learn how to slice multiple layers.
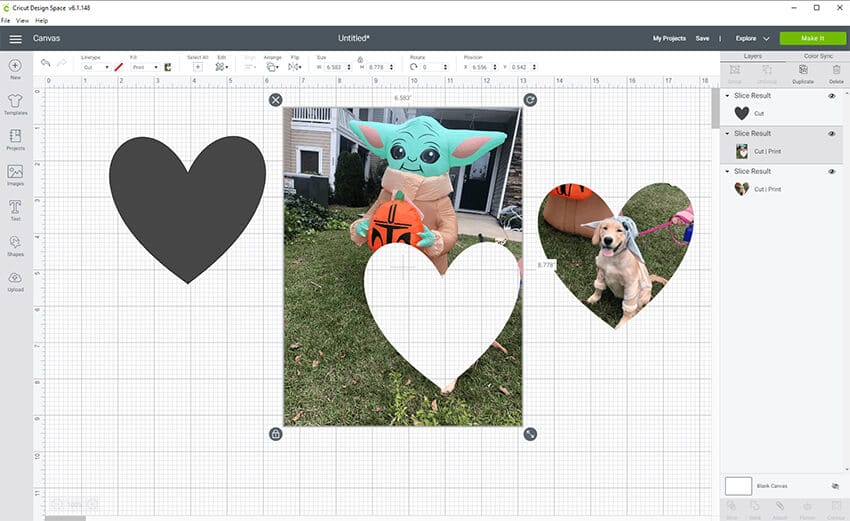
After slicing, you have 3 images. Delete the images you no longer need and your heart sticker is ready for print and then cut.
How to Print Then Cut – The Cutting Process
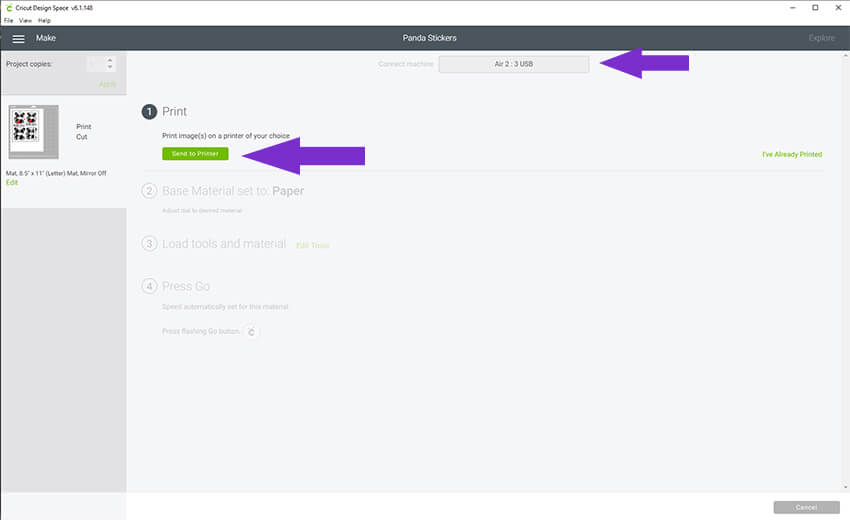
Now that your image is ready to go; how do you print and cut the image? First, you will select the green “Make It” button from your canvas area in design space.
This will open up a preview of your image. Make sure everything that you want to print and cut is within the 6.75″ x 9.25″ area (within the black border). Then, click Continue.
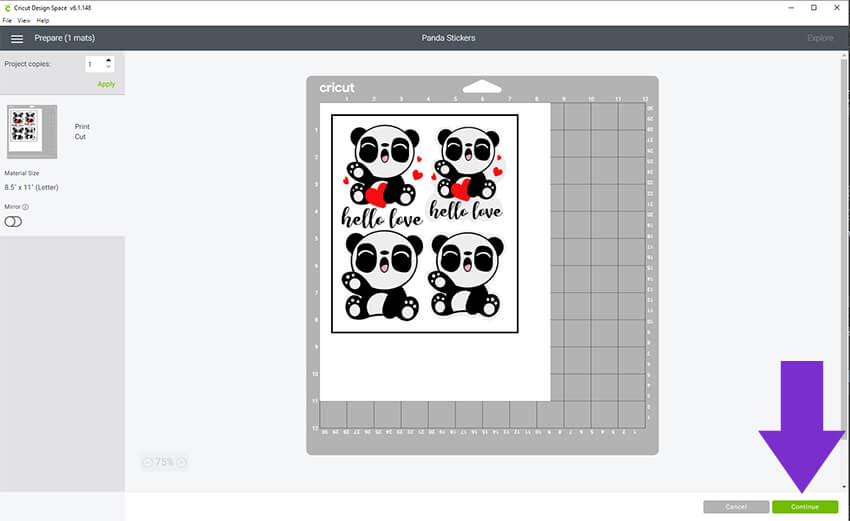
At this point, make sure that you have connected to your Cricut. You will see your machine listed when you are connected. Click “Send to Printer”.
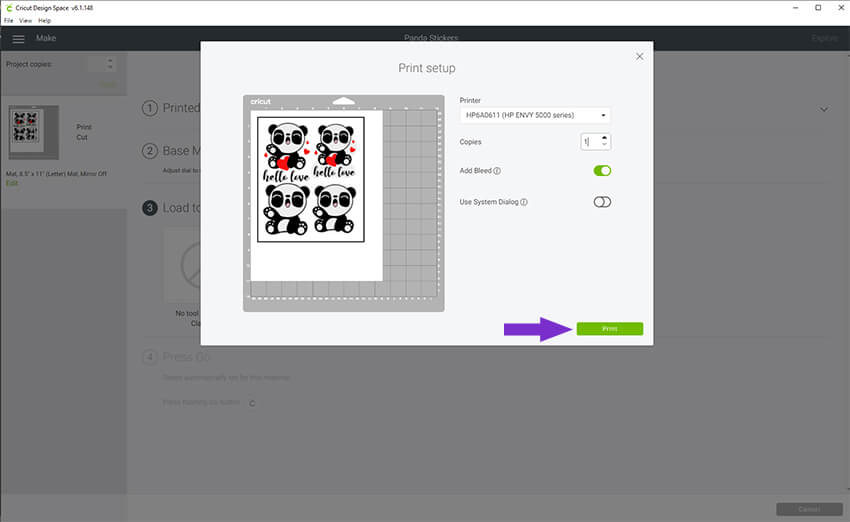
Enter your printer settings and then select Print:
- Printer – Select your printer
- Copies – Enter the number of copies to print
- Add Bleed – The Bleed extends ink slightly beyond the border of the image to eliminate a white margin once the image is cut.
- Use System Dialog – This will enable a pop-up on your printer settings so you can select a high quality setting to print your image.
Once your image is printed, select your cutting settings.
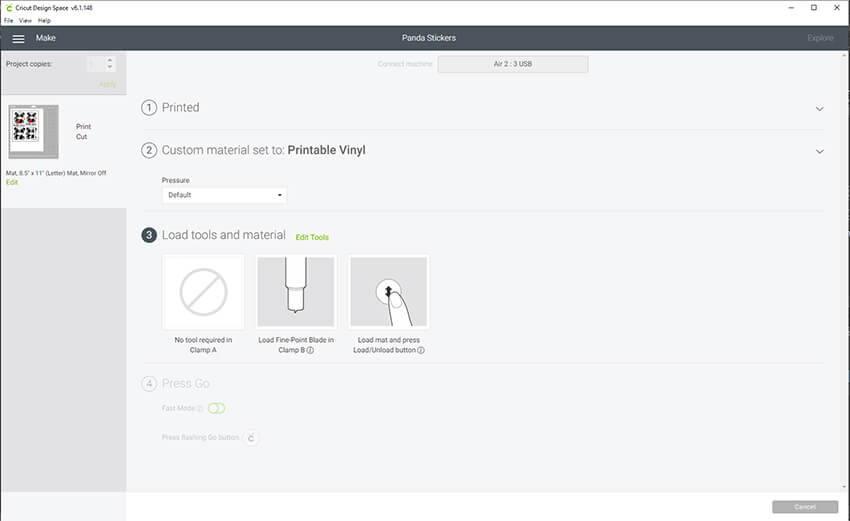
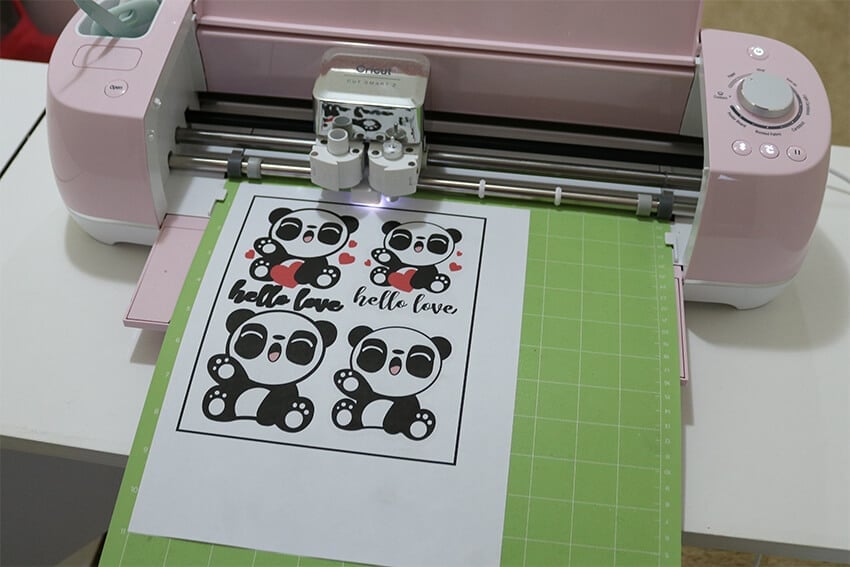
When your image is dry, adhere it to your cutting mat. Load your mat into your Cricut by pressing the load button. Then, select your flashing Cricut button.
If you added a background or border around your image, Cricut will automatically know to cut around this. If you don’t add a background or image, Cricut will cut around each individual image. Take a look below to see what the 2 designs look like with and without a border.
How to Cut Printables and Complex Designs
Using the Cricut print then cut feature is pretty simple when cutting around individual images. But, what if you want to cut something more complicated or with complex patterns or designs? Chances are, you are going to get an error that the machine cannot read the cut sensor marks. In this situation, you will need to manually add your own cut lines to your design.
How to Add Your Own Cut Lines to Your Print Design
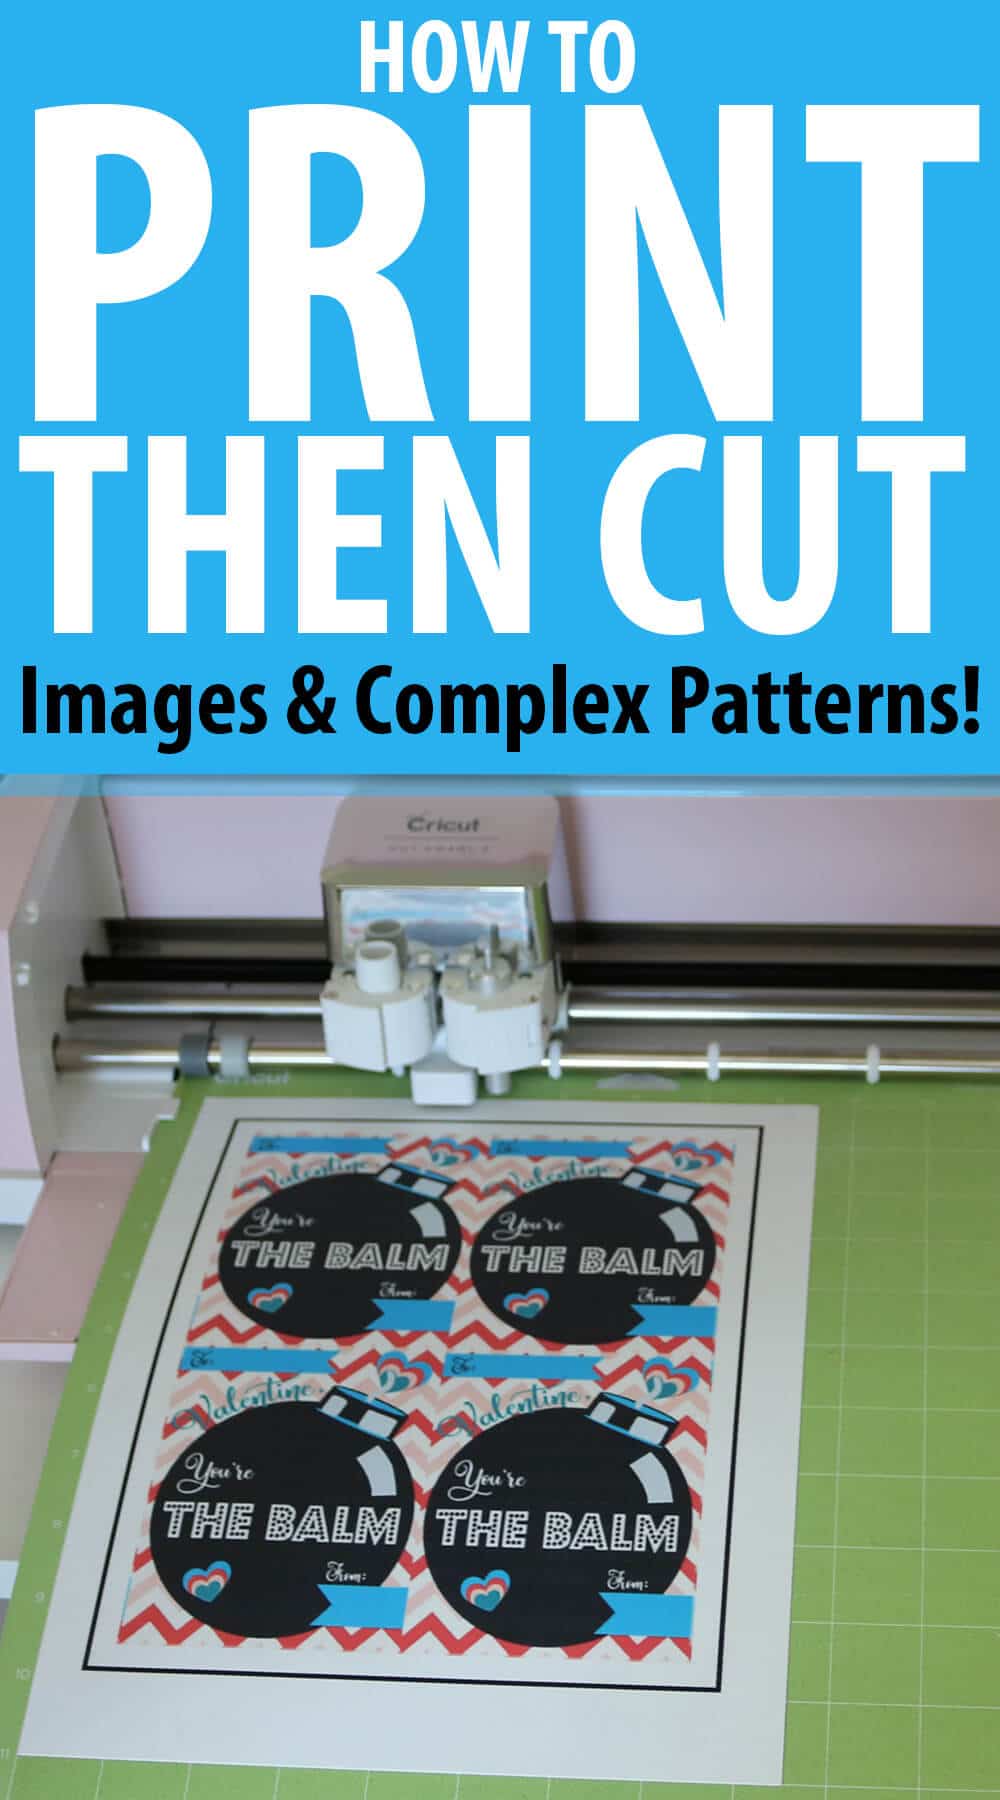
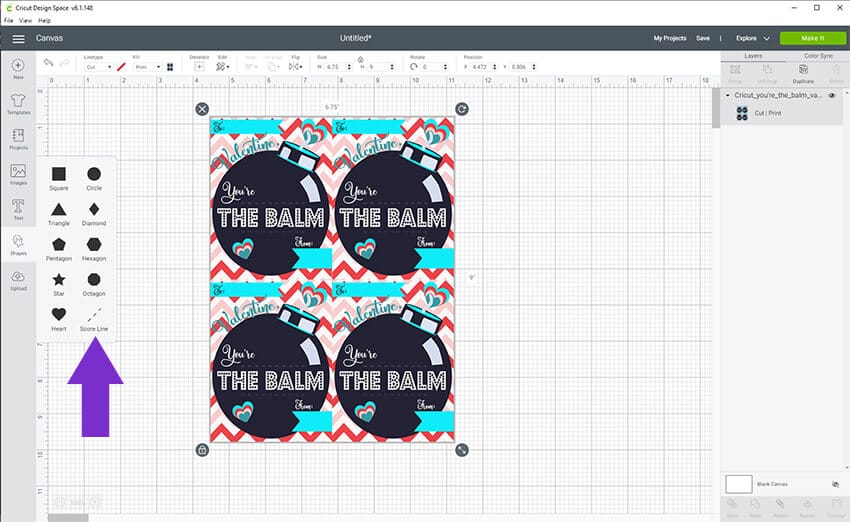
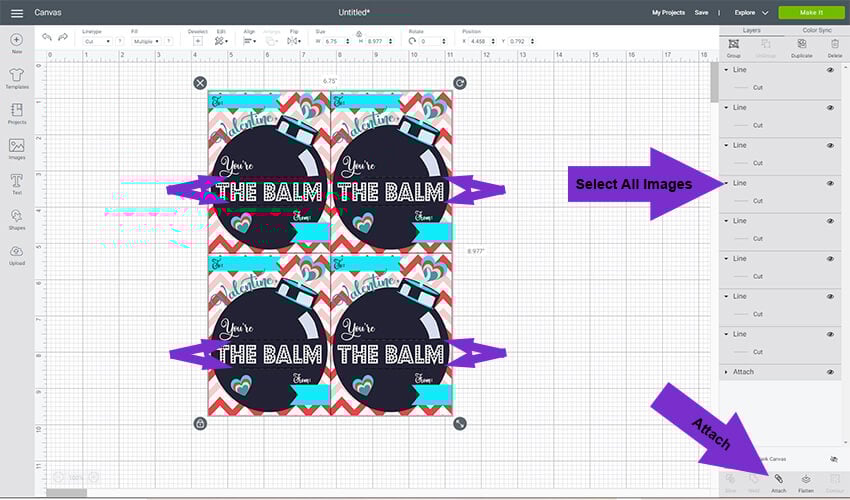
If you have a printable similar to this You’re The Balm Valentine Printable, you will receive an error that the machine cannot read the cut sensor marks. In this case, you need to add your own cut lines to let your Cricut Machine know exactly where to cut on your design.
To add your own cut lines, select shapes and then select the Score Line.
Note: you can download these chapstick Valentine cards here.
Select your score line and change the Linetype from Score to Cut.
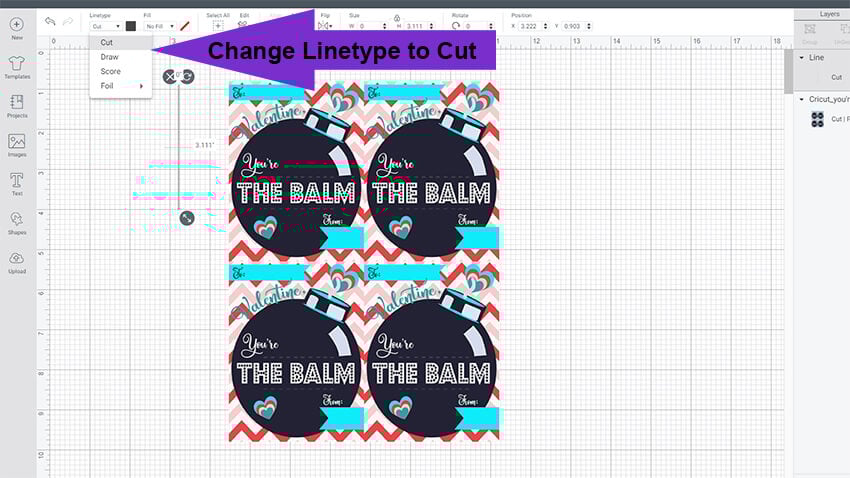
Place your cut line around each of the 4 images.
Note: To turn your line a perfect 90 degree angle, select the rotating arrow on your line and hold down shift as you rotate it.
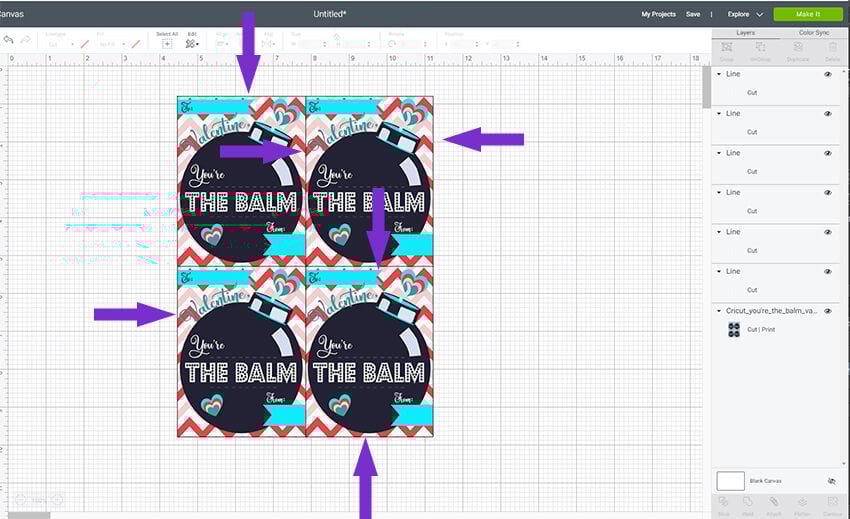
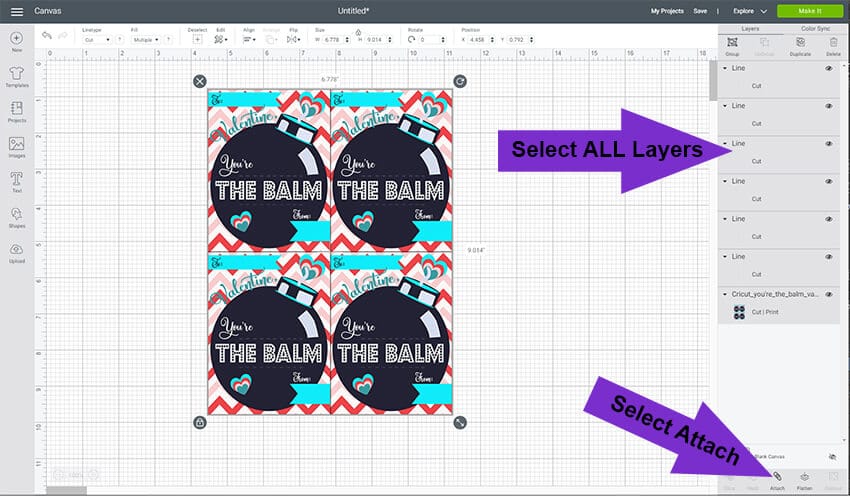
After all of your cut lines are in place, you need to attach all of your layers. Select all layers and select attach.
Your Cricut Machine will now cut each of the 4 individual cards out separately. But, what if you also want your Cricut to cut inside of your print then cut image?
How to Cut Inside of a Print and Cut Image
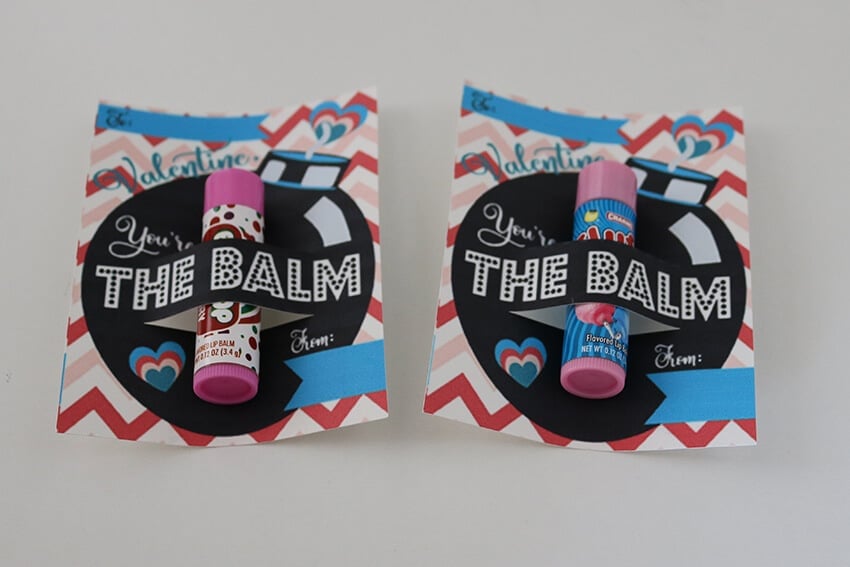
To cut inside of a print and cut image, you will need to add cut lines to your image, just as we did above. This time, we are adding the cut lines to the score marks inside of your design. For this particular design, these cut lines are to hold your ChapStick in place.
Once your cut lines are in place, select all layers and attach.
Your Cricut will cut each of the 4 individual printable cards separately, along with the score lines in the middle.

Your end result will look like this. We love sending this Valentine out each year (who doesn’t love flavored chapstick?). I am amazed at how much easier Cricut’s print and cut feature makes this than having to cut out the inside of each individual line and around each image. The cut lines are much more finished looking as well.
What is the difference between sticker paper and adhesive vinyl?
Both sticker paper and adhesive vinyl can be used to create stickers with your Cricut. They are both great for creating stickers that you want to last. The biggest difference is that the adhesive vinyl will not leave behind the sticky residue that the sticker paper leaves behind. This makes adhesive vinyl a better choice for creating stickers for laptops, tumblers, wall decals or for any other surface where you may want to remove the sticker.
Adhesive vinyl also has a much larger selection than sticker paper. You can find glossy, matte and clear adhesive vinyl.
What kind of printer do you need for Cricut print and cut?
We recommend using an Inkjet Printer for all your print then cut projects with the Cricut Explore and Cricut Maker.
Cricut Print and Cut Size Limit
You can only use 8.5 x 11 inch sheets for the print and cut feature. However, you can only print within a 9.25 x 6.75 inch area. If you try to print an image larger than this, you will get an error message telling you to reduce the size.
You can cut multiple images on the same piece of paper, as long as they all fit within the 9.25 x 6.75 inch image area.
This post covered a lot of different techniques for using Cricut’s print and cut feature. Make sure to save this so you can refer to it as needed.
I would also love it if you share this post on your favorite social media. By doing this, you aren’t only helping others learn something cool, but you are also helping to support this blog. By doing this, I can continue to create free svg files and printables ready to be cut.