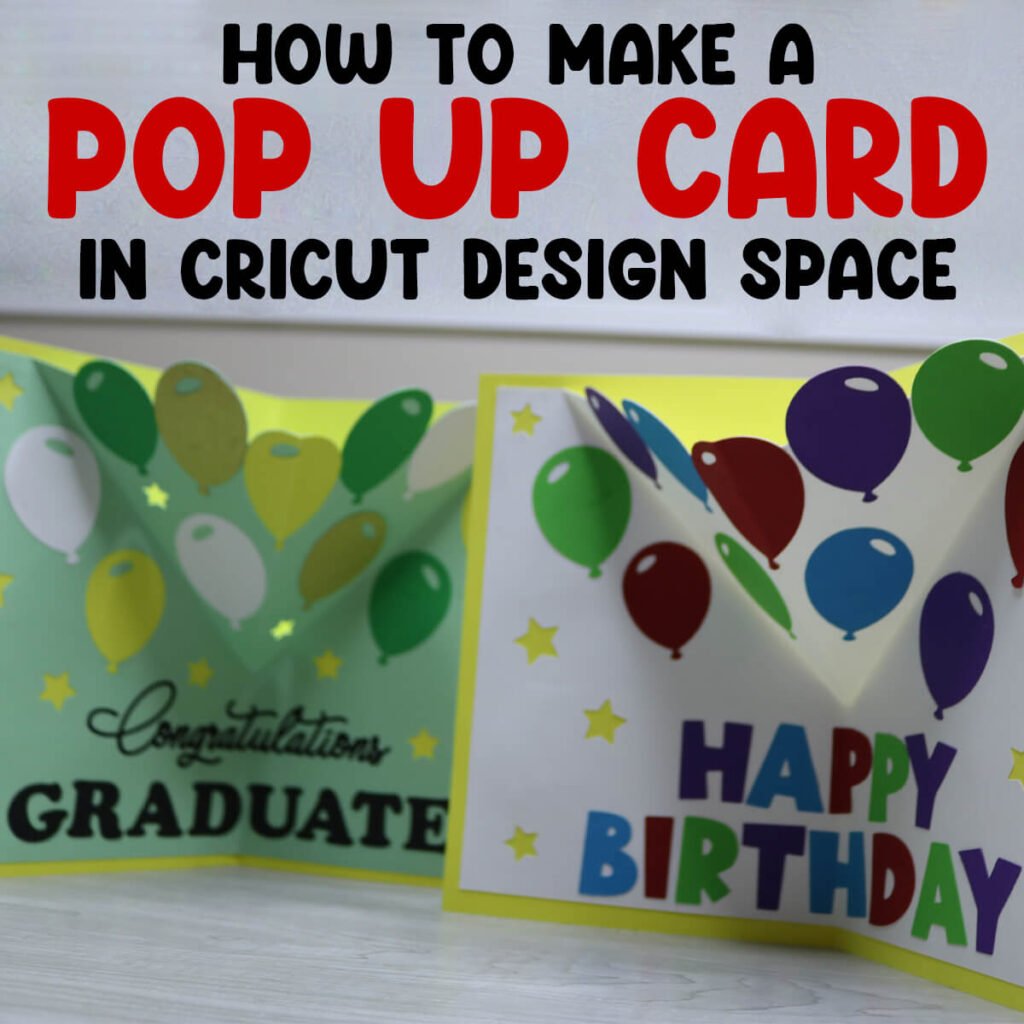
How to Create a Pop Up Card in Cricut Design Space
Follow along as I teach you how to design your own pop up card in Cricut Design Space.
I know you are used to coming to my site for the free svg files and tutorials that come with them. But today, you get to be the designer. And all you need to follow along with this pop up card tutorial is Cricut Design Space which is free. In today’s video, you’re going to learn how to:
- Use shapes, resize them and modify the colors
- Add multiple score lines to create a pop up effect
- Incorporate already created images and modify them
- Weld multiple shapes together to create a layered paper craft
- Subtract images for a cut out design
Once you learn these skills, you’ll be able to modify existing SVG files or create your own right in Cricut Design Space. If you want a handy guide to help you remember what all these tasks do, make sure to grab my free Cricut cheat sheets to reference whenever you need.
Like making cards with your Cricut? Check out these Card SVG Templates for card ideas for any holiday or occasion.
How to Make a Pop Up Card with Cricut Design Space
To Make this Pop Up Card, You Will Need:
- Cricut Design Space
- Medium Weight Cardstock. You can find all the colors you need in this variety pack.
- Scoring Stylus (which is what I will be using in this tutorial) or Scoring Wheel (Maker only).
- Cricut Pens – I have this pack so I always have the color I need on hand.
- Envelope Templates (free from my blog)
- A good paper craft glue – this Bearly Art craft glue is what I am using.
- Cricut cutting machine – Use this Cricut Comparison Guide to find the right model for you!
Click here to save this on Pinterest so you can easily find this tutorial when you need it… Plus by sharing with others, this helps to keep my SVG files and Cricut tutorials free!
Video Tutorial For Vinyl Record Valentine Card
Watch the step-by-step tutorial to follow along with me as I design this pop up balloon card in Cricut Design Space:

Cricut Design Space Instructions
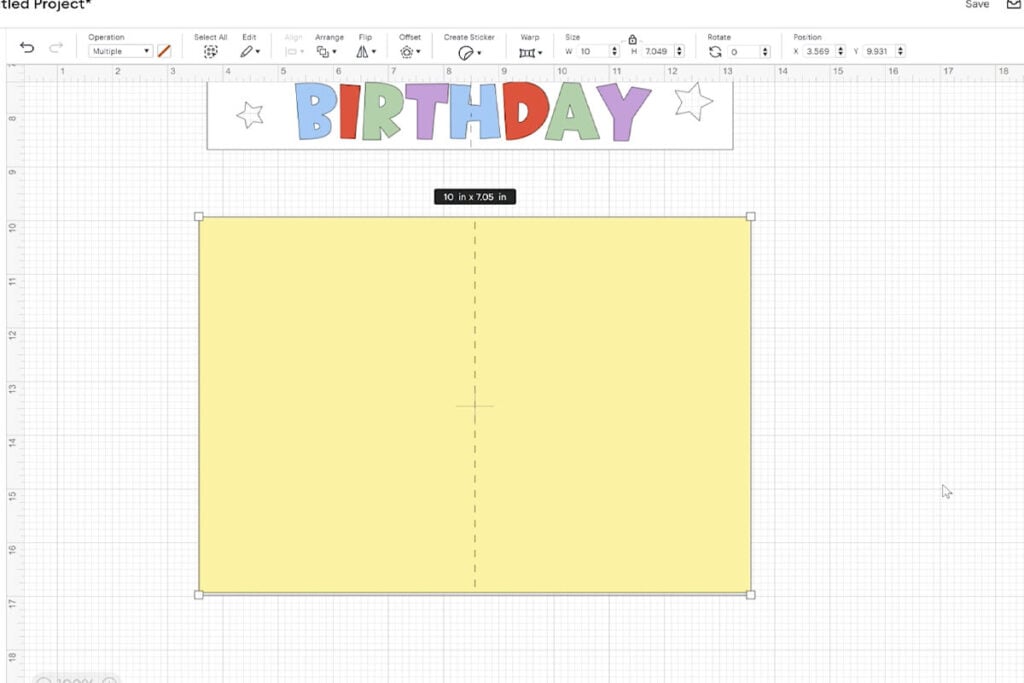
Step 1: Create a Rectangle in Cricut Design Space
Open up Cricut Design Space and create a new project using the Blank Canvas. From the shapes menu on the side, select the square. Then resize the square to 10×7, but make sure to turn off the proportions lock first. Using the colors panel, change the color of the rectangle to the color you want the base of your card. I am using yellow.

Step 2: Add a Negative Offset
Select the rectangle and using the offset tool, add an offset of -0.25, then select “Apply”. Change the color of the smaller rectangle, created from the offset to the inside of your card layer. I am using white.

Step 3: Add Score Lines to the Smaller Layer
Using the shapes menu, add a line to your canvas, then change the operation to “Score” if it isn’t already set to this. Resize this line so it is the height of the inner rectangle. Select the inner rectangle and the score together (hold down shift to do this) and then select “Align” and then “Center Horizontally”.
Duplicate the score line, hold down shift and rotate it to the right 45 degrees. Then shorten it so it aligns with the middle score line. Duplicate and flip the score line, and bring it to the other side. Then select the 3 score lines together and group them.

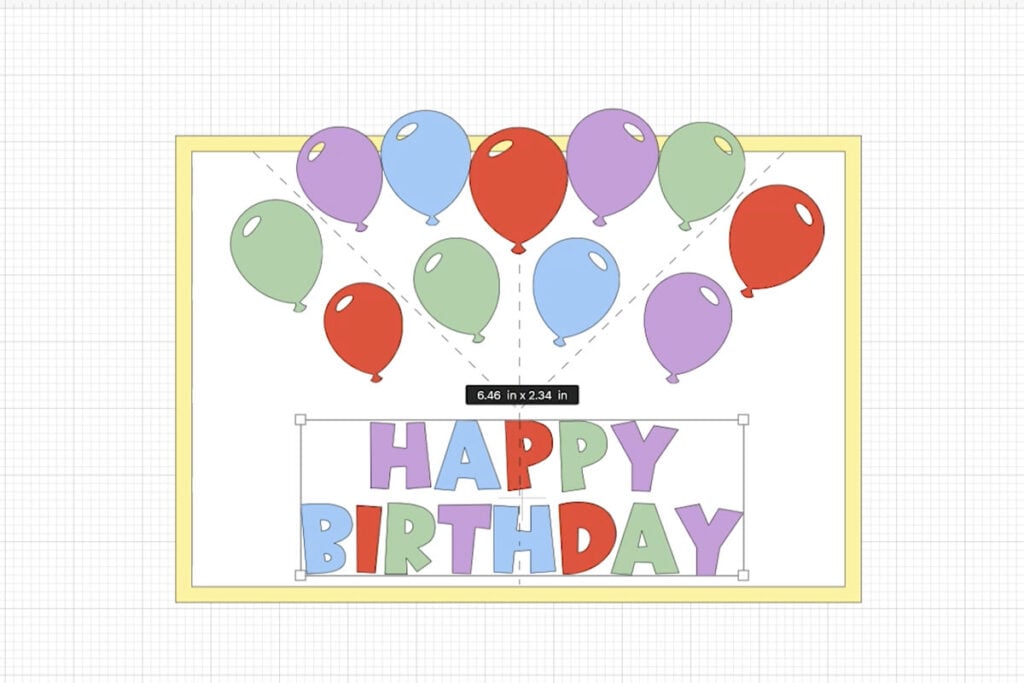
Step 4: Add Balloons Using Images
Select the “Images” icon and type “balloon” in the search field. You can also use the filter to filter by free images if you do not have Cricut Access. Then select the balloon you want to use to add it to your canvas.

Step 5: Modify the Balloon as Needed
If you need to modify the balloon, you can do this using the “Contour” feature. When you select contour, a window will open. Just select the layers that you don’t want and then click the “x” to close the window.

Step 6: Resize, Recolor and Fill in the Balloons
Duplicate the balloon for as many as you need and resize as needed. Place the balloons throughout the top portion of the card avoiding placing them on top of the score lines (except for the middle balloon). Change the colors for multiple colors of balloons.

Step 7: Add Your Text
Create the text for the card using the text feature. If some of the next algins with the middle of the card, use the score feature to help the letters fold easily. Make sure to attach the score line to the direct letter it sits on.
You can also use Cricut pens to write on the card if you prefer. I love using Cricut pens to write on cards. If you have never used this feature before, you can learn exactly how to write with pens using your Cricut in this detailed tutorial.
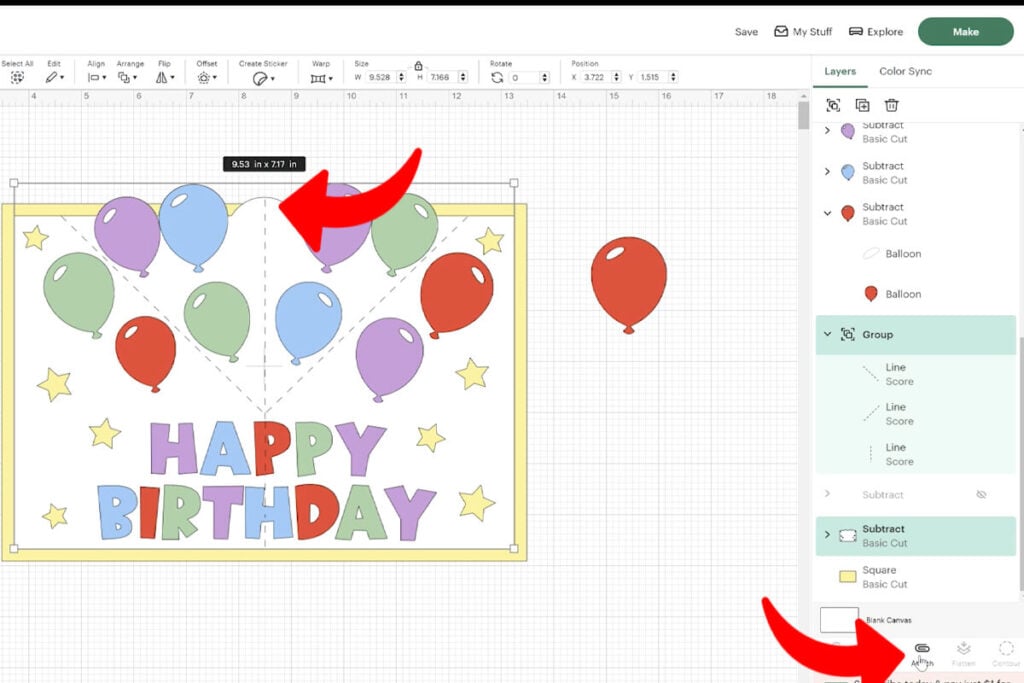
Step 8: Weld Balloons to the Inside Layer
Select all of the balloons together and then group them. Duplicate the group of balloons and place the duplicate layer in place on top of the other balloon layer. It should look like there is only 1 layer of balloons.
Then select select the top groups of balloons and weld them together. Do this by selecting “Combine” and then “Weld” with the group of balloons selected. Then select the welded group of balloons and select the inside card layer (mine is white) together and weld these together. The second group of balloons is still there, they are just behind the welded layer now.
Select the welded layer (mine is white) and use the “Contour” tool to remove the circles in the balloons so your final image should look like mine below.
Then send the white layer to the back and then send the yellow layer to the back so your designs are in the correct layer.

Step 9: Subtract Cut Out Designs
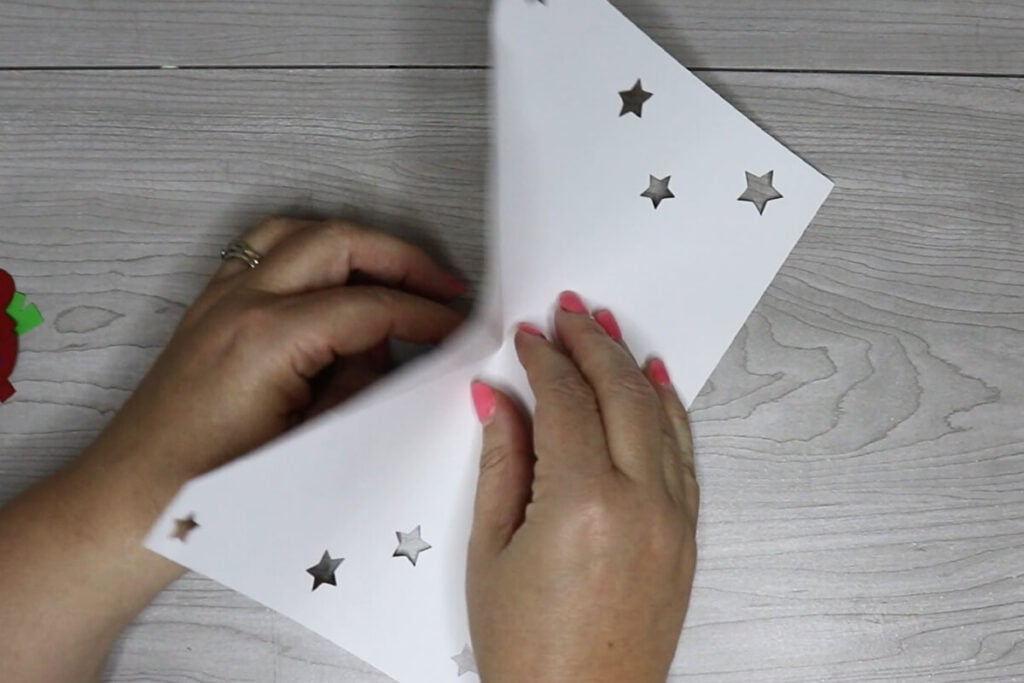
Using the shapes tool, select the star (or any other design that you want). Resize the star and place several stars of different sizes around your card. When the stars are in place, select all the stars together with the white layer. Then select “Combine” and “Subtract”. This will cut the stars out of the white layer.
Then send the white and yellow layers to the back again so the layers are in the correct order.

Step 10: Attach the Score Lines
Move the middle balloon aside. The select the middle score line and increase the size so the score line reaches the top of the balloon. Select the group of score lines and the white layer together and select “Attach”.
Then send the white and yellow layers to the back again so the layers are in the correct order. You can also add a score line on top of the middle balloon. If you add this line, make sure the score line is attached to the balloon.
Note: If you do not attach these correctly, your Cricut will not score in the correct place.
Step 11: Add a Score Line to the Card
Before cutting the card out, drag the back card layer to it’s own place on the canvas and add a score line to the center. Use the Align Center Horizontally tool to get this perfectly centered and then attach the card layer and score line together.
To see how I designed the front of the card, watch the full tutorial video here.
Step 12: Cut Everything Out
Select “Make It” to cut everything out. Make sure to add your scoring stylus or wheel if you are using these. Or, if you are using Cricut pens to write on your card, make sure to follow the prompts so you know when to add each tool.

How to Assemble the Pop Up Card
To assemble the card, start by folding on the score lines. The top middle score line will fold in and the rest will fold the opposite waqy.
Then glue each of the balloons in place and any text that needs glued down as well.

Next, glue the inside card layer to the outside layer. Make sure that you do not add glue to the top part in-between the score lines. This area should be free to fold in and pop out.
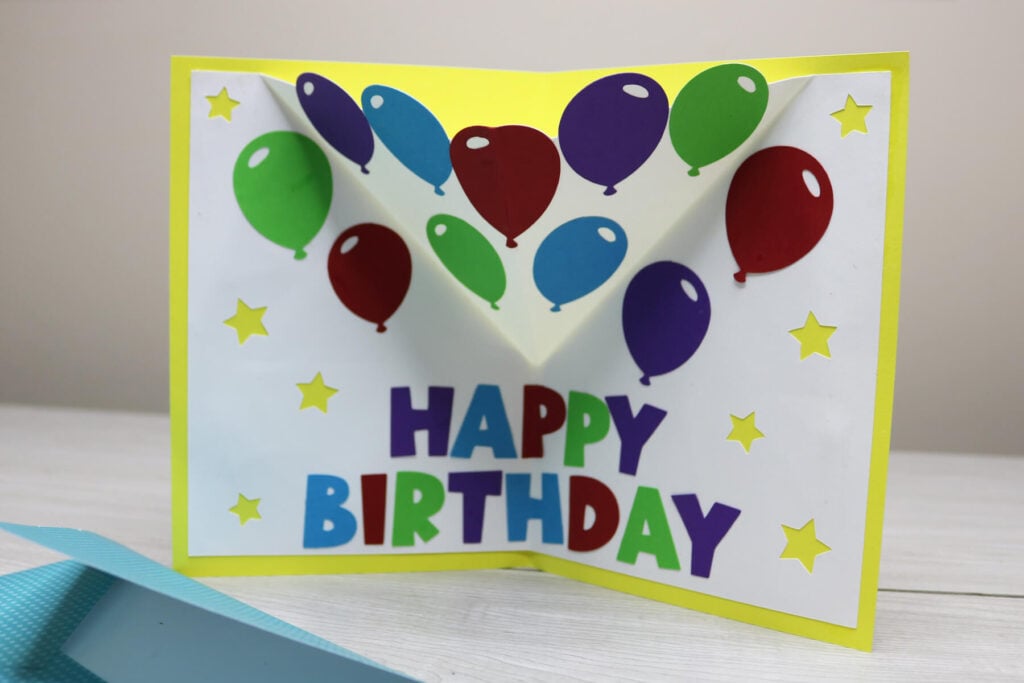
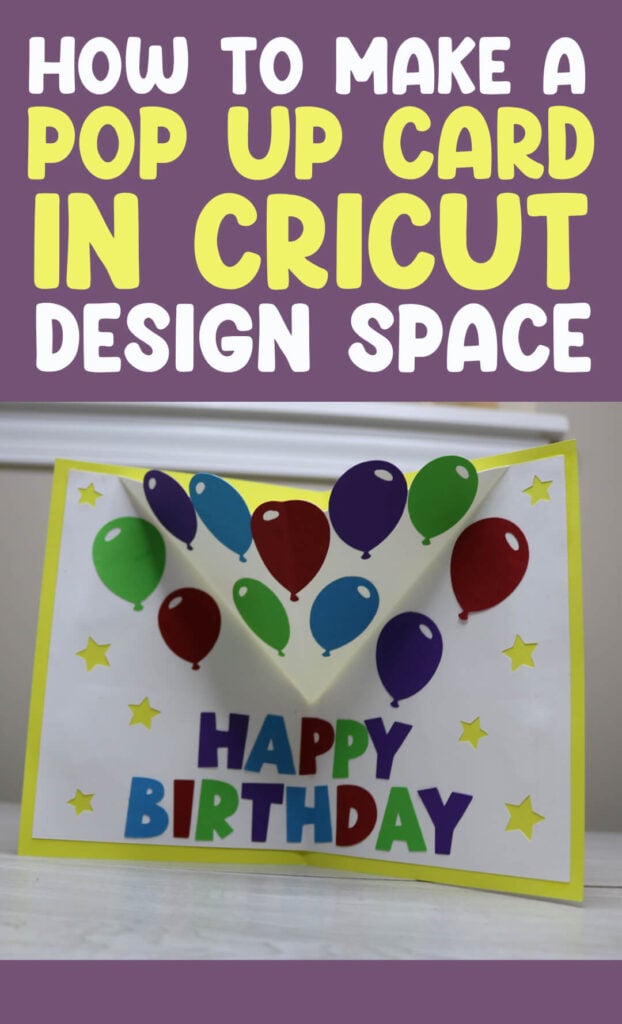
Add the decorations to the front of the card and it’s ready to go! Need an envelope? This card fits in a 5″x7″ envelope. If you don’t have this size on hand, grab one of my free envelope templates to make your own. Use scrapbook paper to creative a decorative envelope.

Use this same technique to make a graduation card or card for any occasion. I would love to see how your card turns out so make sure to post these in my crafting group here.