
Thanksgiving Card SVG
Grab these free Thanksgiving card SVG templates to make cards for your friends and family this Thanksgiving.
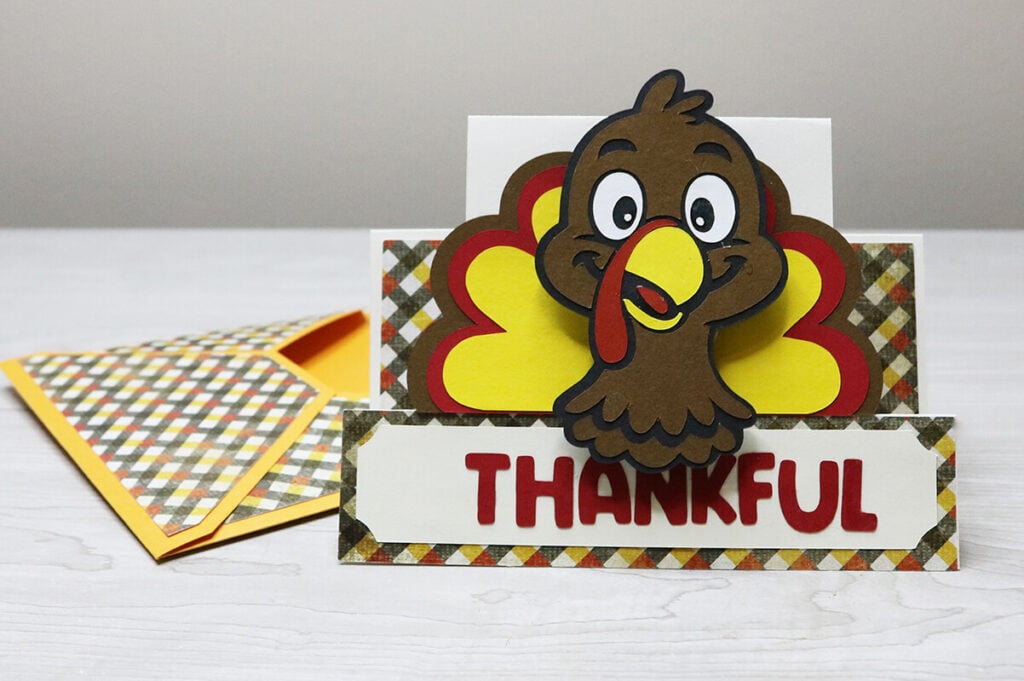
Looking for a cute way to show you’re thankful this year? Make these adorable Thanksgiving wobble cards. Choose from the turkey head or the pumpkin. Not only are these fun to make and give, but they make a great decoration as well. For an extra surprise, add an optional gift card holder to the card.

This post contains some affiliate links for your convenience (which means if you make a purchase after clicking a link I will earn a small commission but it won’t cost you a penny more)! Read my full disclosure policy.
Like making cards with your Cricut? Check out these Card SVG Templates for 65+ Free card templates.
Thanksgiving Card Tutorial
To Make these Wobble Thanksgiving Cards, You Will Need:
- Medium Weight Cardstock. You can find all the colors you need in this variety pack.
- Scoring Stylus (which is what I will be using in this tutorial) or Scoring Wheel (Maker only).
- Cricut Pens – I have this pack so I always have the color I need on hand.
- Self Adhesive Wobbles
- A good paper craft glue – this Bearly Art craft glue is what I am using.
- Cricut cutting machine – Use this Cricut Comparison Guide to find the right model for you!
Download the Thanksgiving Card SVG
You can download this free Thanksgiving card SVG from my members only free library (design #32 under Card Templates or search “Thanksgiving Wobble Card SVG”).
Don’t have a password? Unlock my free members library by entering your name and email in the form below or click here.
Click here to save this on Pinterest so you can easily find this tutorial when you need it… Plus by sharing with others, this helps to keep my SVG files and Cricut tutorials free!

Step 1: Upload the Thanksgiving Card SVG to Cricut Design Space
Upload the Thanksgiving card SVG to Cricut Design Space. If you need help with uploading SVG files, then check out my tutorial here. Make sure to check the size of your project and adjust if needed. Click on the image (while everything is grouped together) and the width should be 31.54″ and the height 13.78″.
After resizing your project (if needed), click on “ungroup” to ungroup your layers.

Step 2: Choose the Designs
You don’t need to cut everything out in the file. Decide which gift card holder you want and delete the other. If you don’t want a gift card holder, then delete both.
Next, delete either the turkey or pumpkin because you’ll only need one of these for each card. If you want to make both, then make sure to duplicate the other layers so you have additional card pieces.
Choose either “Thankful” or “Happy Thanksgiving” and delete the phrase that you don’t want to use. You can also delete both and create your own text.
If you don’t want to make an envelope, then delete the envelope layers and the purple triangle pieces that go with it.

Step 3: Add and Attach Score Lines
The base of the card has a few score lines that you need to modify. Click on the arrow to open the layers in this group. Then click on the group of lines and change the operation from “Basic Cut” to Score.

Then, select the full group with the lines and card layer selected together and select “Attach”. If you do not attach this correctly then your Cricut will not score in the correct place.

Step 4: Adjust Pen Layers
If you want to write on the gift card holder with Cricut pens, then click on the text layer for this group and change the operation from “Basic Cut” to “Pen”. You will also need to change the line on the gift card holder to score, just as we did before. Then select the gift card holder layer, pen layer and score lines together and select “Attach”.
If you want to use the envelope, make sure to change the black rectangle on top to score lines and attach them to the envelope just as we have already done.

Step 5: Cut Everything Out
Once all your modifications are made, select “Make It” to cut everything out. If you are using a scoring tool or pens, make sure to follow the prompts in Cricut Design Space so that you know when to add those.
Step 6: Attach Decorative Elements to the Card
Lay the card flat. The cut lines will go down further on one side, this side is the front so lay this side in front of you. Glue down the decorative paper across the bottom. The top of this should line up with the top of the cut lines, if it doesn’t then flip your paper around.
Then glue the banner on top with the phrase “Thankful or Happy Thanksgiving”. Glue the other decorate pieces in-between the top score line and the score line below it. These pieces should fit perfectly in this space with a small border of the card showing around it.
For the turkey Thanksgiving card, glue the layered turkey feathers down, lining up with the decorative scrapbook paper. Do not add glue to the sides of the turkey feathers where they pass the cut lines.

Step 7: Fold on Score Lines
Fold the card on all of the score lines, almost alternating which way each score line goes (see image below). When the card is folded, it will easily lay down flat when you press it and stand up on it’s own.

Step 8: Attach the Wobble
Glue together the layered turkey or pumpkin design. Then add a self-adhesive wobble to the back. Attach the wobble to the front of your card.

Step 9: Add an Optional Gift Card Holder
If you want to add a gift card to this Thanksgiving card, then glue the gift card holder to the inside of the card. Just fold the 3 flaps in, add glue to them and then attach it to the card.

Step 10: Assemble the Envelope
The envelope is super easy to assemble. Just fold on all 4 of the score lines. Then glue the decorative paper in the center of each of the flaps, leaving a border around it. Attach the envelope by folding the 2 sides in and then gluing the bottom piece on top.
Thanks so much for checking out this Thanksgiving card tutorial. When you’re done making your cards, make sure to post these in my crafting group here or tag me if you post them on social media. I absolutely love seeing your crafts and can’t wait to see how these turn out!
Video Tutorial For Thanksgiving Card
Watch the step-by-step tutorial to learn how to make these wobble Thanksgiving cards here:
