
5 Stand Up Cricut Christmas Card Ideas – Free SVG Templates


Materials for Christmas Cards
This post contains some affiliate links for your convenience (which means if you make a purchase after clicking a link I will earn a small commission but it won’t cost you a penny more)! Read my full disclosure policy.
Making a Christmas card with your Cricut is really easy to do! To make these Cricut Christmas cards, you will need:
- Cardstock in a variety of colors. If you don’t already have these colors on hand, this variety pack has all the colors you will need for making these Christmas cards.
- Cricut Maker or Explore Cutting Machine and your standard cutting mat.
- Scoring Stylus (which is what I will be using in this tutorial) or Scoring Wheel (Maker only). If your cutting machine doesn’t have the scoring feature, this scoring board and stylus is great to use.
- Glue – I highly recommend this Bearly Art Craft Glue. It’s great for paper crafts and doesn’t leave a wet, wrinkled appearance behind like a lot of other glues do.
- Cricut Pens – I am using this Cricut Marker in this tutorial
- 5×7 Envelopes or make your own (tutorial in post)
- Christmas Card SVG – Download at the bottom of the post
Christmas Card Step-by-Step Cricut Tutorial
Watch the full step-by-step video tutorial on how to make these Christmas cards with your Cricut here:

Before cutting your cards, you will need to make some modifications in Cricut Design Space. The modifications are the same for all 5 Christmas Card SVG designs. Once you upload the Christmas Card to Cricut Design Space, start by ungrouping all of your layers.
Select the layer with the black frame and then select the 2 lines that are grouped together. Change the operation from “cut” to “score”. Then, attach the score lines to your black frame layer.

You will also need to change “Merry Christmas” from “cut” to “pen” in the operations menu. Then attach your pen layer to the card. You can also delete this layer and add your own custom message with your Cricut pens.

Assembling Christmas Cards
Once you make the changes in Cricut Design Space, go ahead and cut out all of your pieces and assemble your Cricut Christmas Cards!

Santa Christmas Card
To assemble this Santa Christmas card, start with assembling Santa. To assemble Santa, you will layer the skin tone piece over the black piece. Then attach the additional red clothing items and then white pieces.

Next, fold on both score lines on your black frame and glue the black frame to the base of your card. Glue the decorative frame on top. And then glue Santa to the bottom half the Santa cut out on your card. You will easily be able to move Santa up to stand in the cut-out slots provided.
Elf Christmas Card
This Elf is the perfect handmade Christmas card design! To assemble this Elf Christmas card, start with assembling the elf. Layer the skin color on top of the hair color layer (brown) and then the red on top of the skin color layer. Then attach the additional green and gold pieces.

Next, fold on both score lines on your black frame and glue the black frame to the base of your card. Glue the decorative frame on top. And then glue the elf to the bottom half the elf cut out on your card. You will easily be able to move the Elf up to stand in the cut-out slots provided.
Snowman Christmas Card
If you are looking for an easy DIY Christmas Card idea, this snowman is your choice! This is the simplest of all 5 of these Christmas Card SVG designs to assemble.
To assemble this Snowman Christmas card, start with assembling the snowman. Layer the white snowman on top of the black layer. Then attach the red scarf, ribbon and carrot nose.

Next, fold on both score lines on your black frame and glue the black frame to the base of your card. Glue the decorative frame on top. And then glue your snowman to the bottom half the snowman cut out on your card. You will easily be able to move the Snowman up to stand in the cut-out slots provided.
Reindeer Christmas Card
This reindeer design is another Cricut Christmas card that you will love! To assemble this Reindeer Christmas card, start with assembling the reindeer. Layer the lightest brown on top of the darkest brown layer and then layer the middle brown on top of the lighter brown. Then attach the red nose and accent in the eye.

Next, fold on both score lines on your black frame and glue the black frame to the base of your card. Glue the decorative frame on top. And then glue your reindeer to the bottom half the reindeer cut out on your card. You will easily be able to move the reindeer up to stand in the cut-out slots provided.
Polar Bear Christmas Card
If you are looking for a cute handmade Christmas card idea, this polar bear card is the one! It doesn’t get much cuter than this polar bear sipping on hot chocolate!
To assemble this polar bear Christmas card, start with assembling the polar bear. Layer the pink on top of the black layer and then the white on top of the pink layer. Then attach the scarf, hat and hot chocolate.
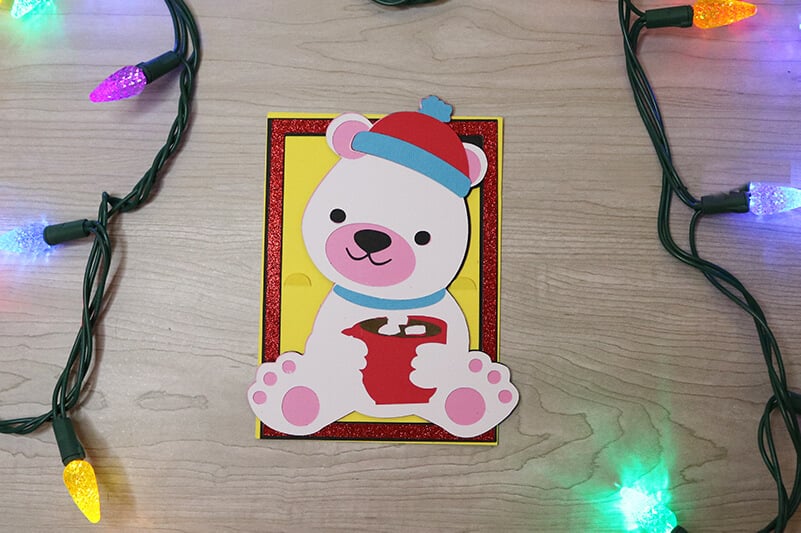
Next, fold on both score lines on your black frame and glue the black frame to the base of your card. Glue the decorative frame on top. And then glue your polar bear to the bottom half the polar bear cut out on your card. You will easily be able to move Santa up to stand in the cut-out slots provided.
How to Make Envelopes for your Christmas Cards!
These Cricut Christmas Cards fit perfectly in a 5×7 envelope. You can find different color envelopes in this size here. Or make your own with these envelope SVG templates. Envelopes are super simple to make. And you can customize them with fun pattern paper or add liners to dress them up!

Before downloading these Cricut Christmas Cards, please share this design on Pinterest – it’s quick to do and makes a HUGE impact to keep SVG Nation’s designs free to you.

To get these Christmas Card SVG Files, enter your name and email into the form below and then click the “Get It Now!” button!
Please remember these are for personal use only. If you’re looking to sell products using these designs, please purchase a Commercial Use License here.