
DIY Photo Cards with Your Cricut or Printable PDF

f you’re looking for cute, meaningful, and customizable DIY photo cards, you’re in the right place. This easy project lets you turn your favorite photos into a keepsake card using either the SVG file with your Cricut/Silhouette or the printable PDF if you don’t have a cutting machine.

This post contains some affiliate links for your convenience. (Which means if you make a purchase after clicking a link I will earn a small commission but it won’t cost you a penny more)! Read my full disclosure policy.
Love making handmade cards? Find more card designs like these DIY photo cards with 65+ card SVG templates for more holidays and occasions. Or search all of my free SVG files for more Cricut crafts ideas.
Learn how to make DIY Photo Cards
This photo card is the perfect handmade gift for Mother’s Day, birthdays, anniversaries, graduations, or “just because.” And the best part? It’s quick and easy to make.
This tutorial walks you through using your Cricut to write on this photo card (front and back) and how to assemble everything. If you are using the PDF or your cutting machine doesn’t have a writing feature, just write on the card yourself.
Watch the step-by-step tutorial to learn how to make these DIY photo Cards with your Cricut:

To Make these DIY Photo Cards, You Will Need:
- Medium Weight Cardstock. You can find all the colors you need in this variety pack.
- Scoring Stylus (which is what I will be using in this tutorial) or Scoring Wheel (Maker only).
- Cricut Pens – In this tutorial, I am using my Metallic Marker set, I also have this pack so I always have the color I need on hand.
- Sticker Paper (optional, you can also glue the pictures on)
- A good paper craft glue – this Bearly Art craft glue is what I usually use.
- Brayer Tool for smoothing out the glue
- Cricut cutting machine – Use this Cricut Comparison Guide to find the right model for you!
Download The DIY Photo Card Templates
You can download these free DIY Photo Card Templates from my members only free library (design #39 under Card Templates or search “Photo Card Templates”).
Don’t have a password? Unlock my free members library here.
Share the love and easily come back to this tutorial anytime just by saving this on Pinterest… Plus this helps to keep my SVG files and Cricut tutorials free!

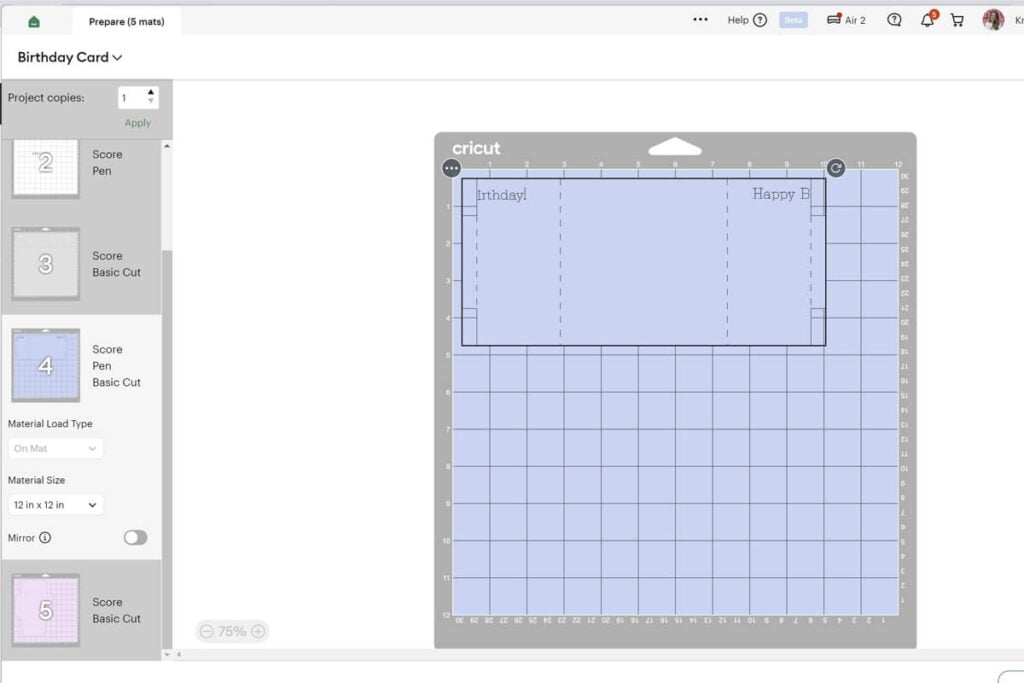
Step 1: Upload the SVG File to Cricut Design Space
Upload the photo card SVG to Cricut Design Space. If you need help with uploading SVG files, then check out my tutorial here. Then click on “ungroup” to ungroup your layers.
Step 2: Add and Attach Score Lines
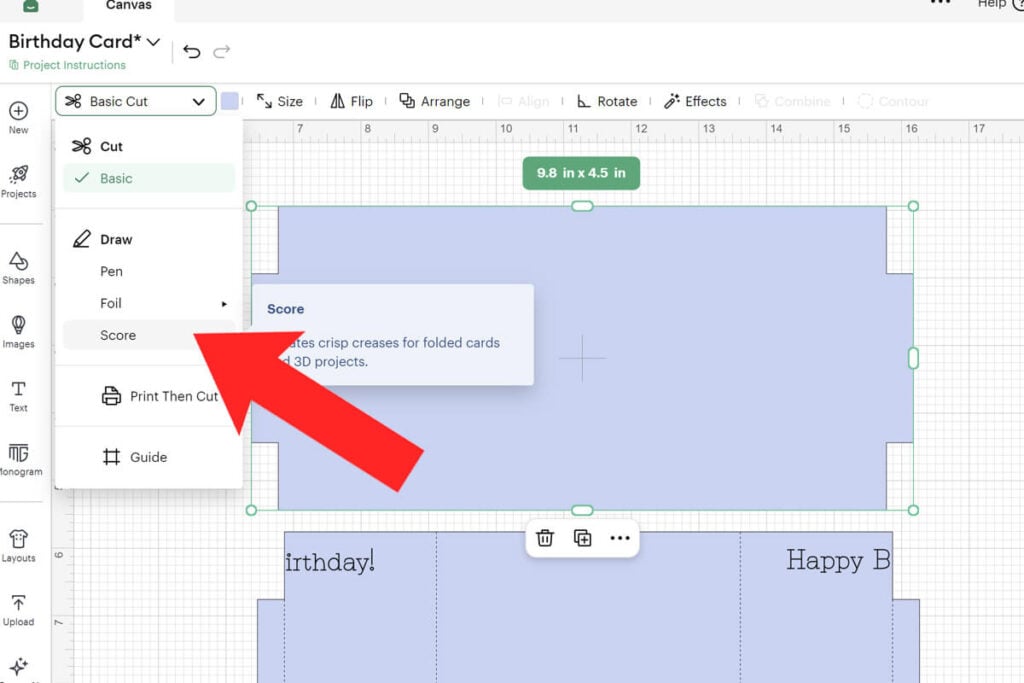
This photo card has a few score lines that you need to modify. Click on the arrow to open the layers in the blue card group. Then click on the group of lines and change the operation from “Basic Cut” to Score.
Note: If you are not using a scoring tool with your cutting machine, make sure that you delete these lines instead and you can fold everything by hand.
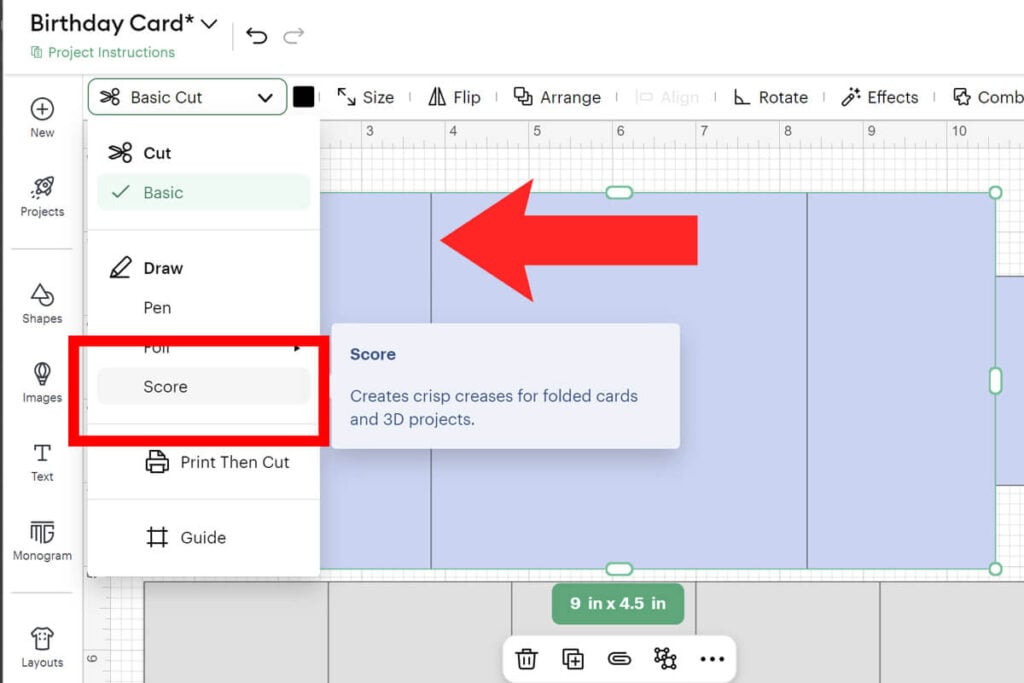
Then select the card layer and all score lines together and select “Attach”. If you skip this step, your Cricut will not score in the correct place. It knows what to score based on the layer that you attach the score lines to.
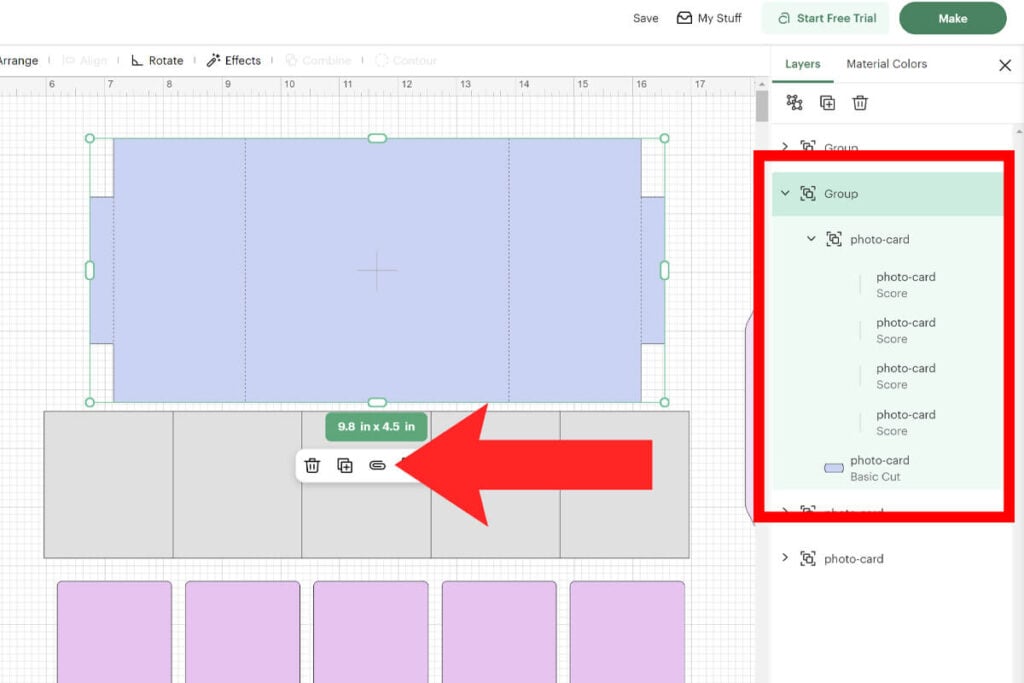
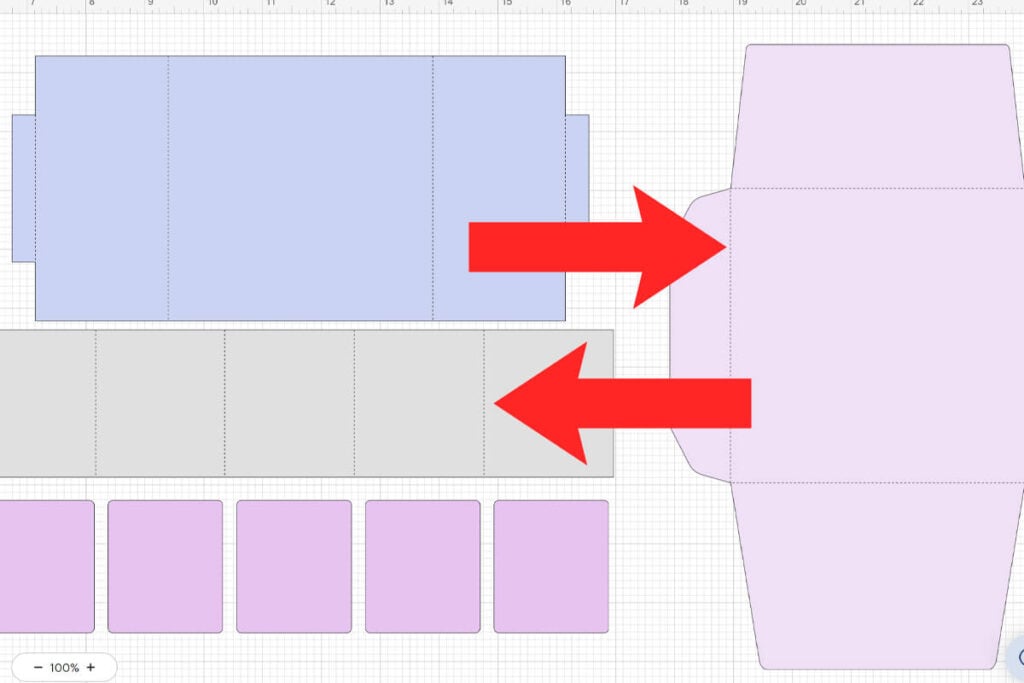
Repeat these steps for the film strip layer and envelope layer as well. Or you can delete the envelope if you don’t need this.
Step 3: Writing on the Card
If you plan to write on the photo card by hand, you can skip this step. To use your Cricut to write on your card, start off by adding your text (you can find fun sayings for your card further down in this post).
Use the text tool to create your text. Then click on the font window to open the font menu. Filter your fonts by writing fonts and also free if you want to use a free font. Then find the font that you want to use. I am using the free Typewriter font.
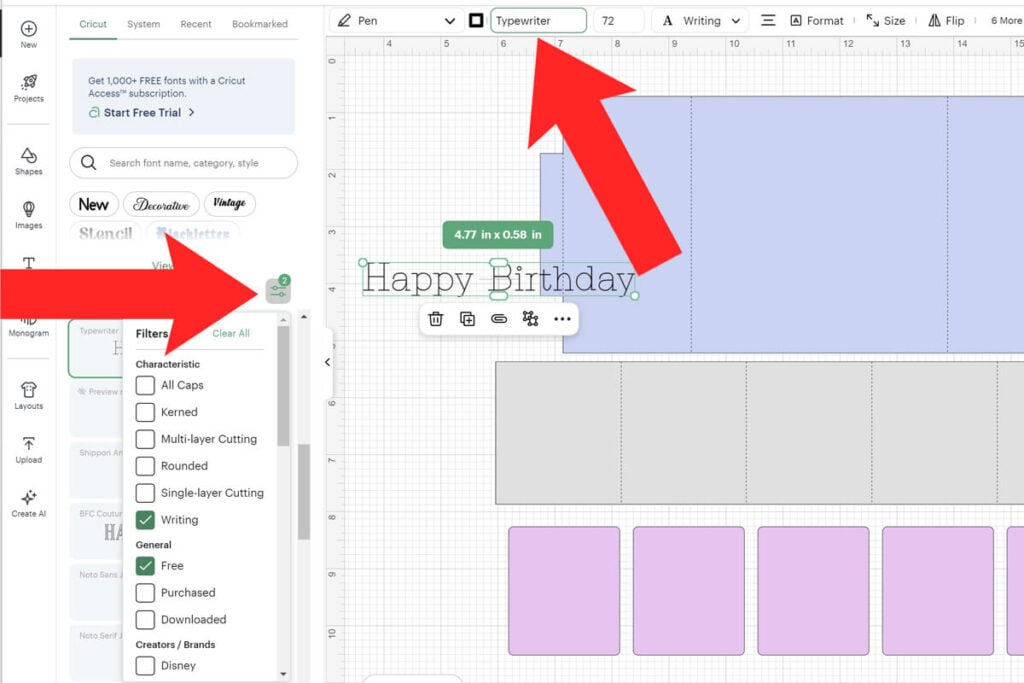
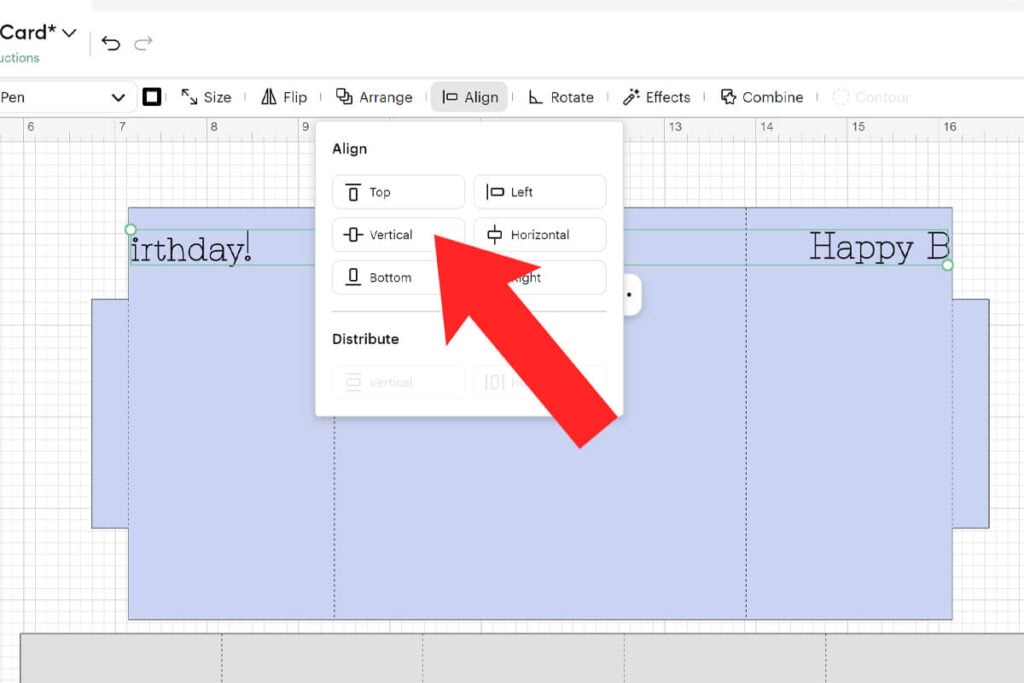
Since I will be writing Happy Birthday on the front of the card, I’ve created 2 different texts for my font and separated them. This way when the card folds together, the text will read just as it should. To make sure the text is aligned, open the align menu and align these vertical. Then attach the text to the card layer.
Note: Make sure all of your text is above or below the 2 side rectangles. That middle area for the front and back of the card will be covered by the photo strip.
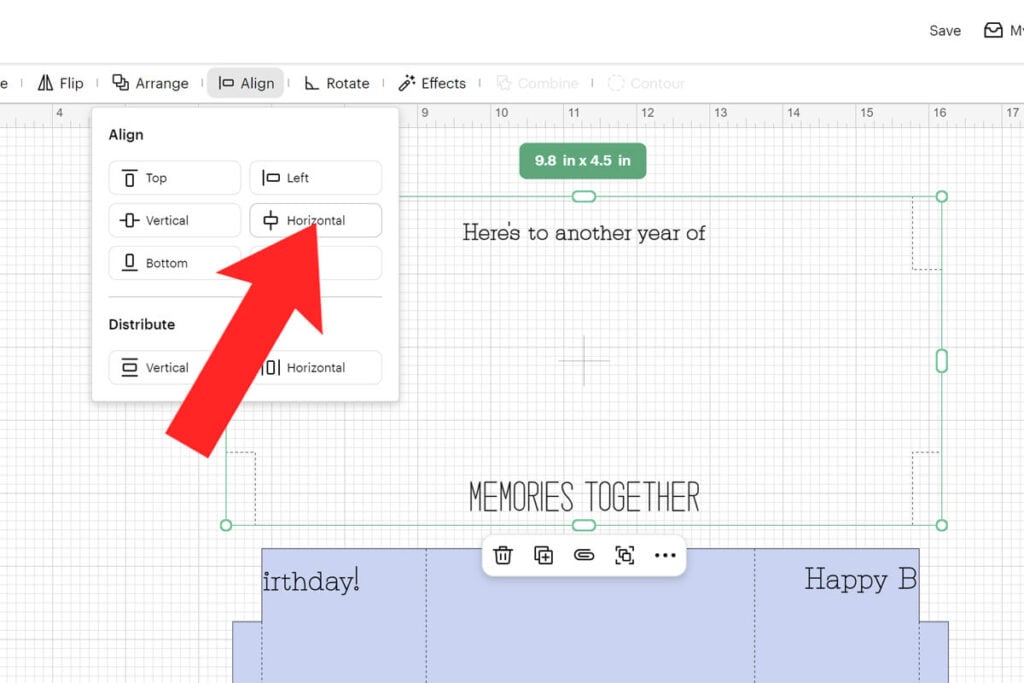
To also write on the inside of the card, duplicate the card layer. Then remove the score lines and any text that you added to it so that you are left with just the base of the card. Then select this and change the operation to “Score”.
Add your text and choose a writing font. Make sure the text doesn’t go through the middle of the card as this is where the photo strip will go. Select the card and text layer(s) together, select Algin and center it all horizontally.
Then select the card layer and text together and select “Attach” to attach these together.
Step 4: Add the Photos
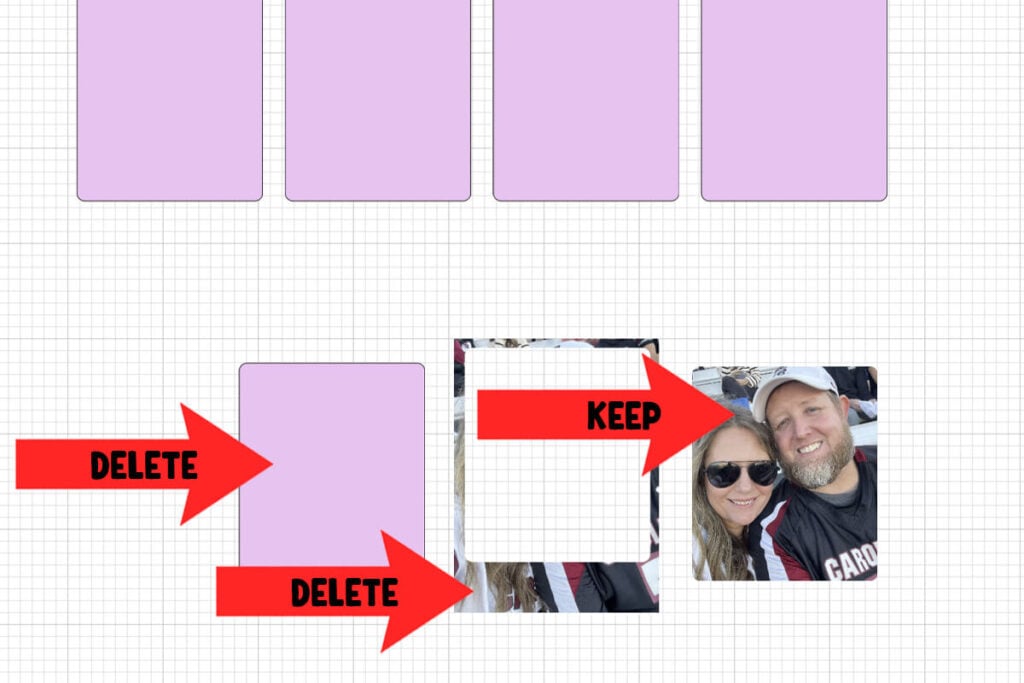
Upload a photo that you want to use in the card and resize it so it’s around the same size as the pink templates. Bring the template in front of the photo by using the “Arrange” option or dragging the layer above it. Then select the pink template and photo together (hold down shift while selecting them) and select “Slice.”
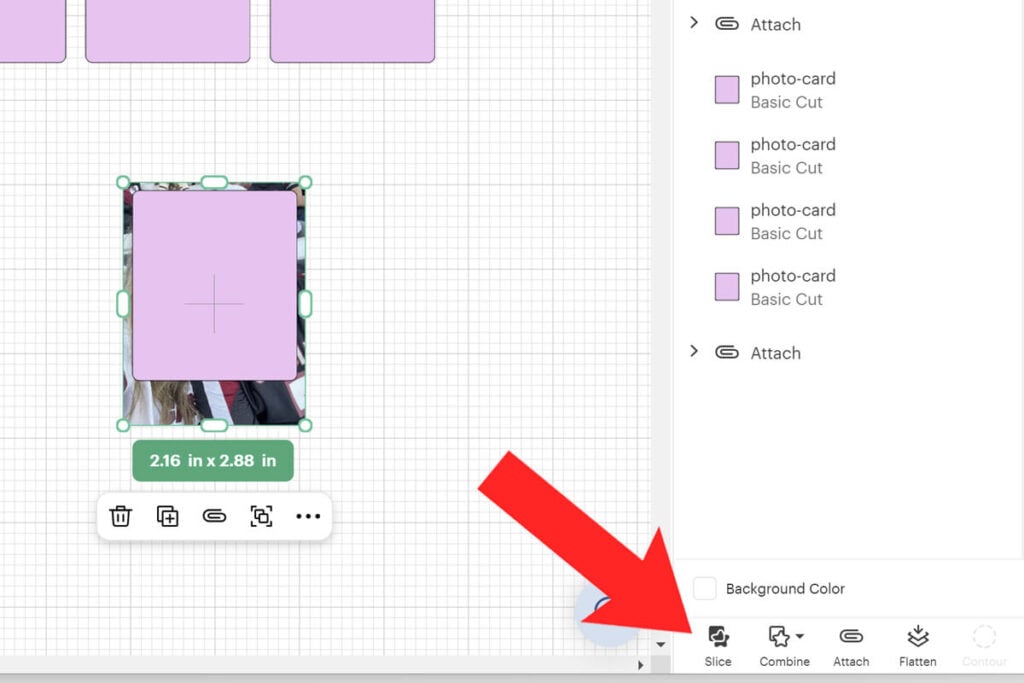
When you separate the pieces after slicing them, you will be left with 3 pieces. Delete the 2 extra pieces and keep the photo piece. Repeat this for the other 4 photos. You will use the print then cut feature when cutting the photos out. You can either use white printable cardstock or sticker paper. I am using this sticker paper so that I can easily stick them to the photo film strip without having to glue them.
Tip: This is how you make different shapes of photo magnets!
Step 5: Cut Everything Out
Select “Make” to begin the process of cutting everything out.
First, use the print then cut feature to cut the photos out. Select the option in Cricut Design Space to send this page to your printer. Then place the printed sheet on your Cricut mat, select the material that you are using and place this in your Cricut so that it can cut the photos out. Here’s a step-by-step tutorial on how to print then cut with your Cricut if you need more help.
Next, we’re going to jump around a bit with cutting everything out. Select the mat with the front of the card layer. This will be the design with the score lines attached. Cut this mat out making sure to follow the prompts in Cricut Design Space for when to add your scoring tool and pens.
When this is done, only remove the card layer from the cutting mat. Leave the extra paper on the mat. Flip the card over, placing it exactly where it was before, only it’s been flipped, making sure to keep the top the top. Then remove the extra paper around it.

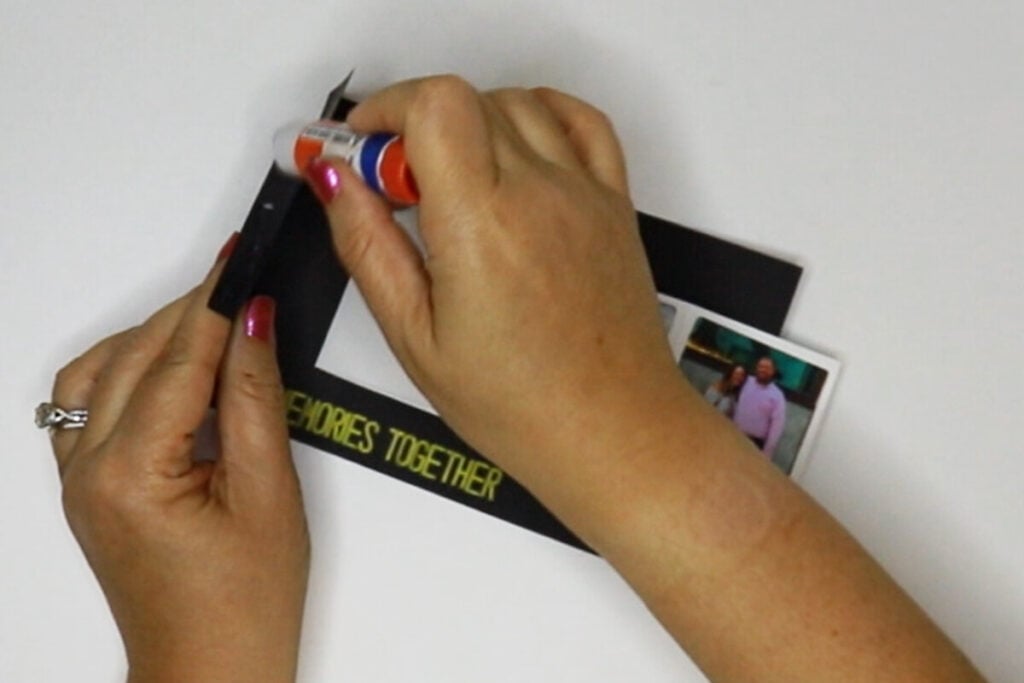
Select the mat with the front of the card layer that has the score lines and text. Leave the scoring tool out when you send this to your Cricut because it doesn’t need to score around it. Then add your pen and let your Cricut write on the front of the card.
Cut all the rest of the pieces out, making sure to add your scoring tool as needed.
Step 6: Assemble the Photo Card
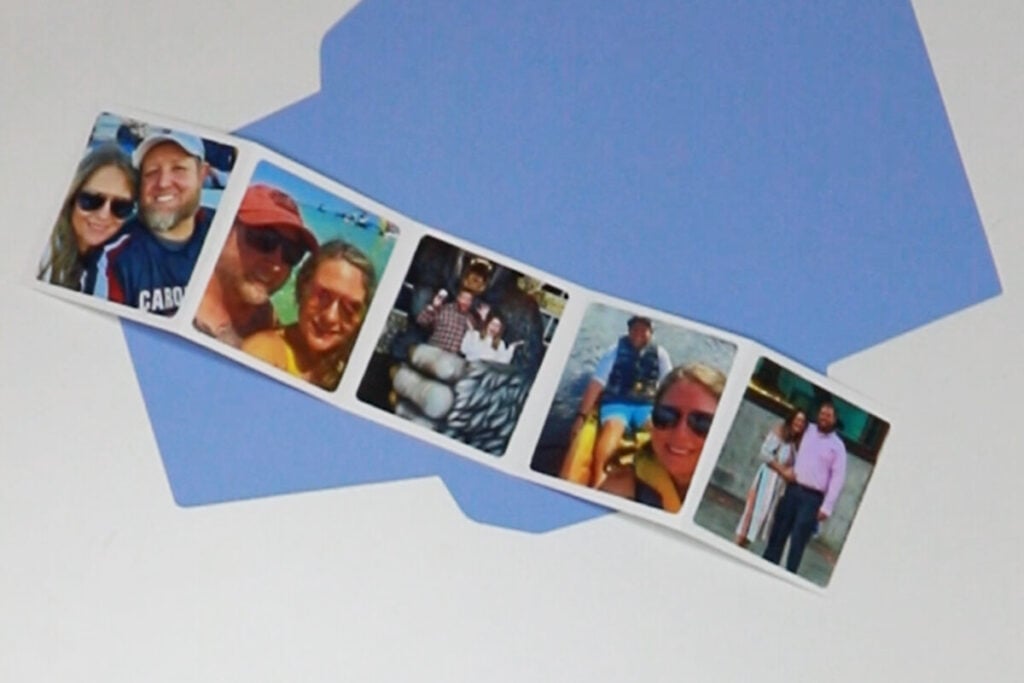
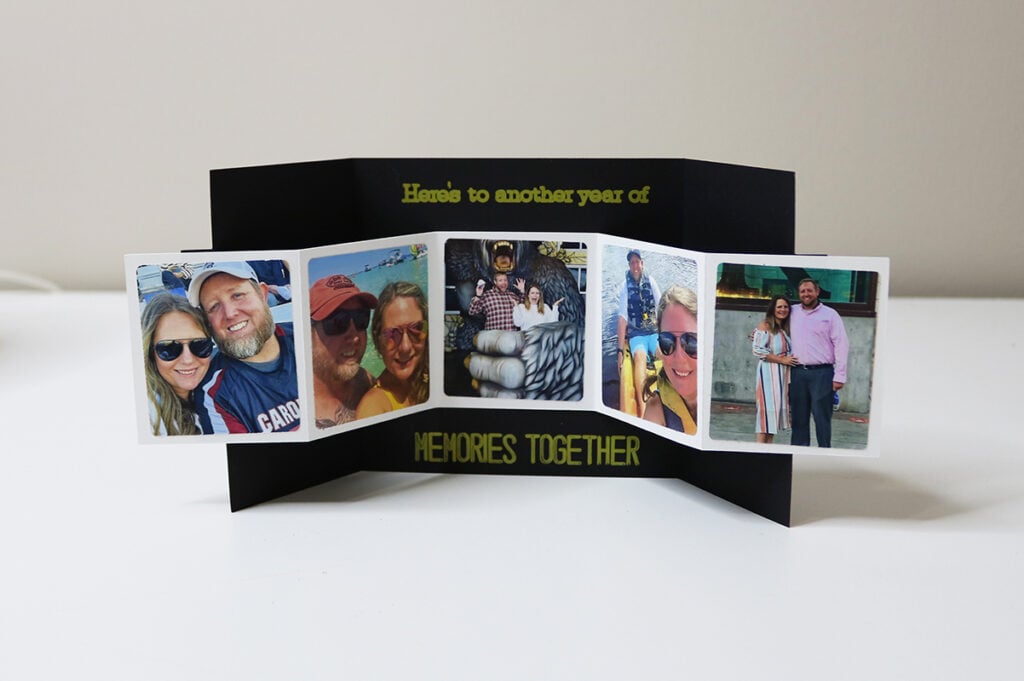
To assemble the DIY photo cards, start by folding the photo strip. Starting in the middle, fold the left side in to cover the middle and then fold the end side the opposite direction. Fold the other side this way, so when it lays out, there is a bend causing the photo strip to fold up on the ends. Then attach the photos to the photo strip.
Lay the card base out flat and fold the sides in so they close over the text. Fold the end tab sides the opposite direction. Then lay the card out flat so that the inside of the card is facing up. Attach the photo strip by gluing ONLY the middle photo to the middle of the inside of the card.
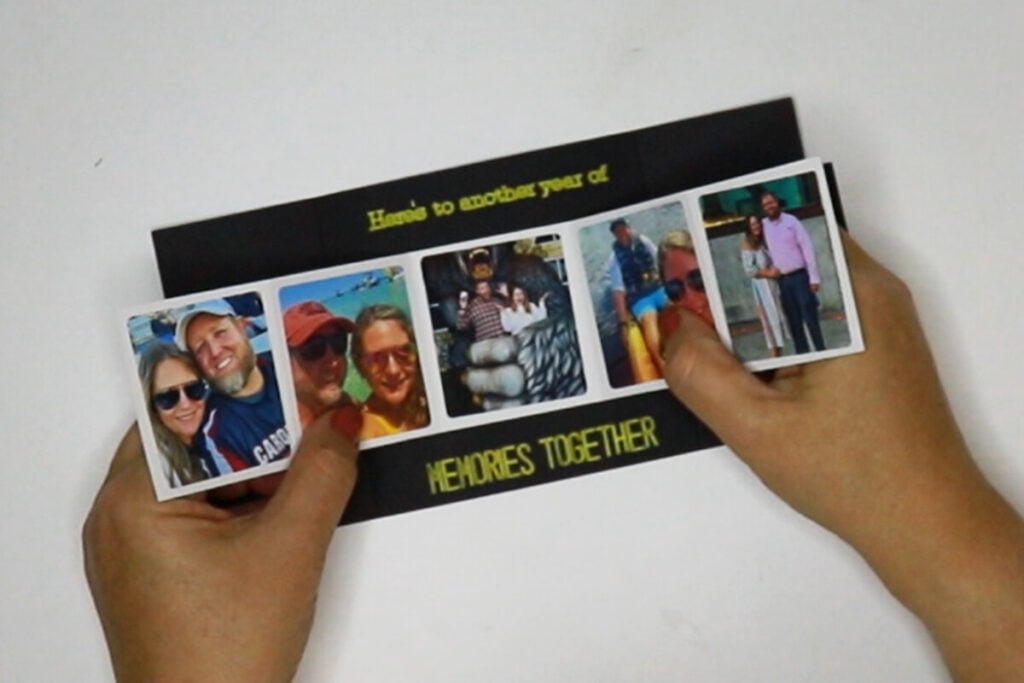
Then fold the left photos over so they fold on top of the middle photo like an accordion. Fold the card flap over and apply glue to the tab flap. Fold this flat over to glue the small flat on top of the photo. Repeat this for the other side.
With the photos attached to the side pieces, you should be able to open the card up to see the beautiful card display. When you close the card, the photos will fold so that only one photo remains on top.
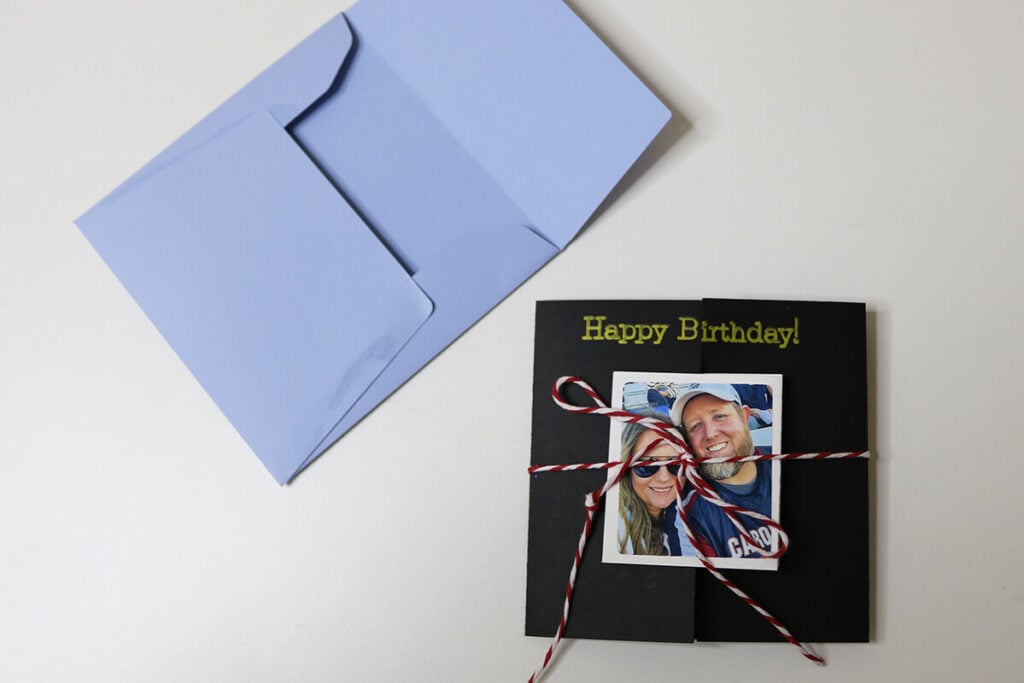
Step 7: Make the Envelope
To assemble the envelope, start by folding in on all 4 of the score lines. Then fold the 2 side pieces in and glue the larger flap on top of this.
If you want the photo card to stay fully closed, tie a small string or ribbon around it before putting it in the envelope for them to open.
Fun Sayings to Put on Photo Cards
If you are looking for ideas on what to write on your card, here are some favorites that fit for multiple occasions:
- Love you more than all these photos
- Best mom. Best memories.
- You make life picture‑perfect
- Forever my favorite person
- Thanks for every little moment
- Capturing our chaos
- You’re the magic in every memory
- You make ordinary moments sparkle
- You’re my favorite snapshot
- Every memory is sweeter with you in it
- Grateful for every moment we’ve been through together
- Your love is the story I’ll never stop telling
- Thank you for giving me a beautiful life
- Making memories today
- Proof you’re aging like fine wine
- Celebrating you in every frame
- Life with you is picture‑perfect
- Another year of fabulous chaos
- Here’s to another year of memories together
- Our love, our story
- Always my favorite person
- Every year with you is my best one
- Loving you is my favorite adventure
- Thank you for every moment we’ve built
- You make this life beautiful
- A tiny strip of sunshine
- You make ordinary days special
- Just a reminder you’re loved
Whether you’re crafting with your Cricut or printing the PDF at home, this DIY photo strip card is a sweet, simple way to turn your favorite memories into a keepsake. It’s personal, customizable, and guaranteed to make someone smile.