
Poinsettia Paper Flowers
Use this Free Poinsettia SVG with your Cricut or Silhouette cutting machine. These DIY paper poinsettia flowers are perfect for adding Christmas decorations. Add them to gifts, cards or even use felt to create your own poinsettia bouquet.

Supplies Needed to make Poinsettia Paper Flowers
- Red and Green Cardstock Paper – This is a great variety pack of cardstock that cuts well. Or you can use Red and Green Felt Sheets.
- Stick on Rhinestones like these or Yellow Cardstock Paper
- Craft Glue
- Cricut Maker or Explore Air Cutting Machine (or any other cutting machine) and this machine mat for cutting.
- Scoring Stylus (which is what I will be using in this tutorial) or Scoring Wheel (Maker only)
- Free Poinsettia SVG (download below)
How to Make Poinsettia Flowers
Step 1 – Upload your Poinsettia SVG to Cricut Design Space
Upload the free Poinsettia SVG to Cricut Design Space. If needed, this tutorial will show you how to upload files to Cricut Design Space. Before editing the design, you will need to ungroup the layers. To do this, click on the top layer (which will select all layers) and then select “ungroup”.

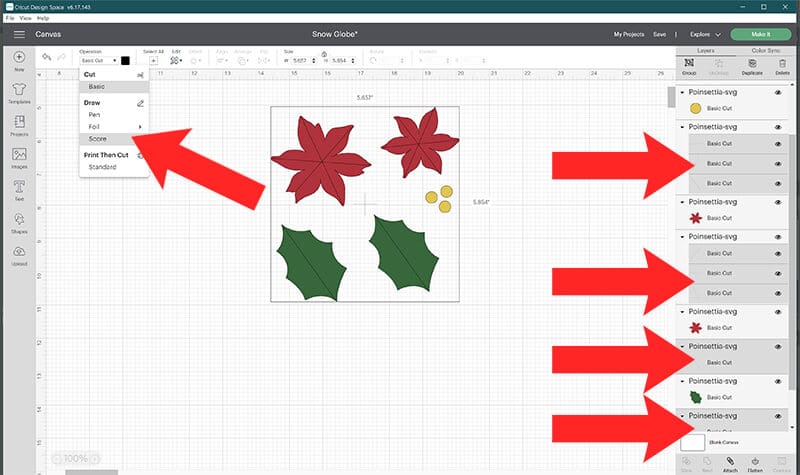
Step 2 – Resize Your Flower Pieces and Add Score Lines
Resize the poinsettia flower pieces as needed and then change your lines to score lines. To do this, select your score layers (right now they say Basic Cut). You can select these together by holding down shift. Then go to the drop-down menu and select “Score”.
Step 3 – Attach Your Score Lines
Next, attach each score line to the correct place by selecting both layers and then “attach”. Do this for both flowers pieces and both leaf pieces.
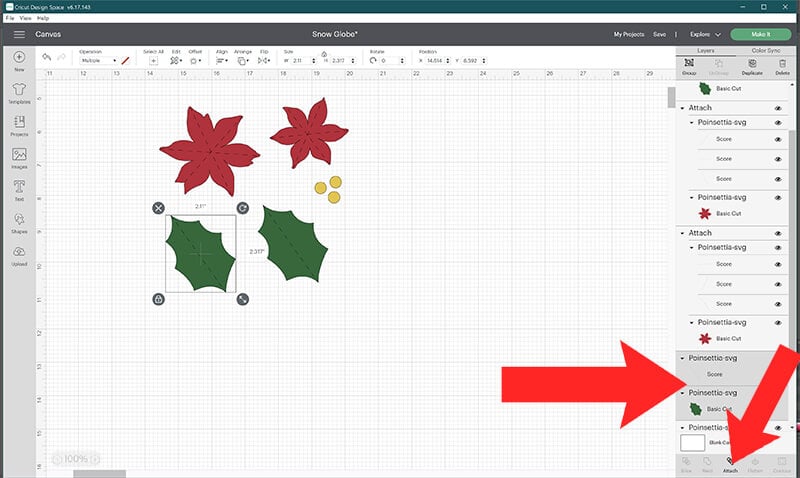
Your poinsettia flowers are now ready to make! Click Make It in the upper right of your screen. In the mat preview screen, you’ll see all the mats for your project. Your score and cut lines should be placed in the correct location. If they are not on top of their design, you will need to go back and attach them together. Then, click Continue to cut.

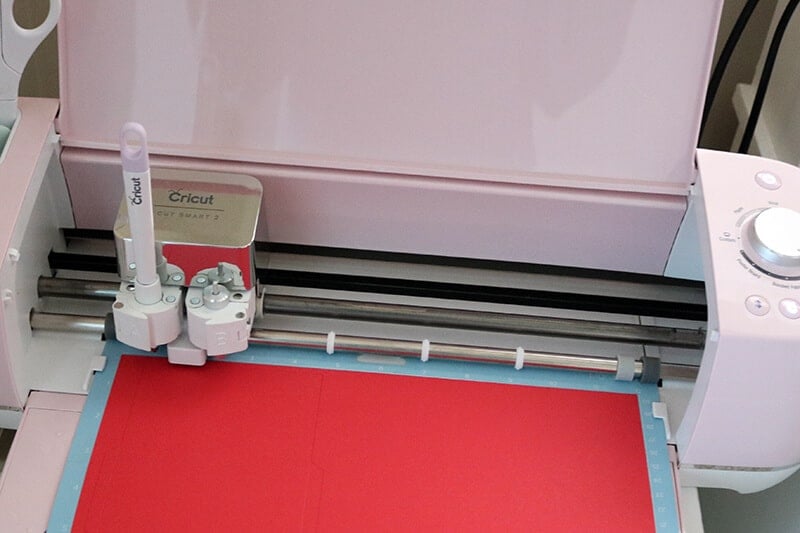
Step 4 – Prepare Your Cricut Mats
Prepare your Cricut mats as shown in the mat preview screen. Make sure that you have inserted your Scoring Stylus or Scoring Wheel before you begin to cut your project. I am using this Scoring Sylus in this tutorial. Then, cut all of your cardstock for your project.
**Note – If you prefer flat paper poinsettia flowers, you can delete the score lines and skip scoring them. Scoring the flowers gives a nice 3-dimensional effect, making them look more realistic.
Assemble Your Poinsettia Flowers
Once all the pieces are cut, you can assemble your poinsettia flowers. Fold on each of your score lines to add a 3-dimensional effect to your flowers and leaves. Then, glue your flower pieces together. I glue the leaves diagonal over the other. But you can assemble these however you like!
Then, add your rhinestones! You can also cut yellow circles which are included in the poinsettia SVG files, but I prefer using rhinestones.

These poinsettia paper flowers look great to decorate presents. You can also use it to add more decor to this paper gift card holder.
**Tip – These look really neat using red and green felt as well. You can create a realistic looking poinsettia bouquet this way!

Looking for more designs? View all of my Christmas SVGs here and my free Paper Crafts here.
Before downloading this SVG, please share this design on Pinterest – it’s quick to do and makes a HUGE impact to keep SVG Nation’s designs free to you.

To get this Free Poinsettia SVG file, enter your name and email into the form below and then click the “Get It Now!” button!
Please remember these are for personal use only. If you’re looking to sell products using these designs, please purchase a Commercial Use License here.