
How to Use Adhesive Vinyl & Layering Adhesive Vinyl
Here are step by step instructions on how to use adhesive vinyl with your Cricut to make decals. Learn tips and tricks for cutting and layering your vinyl.

If you are new to using adhesive vinyl, or want to learn a better way for layering vinyl, then this guide is just what you need. This tutorial will cover everything you need to know about using adhesive vinyl, from cutting it, to weeding it, and layering it.
What is Adhesive Vinyl?
Adhesive vinyl is a sticky backed material that you can cut with your Cricut, Silhouette or other cutting machine. This vinyl is used for applying decals or designs on hard surfaces like cups, walls, cars, windows, etc.
Types of Adhesive Vinyl
You can purchase removable adhesive vinyl or permanent adhesive vinyl. Although permanent adhesive vinyl is not truly permanent, it will last up to 8 years and is dishwasher safe. Removable vinyl will still last for awhile, but is not dishwasher safe and can be removed easily.
Both permanent and non-permanent adhesive vinyl come in a variety of styles, so there is no limit to what you can do when it comes to project ideas!
- Oracal 651: glossy and matte (permanent, indoor use)
- Cricut Permanent Vinyl
- Oracal 641: matte (made for outdoor use, but not as water resistant as other permanent vinyl)
- Oracal 751: glossy (rated for even longer outdoor use)
- Cricut Removable Vinyl
- Oracal 631: matte (removable vinyl)
- Holographic
- Glitter
- Foil
- Chalkboard
- Dry Erase
- Glow in the Dark
- Patterned
- Printable
- Window Cling
- Stencil Vinyl (for creating stencils for painting or drawing)
How is Adhesive Vinyl Different than Iron On Vinyl (HTV)?
Adhesive vinyl has a sticky back, making this vinyl similar to a sticker. Iron on vinyl (also called heat-transfer vinyl or HTV) has a heat-activated sticky back. You need or iron or EasyPress to apply iron on vinyl.
Adhesive vinyl is best for smooth surfaces, like cups, glass, walls, notebooks or to use as car decals.
Iron on vinyl is best to use on fabrics, so you can use it to decorate shirts, aprons, shoes, bows and other fabric type items. You can check out my post How to Use Cricut Iron on Vinyl for more information on applying HTV vinyl.
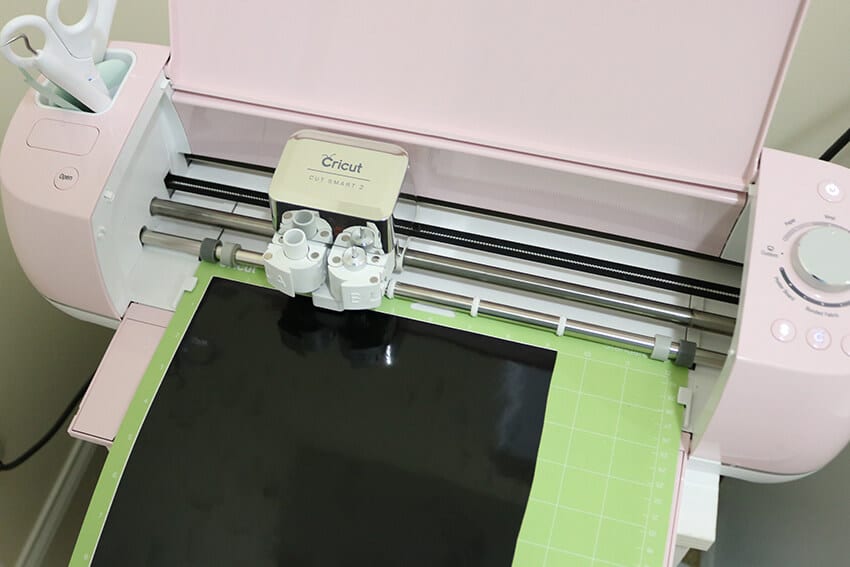
How to Cut Adhesive Vinyl
To cut your vinyl, you first need to create your design in Cricut Design Space. Or, if using an SVG file, upload your SVG file to Cricut Design Space.
Adjust your graphic to the correct size. If you have multiple layers, make sure to attach your layers of the same color so they cut in the right spot. If you do not attach your images, Cricut will automatically cut your design to use the least amount of vinyl, instead of cutting them in the design locations.
To attach, select all layers that you want to attach by holding down shift and then select Attach in the lower, right hand corner of design space.
When your image is ready to cut, click the green “Make It” button.

Place your vinyl on your cutting mat. When using adhesive vinyl, the glossy (finished) side always goes up. Then, click on “Continue”.

If you are using the Cricut Explore, set your dial to Vinyl.

When using the Cricut Maker, you will select your base material from Design Space. If you don’t see your material listed, click on “Browse All Materials” and search for your material there.

Load your mat into your Cricut machine and press the blinking green arrow. This will load the mat for you. Then, press the blinking green C to cut your vinyl.
How to Weed Your Vinyl
When your image has finished cutting, remove the mat from your Cricut. Before weeding, cut around your image so you can save the unused vinyl for another project. Then, weed your vinyl.
Weeding vinyl is the process of removing the excess vinyl. When you are finished, the only pieces left on the paper are your design pieces. You may need to use a weeding tool for weeding out smaller pieces.

Once you are finished weeding your design, place a piece of transfer tape on top of your design. Use your scraper to transfer it over.

Then, peel away the backing of your vinyl. Your image is now ready to apply to your surface. In this situation, this hockey decal is being used as a car decal.

Since this decal is being given as a gift, I will put the backing of the transfer tape back on and it is ready to be gifted.

How to Layer Adhesive Vinyl
When using more than one color of vinyl, you will need to layer your vinyl. This gets a little trickier than using one color. However, this tutorial will give you tips and tricks to make the process easy to do.
Add Guides to Your Image
When layering vinyl, you can just eyeball it and hope you place your vinyl exactly where it needs to go. This works well with iron on vinyl because the stickiness isn’t activated until you heat it. So, you can slide the image around until it’s just right. But, with adhesive vinyl, once you place it down, that’s it. So, to make sure it lines up properly, I like to add guides to my image.
To add guides to your image, first create 2 stars and place them around your image. You can add more than 2 if this makes it easier for you to line up. The stars can be as large or small as you need them to be. The stars are going to be used on each layer that you cut as guides to line your vinyl up, so create them to make this the easiest for you.
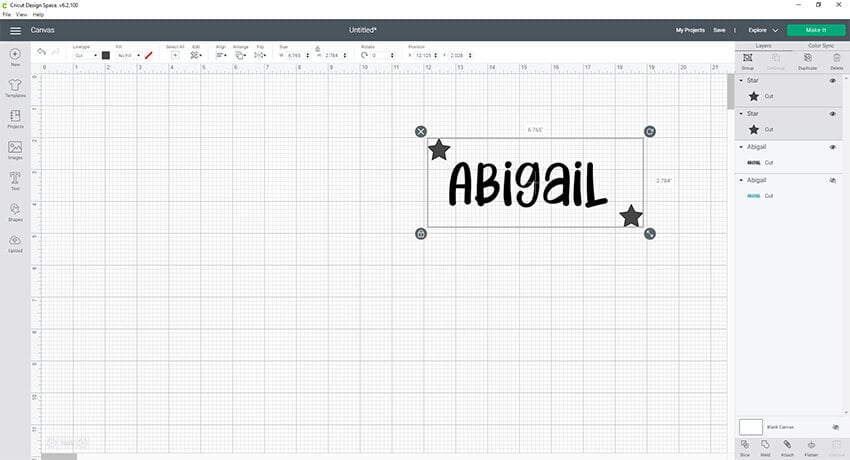
Now that we have our guides in place for one of the layers, we need to duplicate the 2 stars and add them to the second layer. You will do this for each layer of vinyl you are cutting. So, if you have 4 different layers, you will have 8 stars. The stars need to be perfectly on top of each other for each layer.
Once all of your stars are in place, you need to weld one of the top and one of the bottom stars to each layer. To do this, line the 3 layers up that you want to weld together by dragging your layers in the layers panel. Select all 3 layers by holding down shift and click on weld.

Then, weld your second layer with the stars. Continue to do this for each layer that you have.

Cut and Weed Your Adhesive Vinyl
Once your images are welded together, you are ready to cut, so click on the Make It button.

You will continue to cut and weed the vinyl, just as we did with the hockey puck. When you are finished, you will have guides on all of your layers, making it much easier to line up perfectly.

Transfer Your Image
Next, you will transfer each layer to your transfer tape.
Note: This is very important. You need to work backwards when working with the layers. You need to transfer the image that you want on top FIRST. The bottom layer will be the last layer that you transfer over.

Next, add your second layer to the transfer tape. I think the easiest way to do this is to lay the image you are transferring down on the surface you are working on. Then, take your transfer tape with the first layer already attached and hold it over the second layer. Slowly place the transfer tape down, lining it up with your star guides. Once this is in place, use your scraper to smooth it down all the way.

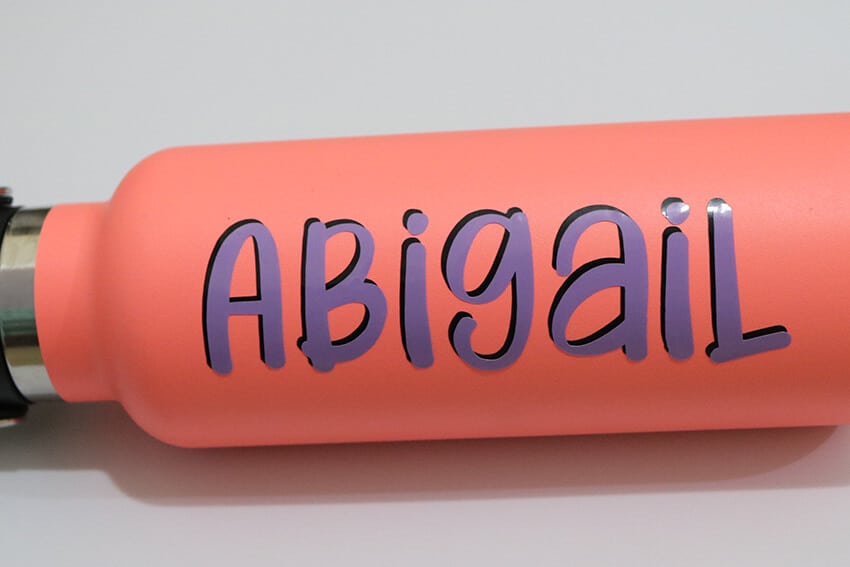
Once all of your layers are on the transfer tape, cut away the star guides. If you leave them here, they will become part of your project. Then, you can apply your adhesive vinyl, layered design to your surface. Use a scraper to make sure that you transfer it over well.

If you send your kids to school or activities with a water bottle, then the bigger you can have their name on there, the better! I label all of the kids water bottles and since doing this, they all seem to return back home.
I hope you found this tutorial helpful! I’ve got a lot of other helpful tutorials on using your Cricut and Design Space for you to check out. And if you need inspiration for project ideas, make sure to check out my growing library of SVG files that are all free for your personal use.
