
Snowflake SVG
Use your Cricut or Silhouette cutting machine to create your own DIY Snowflake Ornaments! Learn how to make these snowflakes (and download the snowflake svg) with the step-by-step tutorial below.

This snowflake svg is perfect for making snowflake ornaments or to hang as decorations. They look great to decorate Christmas gifts as well. The files come with 4 different snowflake designs for you to use.
This Christmas craft easily comes together with the use of your cutting machine. Both the DXF and SVG files are included so you can use this free snowflake file with either your Cricut or Silhouette.
Follow the steps below to create these Snowflake paper ornaments.
Supplies Needed for DIY Snowflake Ornaments:
- Cardstock in your color choices – I used this white glitter heavy weight cardstock and absolutey LOVE IT!!
- String or ribbon for hanging your ornament.
- Cutting Machine and this light grip cutting mat.
- This scoring stylus if using a Cricut. If your cutting machine doesn’t have the scoring feature, this scoring board and stylus is great to use.
- Snowflake SVG Free – Download at the bottom of the post
Step by Step Tutorial
Step 1
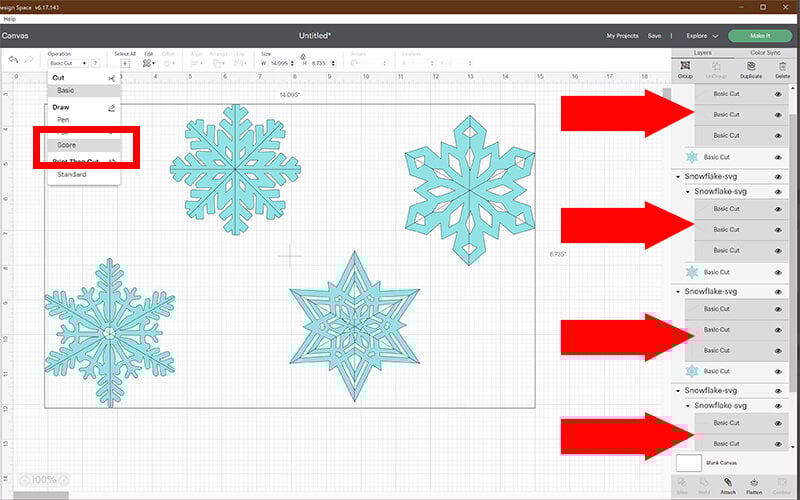
Upload the free Snowflake SVG to Cricut Design Space. If needed, this tutorial will show you how to upload files to Cricut Design Space. Before editing the design, you will need to ungroup the layers. To do this, click on the top layer (which will select all layers) and then select “ungroup”.
Step 2
When using a Cricut, you will need to change the layer with the red lines to “Score” instead of “Cut” in Design Space. If your cutting machine does not have the scoring option, hide those layers and score the snowflakes by hand or with your scoring board and stylus after you cut it. If don’t want to fold the snowflakes, you will want to hide the layers as you won’t need to score them.
Step 3
Attach your score lines with the snowflake by selecting your snowflake layer and 3 score line layers and click “Attach.” Resize your snowflakes as needed.

Step 4
Select “Make It” and prepare your light grip cutting mat as shown in the preview. You can also rearrange where your items will cut by clicking on the item and moving it on the mat.
Step 5
Place your scoring stylus in Clamp A of your machine.
**Note: If you are adding the folds to your snowflake, you will need to place the glitter side down on your cutting mat.
Cut and remove your design from the mat.
*Tip: When removing cardstock, I put the mat face down on the ground and roll the mat off of the design. The cardstock comes right off this right!

Step 5
Fold on the score lines to give your snowflakes a 3-D effect. Add string or ribbon by gluing it to the back if making ornaments.
Looking for more designs? View all of my Christmas SVGs here and my free Paper Crafts here.
Before downloading this graphic, please share this design on Pinterest – it’s quick to do and makes a HUGE impact to keep SVG Nation’s designs free to you.

To get these Free Snowflake SVG file, enter your name and email into the form below and then click the “Get It Now!” button!
Please remember these are for personal use only. If you’re looking to sell products using these designs please purchase a Commercial Use License here.