
Cricut Combine Tools {Weld, Unite, Subtract, Intersect, Exclude}
Check out the new update in Cricut Design Space! And learn how to use the new Cricut Combine Tools: Weld, Unite, Subtract, Intersect and Exclude!
I love how Cricut Design Space is always working to upgrade its software. And this 2022 update is one of the best I have seen! These new combine features give you a lot more design options like what you would see in design software like Inkscape or Adobe Illustrator.
If you don’t see these features, it’s because they are still in Beta. To switch to the Beta version of Cricut Design Space, click on Settings in the upper left menu. You can toggle between the Beta and Live version of Cricut Design Space here. At this point, these changes are for the desktop version only.

This newest update replaces the “Weld” icon with “Combine”. Within the Combine icon you can Weld, Unite, Subtract, Intersect and Exclude! So, let’s cover what these items do!
Grab My Free Cricut Combine Tools Cheat Sheet
You can grab my updated Cricut cheat sheets with a new sheet on how to use the Cricut combine tools! Just enter your name and email below and then check your inbox. If you prefer a one page with 12 popular Cricut tasks, you can grab my Cricut Cheat Sheet here.
What are the new Combine Tools in Cricut Design Space?
Watch the full step-by-step video tutorial on how to use the Cricut Combine Tools:

The new combine tools in Cricut Design Space replaces your Weld option. Instead of just having the option to weld, you now have 5 different options for combining elements, including weld.
These new options are located in the toolbar at the bottom of the layers panel. Because the combine tools are all about combining elements together, this option will only be available to you when you have 2 or more items/layers selected.

How to Weld in Cricut Design Space
The weld option has been available in Cricut Design Space for a while now. The only thing that has changed about weld, is where it is located.
When you weld, you turn multiple layers into a single layer image. Here are some of examples of when you will want to use the weld option.
Weld overlapping shapes or letters of the same color, so they cut as one image.
When you have overlapping shapes or letters of the same color, they will each cut individually which can really mess up your design. So, you will want to weld your letters or elements together, so they cut as one design.
To weld, select your layers and click Combine > Weld and your selected layers will be welded together. They will appear as a single layer in your Layers Panel now.

Weld shapes together to create your own unique shapes.
Cricut Design Space has a lot of shape options to choose from. But there are still shapes that aren’t available. When this happens, you can weld shapes together to create your own unique shape.
For example, to create a cloud in Cricut Design Space, you will use a combination of circles and then weld them together.
To weld these together, select your group of circles and click Combine > Weld and your selected layers will be welded together. They will appear as a single layer in your Layers Panel now.

Welding is a PERMANENT change. There is no option to unweld. You can only use the undo feature if this is a recent change.
How to Unite in Cricut Design Space
The unite tool is basically the new and improved weld!! It does everything that weld does but keeps your items on individual layers so that you can edit each layer in your design individually. Plus, you can undo unite!!
Going back to the cloud example. Once you weld the cloud, you cannot change the shape of it. But with unite, you can still click on each individual circle and adjust the shape and location. Once you finish adjusting it, it automatically adjusts your united {welded} shape!

You can even add more images or shapes to your design when you unite it. Just drag and drop them in your Unite layers in the Layers Panel. So, with unite, you can still access each individual layer. But when you cut it, it cuts as a single piece just as weld would.
You can also Undo the Unite by clicking on Combine > Undo Unite. This will separate your layers back to how they originally were. If you choose Merge Layers, this will merge your layers together into one layer just as Weld does. You will not be able to undo the Merge Layers.

How to Subtract in Cricut Design Space
Subtract is very similar to the slice tool in Cricut Design Space that you are probably already familiar with. The main difference is that the Subtract feature does not leave the extra pieces that slice does. Instead, the subtract just cuts the top layer out of the bottom layer.

You can also subtract multiple layers at the same time which is something that the slice tool cannot do. In order to create this “A” with the star cuts out using slice, you would have to slice each star individually and then clean up all the extra pieces.
The subtract tool makes this SO much easier. Just select your “A” and all your star layers together, click Combine > Subtract and the top layers {stars} will be removed from the bottom layer {A}. You will also notice that each star still remains on its own layer. So, if you want to resize, move or delete any of the starts, you still can!

The last difference between Subtract and Slice is that you can Undo Subtract. You can also Merge Layers together which will turn this into a single layer image. Once you merge this, it cannot be undone.

How to Intersect in Cricut Design Space
The Intersect combine tool is completely new in Cricut Design Space. However, if you’re familiar with Adobe Illustrator or Inkscape then you may recognize this tool and you are probably excited about this!
Intersect combines shapes and deletes anything that isn’t overlapping. This is a tool that I use often with my design software. If you have ever wondered how people get that leopard print perfectly inside letters or shapes, this is the answer!
To achieve this look, select both the leopard print layer and the heart layer. Choose Cricut Combine > Intersect and you are left with a leopard print heart. So, it deletes everything that isn’t overlapping.

You can use the Intersect tool with more than 2 layers. In this case, it will only keep what is overlapping on ALL the layers selected. So, if you want to create the leopard print heart where I typically like to use 2 colors in the leopard print, then you will need to use the Combine Intersect tool with each color separately.
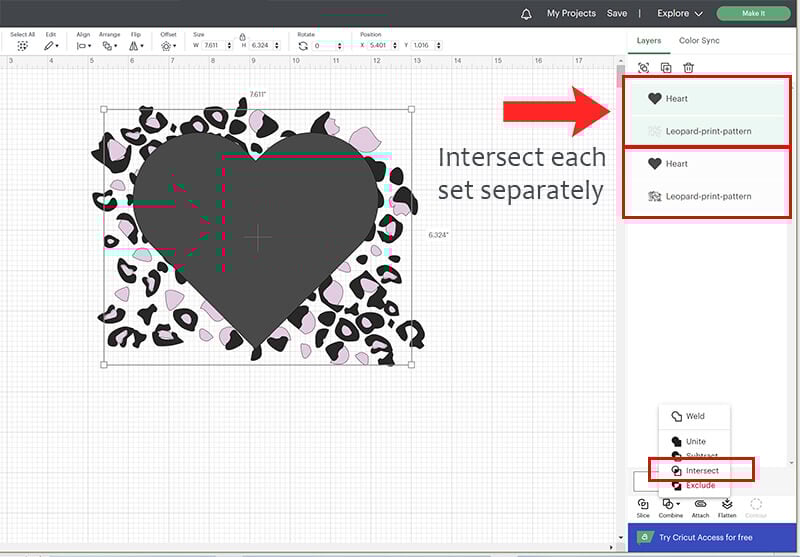
And you will be left with a leopard print heart with more than one color. The Intersect feature also keeps the layers separate, so you can edit and modify each design even after Intersecting them.

Just like the other Cricut Combine Tools, you also have the option to Undo the Intersect and to Merge Layers. Keep in mind that if you merge the layers, this will be a permanent change and you won’t be able to edit each individual design anymore.
How to Exclude in Cricut Design Space
The Cricut Exclude feature is another new feature in Cricut Design Space. It is pretty much the opposite of Intersect. Exclude deletes everything that is overlapping and everything else remains.
Exclude sounds a lot like Subtract. However, the difference between these Cricut Combine Tools is that Subtract deletes the entire top layer, where Exclude only deletes the top layer where it overlaps and keeps the rest of the design on that layer. You will also keep your original layers where you can modify and edit each design element.

The Exclude feature also has the option to Undo and to Merge Layers. Keep in mind that if you merge the layers, this will be a permanent change and you won’t be able to edit each individual design anymore.
This was a pretty big Design Space update! But these Cricut Combine Tools are a great addition to really help you have more control over your design options in Design Space.
Save this tutorial on Cricut Combine Tools so you can reference it as needed!
