
Christmas Boxes
Use your Cricut or Silhouette cutting machine to create your own Cricut Christmas Boxes! Learn how to make these cute boxes (and download the free cricut box template) with the step-by-step tutorial below.

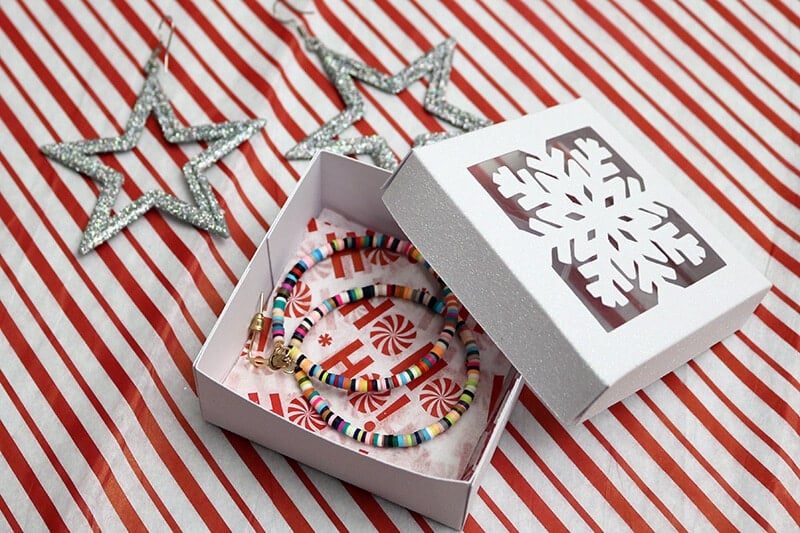
These Cricut Christmas boxes are perfect for small gifts, especially handmade Christmas gifts. The box template is already sized for holding small Christmas treats and gifts. But you can easily size them larger or smaller as needed.
These Christmas Boxes easily come together in just minutes. With 4 different designs to choose from: snowflake, Santa, gingerbread man and a hand holding an ornament, you can easily make a variety of these even if you are new to paper crafts!

Just follow the steps below to create these adorable Cricut Christmas Boxes.
Supplies Needed for these Cricut Christmas Boxes:
- Cardstock in your color choices – This heavy weight cardstock is a great variety pack that I recommend keeping on hand if you like to do paper crafts. You may also like this heavy weight textured cardstock as well. For the snowflake box, I used this white glitter cardstock which is one of my absolute favorite cardstocks to make crafts with.
- If you want the peek-a-boo affect where you can see into the treat boxes, you will either need this thin clear craft plastic or you can use cellophane bags. The craft plastic does give a nicer look, but if you have clear plastic bags on hand, you can go with the easier route.
- Double-sided tape or glue. I prefer the tape.
- Cutting Machine and this light grip cutting mat.
- Scoring Stylus (which is what I will be using in this tutorial) or Scoring Wheel (Maker only). If your cutting machine doesn’t have the scoring feature, this scoring board and stylus is great to use.
- Free Cricut Box Template – Download at the bottom of the post
Step by Step Tutorial
Step 1
Upload the Cricut Box Template to Cricut Design Space. If needed, this tutorial will show you how to upload files to Cricut Design Space. Before editing your design, you will need to Ungroup your Layers. With all your layers selected, click on “ungroup”.

Step 2
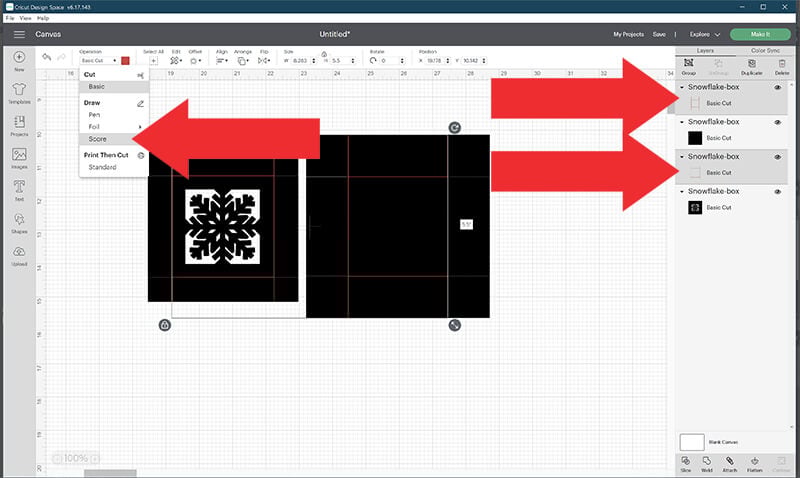
If using a Cricut Explore, you will need to change the layer with the red lines to “Score” instead of “Cut” in Design Space. You can select both layers together by holding down shift.
If your cutting machine does not have the scoring option, hide those layers and score the box by hand with your scoring board and stylus after you cut it. The scoring feature is really useful when making paper crafts like boxes. So, if you don’t have a Scoring Stylus or Scoring Wheel (Maker only), I definitely recommend getting one.
Step 3
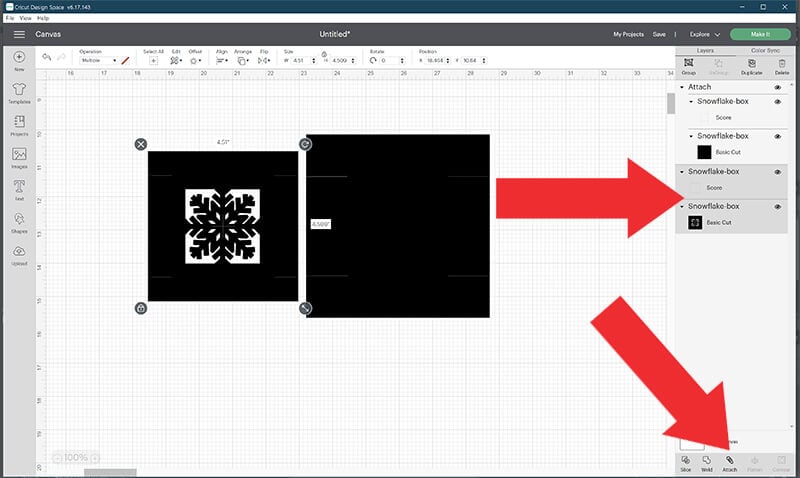
Attach your score lines to your box layer. Hold down shift and select your bottom box layer with the score lines and select “attach”. Do this again with your top box layer and score lines.
Step 4
Select “Make It” and prepare your light grip cutting mat as shown in the preview. Cut and remove your design from the mat.
*Tip: When removing cardstock, I put the mat face down on the ground and roll the mat off of the design. The cardstock comes right off this right!
Step 5
After the boxes are cut, fold along the score lines. Cut out a square piece of craft plastic or your cellophane plastic to fit inside the lid of the box. Use tape or glue to adhere the clear plastic to the inside of the lid. You can also use different colored cardstock instead of the clear plastic to hide the contents inside your Christmas box.

Step 6
Use the small tabs to tape each box piece together. Just fill these boxes with Christmas gifts or treats and they are ready to go!
Looking for more designs? View all of my Christmas SVGs here and my free Paper Crafts here.
Before downloading these Cricut Christmas boxes, please share this design on Pinterest – it’s quick to do and makes a HUGE impact to keep SVG Nation’s designs free to you.

To get this Free Christmas Box Template, enter your name and email into the form below and then click the “Get It Now!” button!
Please remember these are for personal use only. If you’re looking to sell products using these designs, please purchase a Commercial Use License here.