
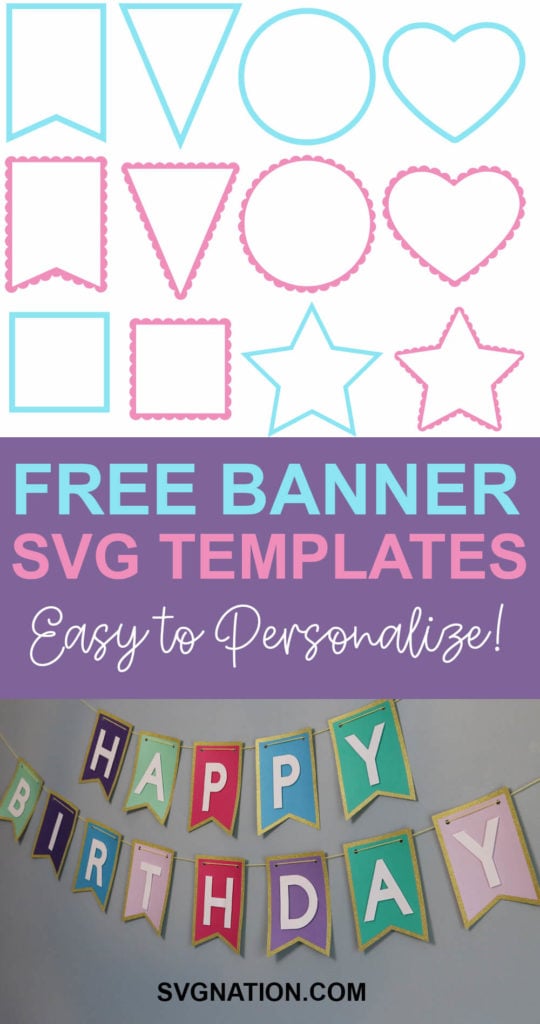
Banner Templates {Create your own Banner for ANY Occasion}
Did you know that you can easily create banners with your Cricut? And with the free banner SVG files I’m sharing today, you’ll easily be able to create Cricut banners because all you need to do is add the text (and I’m going to show you just how to do this)!
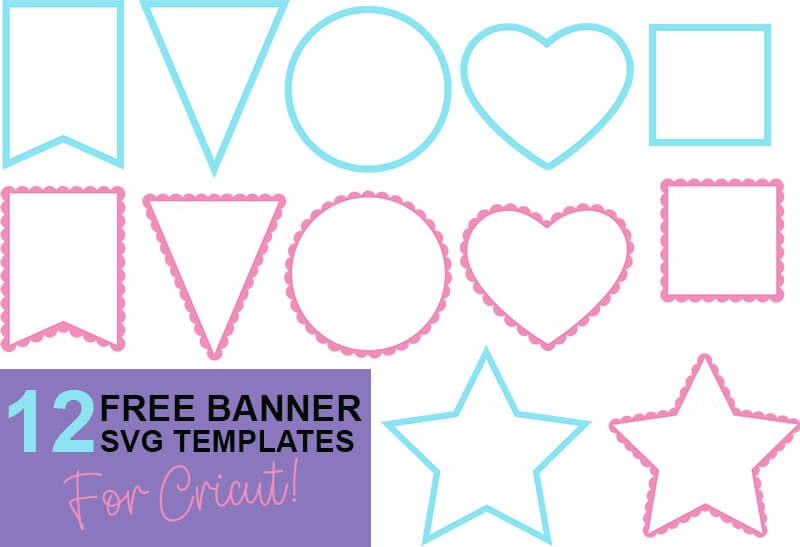
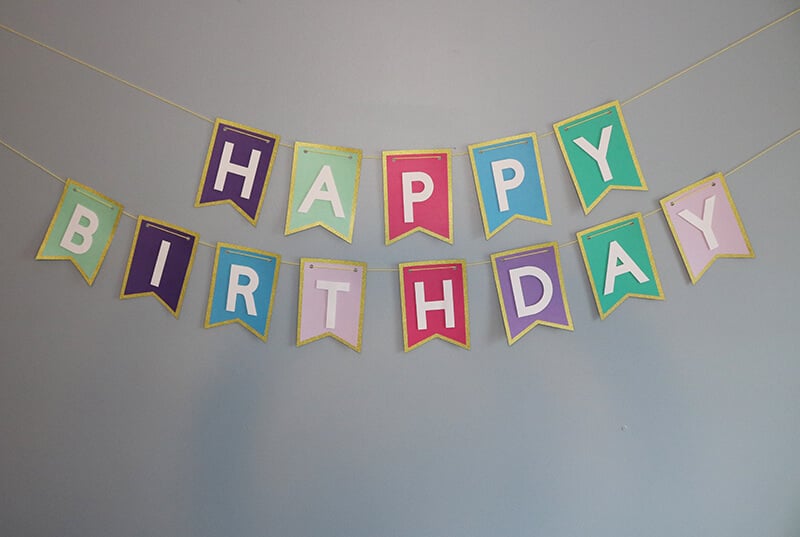
I’m sharing 12 different Cricut banner templates that you’ll be able to use to create banners for any occasion. So by the time you’re done with this tutorial, you’ll be creating banners for birthdays, graduation parties, showers and more! And since there’s so many templates to choose from, your banners never have to look the same.
The great part about adding your own text is that you get to customize this banner however you like. You can personalize it with names, ages or even the year for a New Year’s or Graduation banner. So these templates are going to be able to be used over and over again.
How to Create a Paper Banner with Your Cricut
This post contains some affiliate links for your convenience (which means if you make a purchase after clicking a link I will earn a small commission but it won’t cost you a penny more)! Read my full disclosure policy.
To make paper banners with your Cricut, you will need:
- Medium to Heavy Weight Cardstock – I am using this double-sided gold glitter cardstock which is great for a nice thick and sturdy base for your banner. Along with a variety of colors from this multi-color cardstock pack.
- Cricut Maker or Explore Cutting Machine and your standard cutting mat.
- Glue – This Bearly Art craft glue is my favorite glue for paper crafts.
- Adhesive Foam dots if you would like to add dimension to your banner which I am doing in this tutorial.
- Yarn or some type of string to hang your banner
- Cricut Banner SVG – (Download at the bottom of the post)
Cricut Banner Step-by-Step Tutorial
Watch the full step-by-step video tutorial to learn how to make a paper banner with your Cricut here:

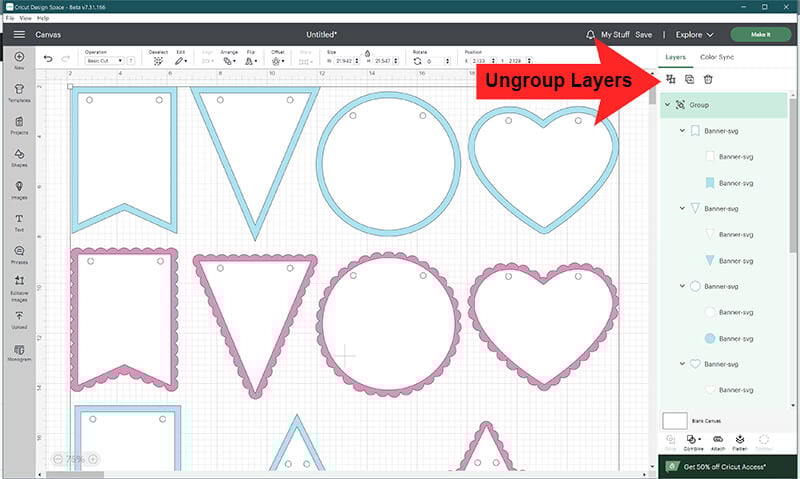
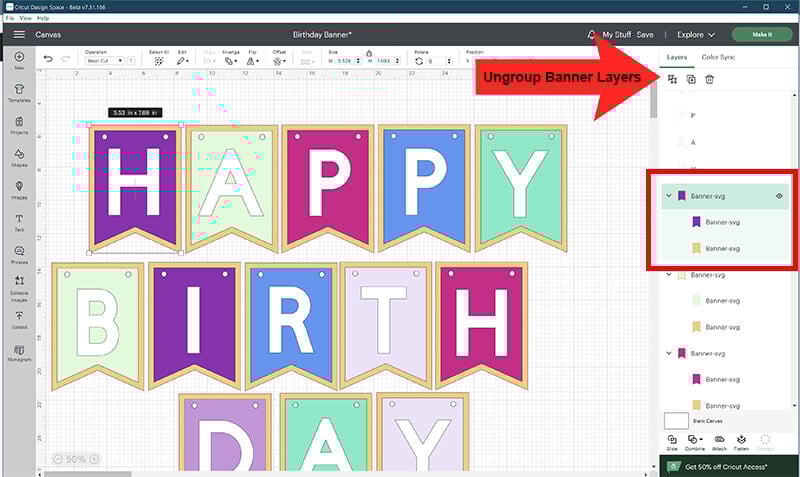
You will start by uploading the banner SVG file to Cricut Design Space. Then, click “Ungroup” to ungroup your layers. All 12 banner templates will be on this file. So go through and delete any that you will not be using for your banner.
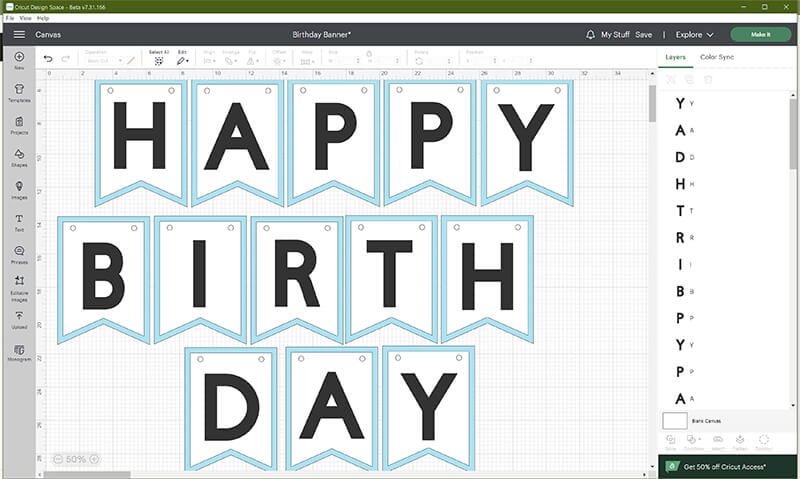
Duplicate your banner shape for as many letters and numbers that you will need. Resize as needed. I am using the pendant shape and resized it, so the width is 5.5″ and the height is 7.654″. This will fit 2 of these pendant banner shapes perfectly on a sheet of cardstock.
Then, add your text, creating a new text box for each letter or number. Select your font. I am using the Cricut Sans Bold for this happy birthday banner. And then place a letter on top of each banner shape. Resize your letters as needed. I resized mine so the height of each letter is 4″.
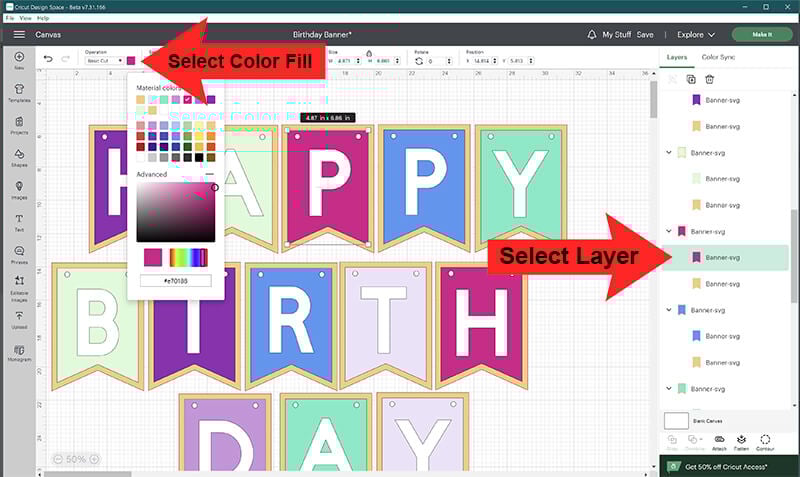
Next, determine the colors that you want to use for your banner and change the colors in Cricut Design space. To change the color, click on the layer and then click on the color fill and change the color. Repeat this for all banner pieces and letters.
Then click on “Make It” to cut out your pieces.
Assembling Banner
When all of your pieces are cut out, you can begin to assemble your banner. Start by gluing the top and bottom banner pieces together. Make sure to line up the holes in both pieces before attaching them.
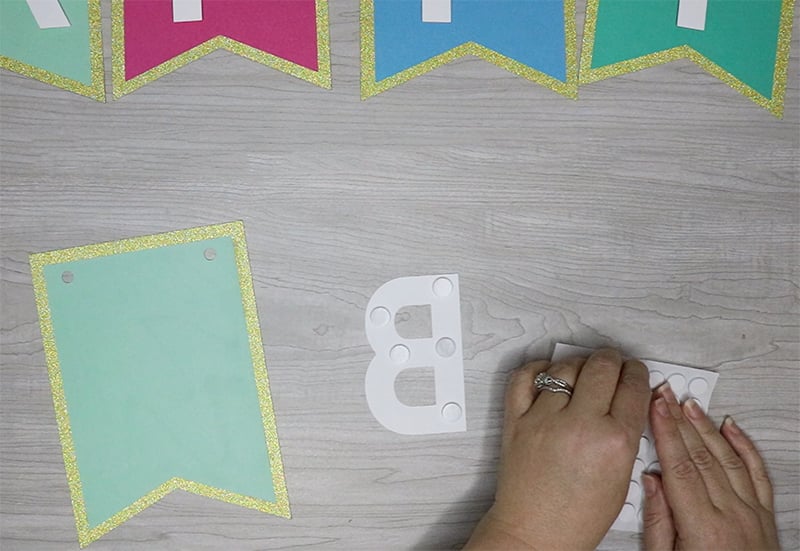
There are 2 different ways that you can add the letters/numbers to your Cricut banner. You can either glue them to your banner or use foam dots or foam tape to give your banner more dimension. I am using foam dots for my banner in this tutorial. But, both ways look great!
If you are using foam dots, then place multiple foam dots or pieces of foam tape on the back of your letter. Remove the backing from the sticky part and then attach it to your banner piece.
Once each banner piece is assembled, attach the pieces together using your string or yarn. Bring your string through the banner piece so it lays over the top.
You don’t need to worry about the spacing between the letters yet. You can respace them when you hang them. Just make sure that you leave plenty of extra string on both ends so that you have room to spread the lettes out as much as you need to.
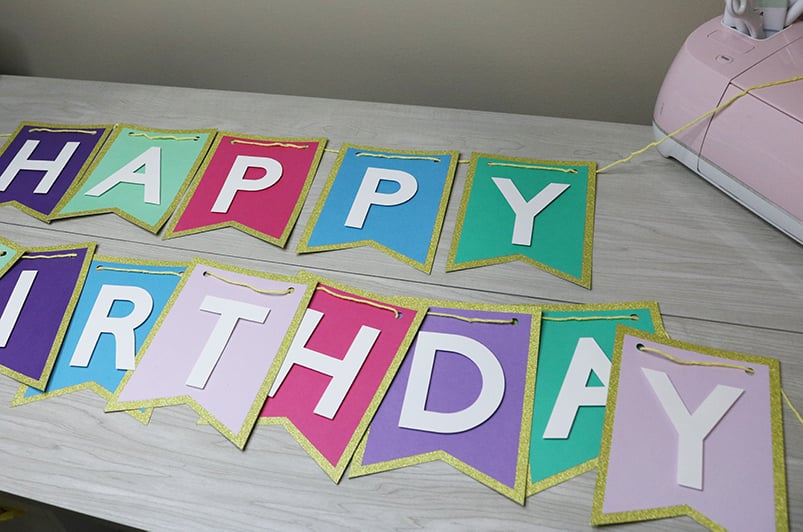
Then when you hang your banner, you can space each piece out as needed.
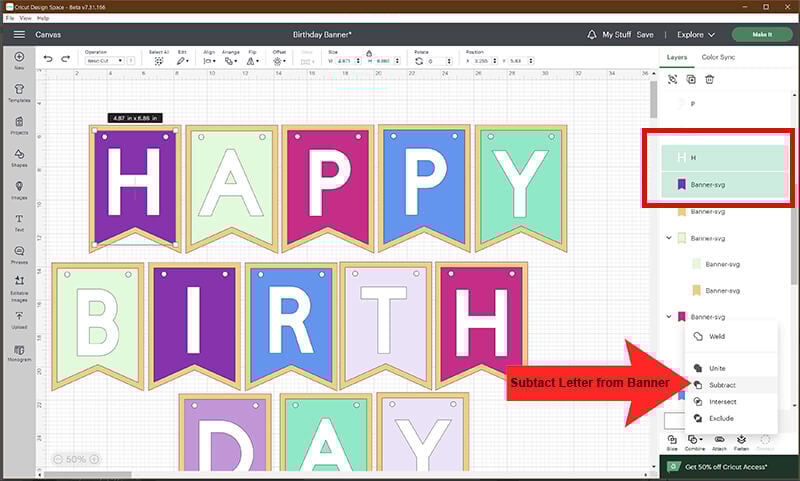
How to Make a Cricut Banner Using the Slice Method
You can also use these banner SVG templates to make paper banners where you slice the letters and/or numbers out of the top layer. So, instead of having 3 layers, you’ll just have 2!
Before you can slice the letter or number out of the banner, you do need to ungroup your banner pieces. To do this, click on the group with the 2 banner pieces grouped together and click “ungroup”. You will need to do this with each banner piece that is grouped together like this.
Then, click on your letter and the top banner piece together. Select “combine” and then “subtract”. This will remove the letter from your banner layer so you will only have 2 layers for each banner piece.
Just remember that when you assemble your banner, to glue on the small pieces that will be cut out from letters like A and P and B, etc.
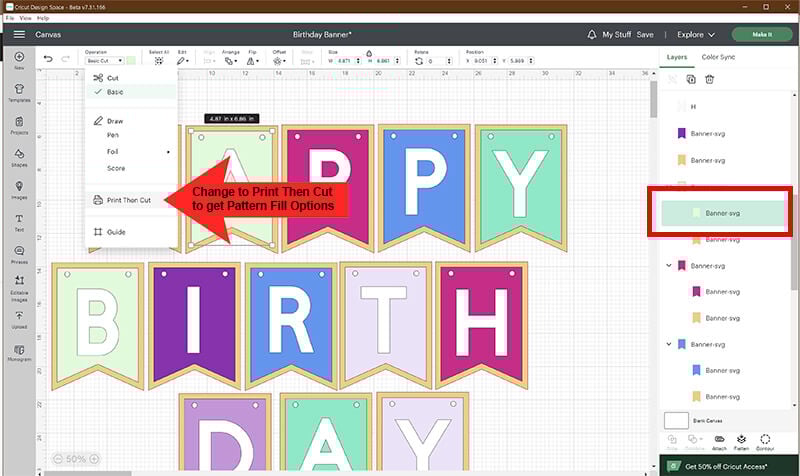
How to Make a Cricut Banner Using the Print then Cut Method
Another option for making your banner is to use the print then cut feature in Cricut Design Space. If you use this feature, you can take advantage of the patterns offered in Cricut Design Space or print colors of cardstock that you may not have on hand.
To do this, you will need to flatten your layers. Before you flatten the layers together for each banner piece, make sure the colors and/or pattern fill are exactly as you want them to be. To get the pattern fill option, you will need to change the basic operation from cut to Print then Cut.
When all of your colors are just as you want them, then you will flatten each banner piece. Select the front and back banner piece together, along with the letter and select “flatten”. Repeat these steps for each banner piece.
It is important that you flatten each banner piece separate, otherwise it will be flattened as one image and will be too large to print and cut.
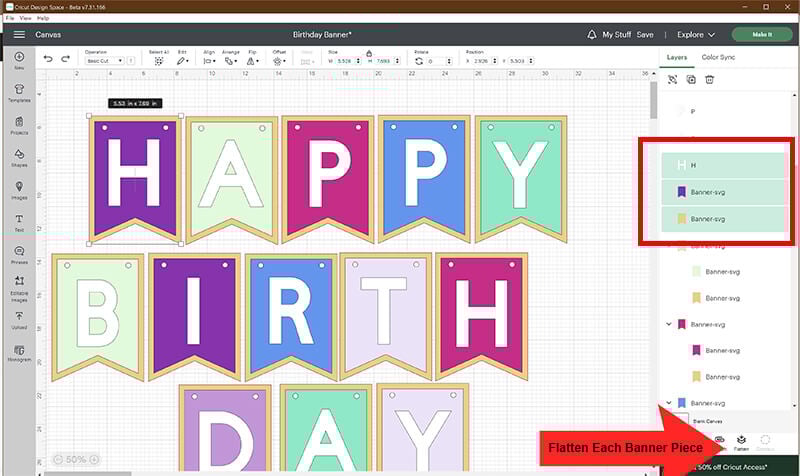
Once all of the banner pieces have been flattened, select “Make it”. Then, follow the prompts in Cricut Design Space to print and cut out each piece.
Download the Banner SVG Templates
Before downloading, please share this design on Pinterest – it’s quick to do and makes a HUGE impact to keep SVG Nation’s designs free to you.
To get these Banner SVG Templates, enter your name and email into the form below and then click the “Get It Now!” button!
Please remember these are for personal use only. If you’re looking to sell products using these designs, please purchase a Commercial Use License here