
Welcome Santa Christmas Sign SVG
If you’re looking for a fun and festive way to greet guests (and maybe the big guy himself), this Christmas welcome sign is the perfect project for your Cricut!
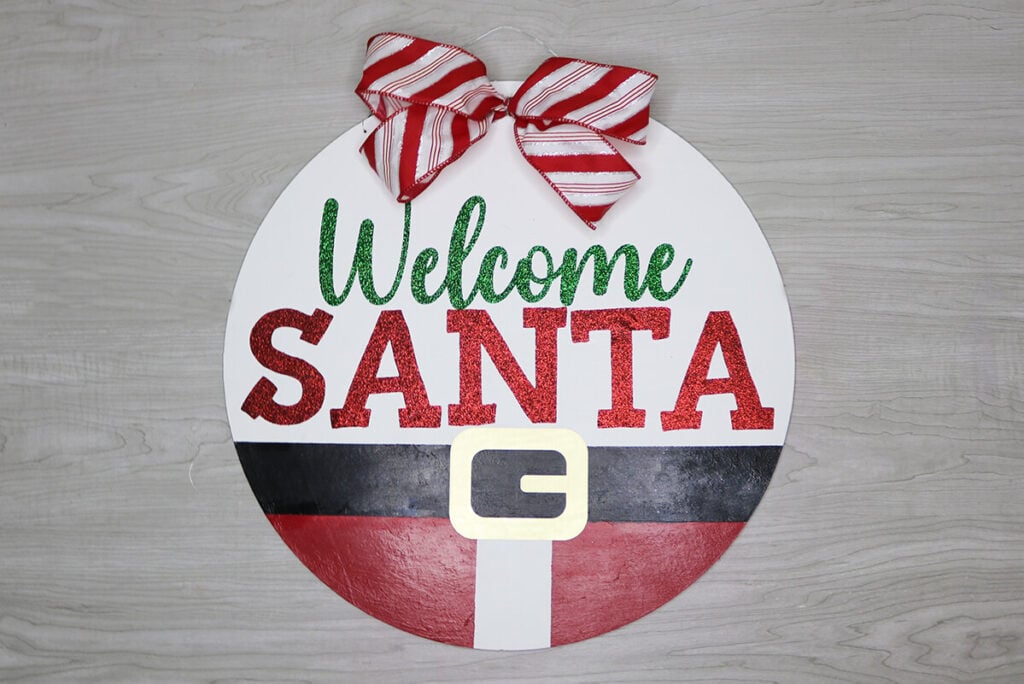
Whether you hang this Welcome Santa Sign on your front door, prop it on the mantel or gift it to a friend, this sign is sure to spread smiles all season long. Grab the free Christmas Sign SVG and follow along with this step-by-step tutorial and I’ll show you how to make this Santa Welcome Sign come to life.

This post contains some affiliate links for your convenience (which means if you make a purchase after clicking a link I will earn a small commission but it won’t cost you a penny more)! Read my full disclosure policy.
For more wood sign designs, check out my collection of cricut wood sign designs that are also made using the wood rounds. Or for more Christmas Cricut craft ideas, check out my free Christmas SVG files.
Download The Welcome Santa Christmas Sign SVG
You can download this free Christmas Sign SVG from my members only free library (design #6 under Wood Crafts or search “Welcome Santa Christmas Sign SVG”).
Don’t have a password? Unlock my free members library by entering your name and email in the form below or click here.
Supplies for Making a Christmas Welcome Sign
- Wood Round – I am using this wood round in the 16×16 inch size. If you want to use another size, I’ll show you how to resize the template in the video tutorial.
- Iron on Vinyl – I’ll be using Red Glitter and Green Glitter
- Brushed Gold Permanent Vinyl
- Acrylic paint (in a matte finish) in black, red and white
- Heat Press – You can use an EasyPress machine, but I prefer using my Mini Press on wood.
- Acrylic Sealer
- 2.5″ Wired Decorative Ribbon for the bow in any holiday print
- Floral Wire (for making the bow)
- Cricut Maker or Explore Cutting Machine and a 12×24 inch cutting mat.
- Welcome Santa SVG Template (available in my free members library design #6 under Wood Crafts —get the password by filling out the form here.)
Save this Pinterest so you can easily find this tutorial when you need it… Plus by sharing with others, this helps to keep my SVG files and Cricut tutorials free!

Christmas Welcome Sign Cricut Tutorial
Upload the Christmas Sign SVG to Cricut Design Space
Upload the Welcome Santa SVG to Cricut Design Space. If you are using a 16″ Wood Round, then upload the regular file and cut everything out. Not modifications are needed.
If you have a different size board, then make sure to upload the file that says “welcome-santa-resizing” file. With the group selected, change the W and H to the size board that you have.

After the image is resized, use this as a template to see where to measure for painting on the red and black colors.

Then ungroup the items and delete everything except Welcome, Santa and the buckle belt. These 3 items are the only items that you will cut out. I recommend using iron on vinyl, but permanent adhesive vinyl will work as well.

Paint the Wood Round
Start off by painting the board white if it isn’t already white. I recommend applying 2 coats of paint. Then measure 3.5″ inches from the bottom and apply painters tape across the board. Add another line of tape 2″ higher. Paint this area black.

When the black paint is dry, apply tape in the bottom middle so you are taping off about 2″. Then paint each side red.

Note: If you are using a different size wood round, the dimensions for painting the black and red will be slightly different so make sure that you use the settings for the size board you are using.
Apply the Vinyl
Apply the vinyl according to the type of vinyl that you are using. I am using a mixture of box. For the belt buckle, I am using a gold permanent vinyl. Since it’s just one piece, I am applying it like a sticker instead of using transfer tape.

For Welcome Santa, I am using iron on vinyl so I will be using my mini heat press. You will want to use the medium setting if you are using glitter vinyl and the low setting for regular iron vinyl. If you are using an EasyPress, press this for 300 degrees for 20-40 seconds. you will press longer for glitter vinyl. For both, remove the film once it’s cool to the touch.

Seal the Welcome Santa Christmas Sign
To get more life our of your wood sign (especially if using outdoors), you’ll want to seal the wood round. This spray acrylic sealer is my go to, but any sealer should work. Spray on the sealer, moving in side to side motions.
Note: Make sure that you are in a well ventilated area when spraying on the sealer.
Make the Bow
Using decorative ribbon, create a bow and attach it to the top of your sign using hot glue. If you need help creating a bow, then watch my step-by-step video tutorial to see how easily I assembled this bow.
Add the Wire to Hang
All that’s left is to add wire or string through the holes and hang your sign. The wood rounds that I purchased came with pre-drilled holes. If yours do not have this, you will need to drill 2 holes and then add your string.

When you’re done, make sure to post these in my crafting group here or tag me if you post them on social media. I absolutely love seeing your crafts and can’t wait to see what colors you choose!
Video Tutorial For Christmas Welcome Sign
Watch the step-by-step video tutorial to learn how to make this Christmas Welcome Sign here:
