
How to Use Puff Vinyl with Cricut and Make it Extra Puffy
Were you a big fan of puff paint and puff print shirts when they first came out? If so, then you’re going to love this puff vinyl trend. This is a type of iron on vinyl that raises up after pressing it for a fun, puffy 3D effect. If you’ve been eyeing these shirts in the store, then it’s a great time to make some for yourself.
In this tutorial, you’ll learn how to use puff vinyl with your Cricut with tips and tricks to make sure you get the perfect press every time. This way your puff vinyl will be extra puffy and extra awesome. By the end of this tutorial, you’ll be a puff vinyl expert. I won’t just show you how to use puff vinyl, but how to create a super puffy shirt using multiple colors of puff vinyl.

This post contains some affiliate links for your convenience (which means if you make a purchase after clicking a link I will earn a small commission but it won’t cost you a penny more)! Read my full disclosure policy.
Best Puff Vinyl
I did several tests with different types of puff vinyl and found my favorite choice to be this TransWonder 3D Puff Vinyl.
I even compared this puff vinyl with the VTS Super Puff Heat Transfer Vinyl that everyone raves about. And while this vinyl works great, it works just as well as the TransWonder. With a lot of different testing, I found you get the best puff by using the proper heat settings.
Since the TransWonder puff vinyl can be ordered from Amazon (with free 2-day shipping) and in a variety pack of colors for a lower price, it easily took the lead as my favorite 3D heat transfer vinyl.

How to Use Puff Vinyl
This is such a fun vinyl to use, and it adds a really fun texture to your shirts. It’s just as easy to use as regular heat transfer vinyl, however it’s much more sensitive. So, it’s extremely important to know the right temperature and press time for the specific type of puff vinyl and design type. And I’m sharing all of that information with you today.
See the full step-by-step video tutorial on how to use puff vinyl:

Which Side Goes Down on Puff Vinyl?
Just like with heat transfer vinyl, you will place the carrier sheet side down on your cutting mat. This is typically going to be the shiny side of your vinyl, however with some puff vinyl’s, the carrier sheet can be dull so just double check which side has the carrier sheet.
For example, for the TransWonder 3D Puff Vinyl, the shiny side is the carrier side, so this side will face down on your mat.
However, for the VTS Super Puff Heat Transfer Vinyl, the carrier sheet is dull, so the shiny side of your vinyl actually faces up!

If you aren’t sure which side is the carrier sheet, you can easily check to see. Just peel the vinyl and sheet apart in the corner, the side that has the clear plastic is the carrier side. This is the side that will face down on your mat.
How to Cut Puff Vinyl
Cutting puff vinyl is just like cutting regular HTV. So, you will need to mirror your design before cutting.

It’s always best to do a test cut whenever cutting a new material with your Cricut because the settings can be different depending on your blade’s sharpness. The setting that works best for me for both brands of vinyl are Everyday Iron on Vinyl with the Pressure set to More.
After cutting, weed your vinyl by removing the pieces that you DON’T need. Your design will be left on the carrier sheet. I found that both brands of puff vinyl were very easy to weed. So, if you have any issues with this step, then try using the glitter iron on vinyl setting to cut your vinyl instead.

How to Press Puff Vinyl
Have you ever seen shirts with puff vinyl that look textured instead of smooth? This is from using too much heat. To get a smooth look, you need to make sure to use the correct heat and time for the vinyl you are using and your design.
Using a heat press is going to be your best option when using this type of vinyl. An iron is not going to provide even heat, so you won’t get the desired look. I am using this EasyPress in this tutorial and my shirts turned out fabulous!
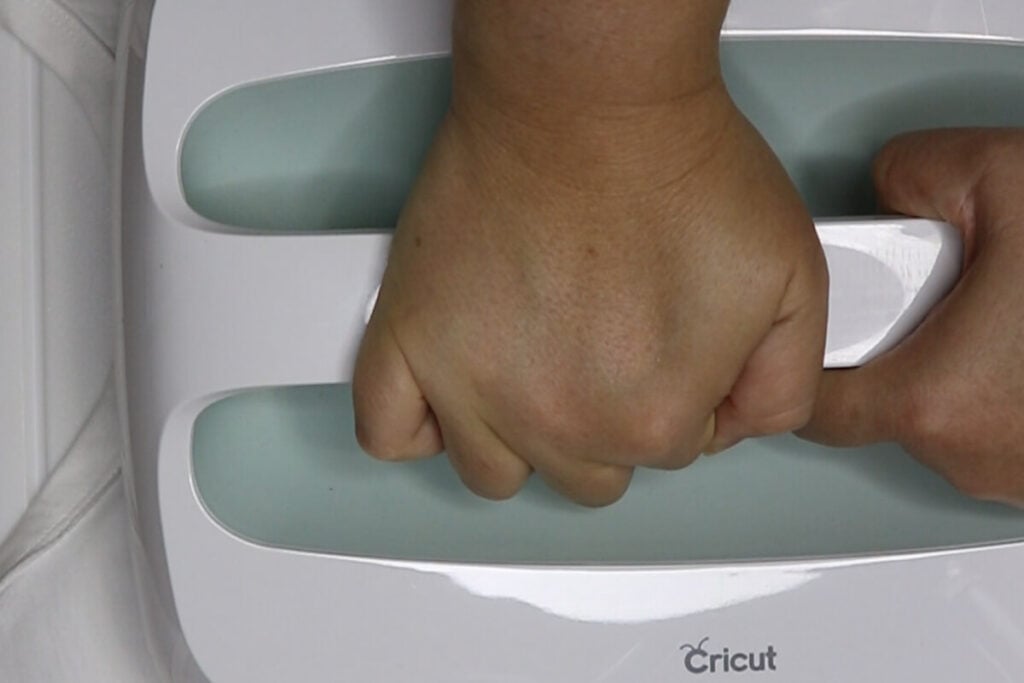
Another key to getting smooth designs is to use a hard surface underneath your shirt. I am using a cutting board inside the shirt, and this did the trick! A harder press is also going to work better also. So, make sure to put all your weight on your EasyPress while you press this.
Puff Vinyl should only be used as the last press for your shirt design. So, if you are laying, make sure your puff vinyl is the last vinyl that you apply. If this vinyl gets over pressed, it will melt and come right off (which is a handy trick if you mess it up!)

Heat Settings & Press Times
I highly recommend testing your 3D vinyl before starting your project. You want to test it on the type of material that you are using because the settings will be different for different materials. For me, these are the heat settings and press times that work best:
- 100% cotton – 310 degrees for 15 seconds
- Cotton/Poly blend – 290 degrees for 15 seconds
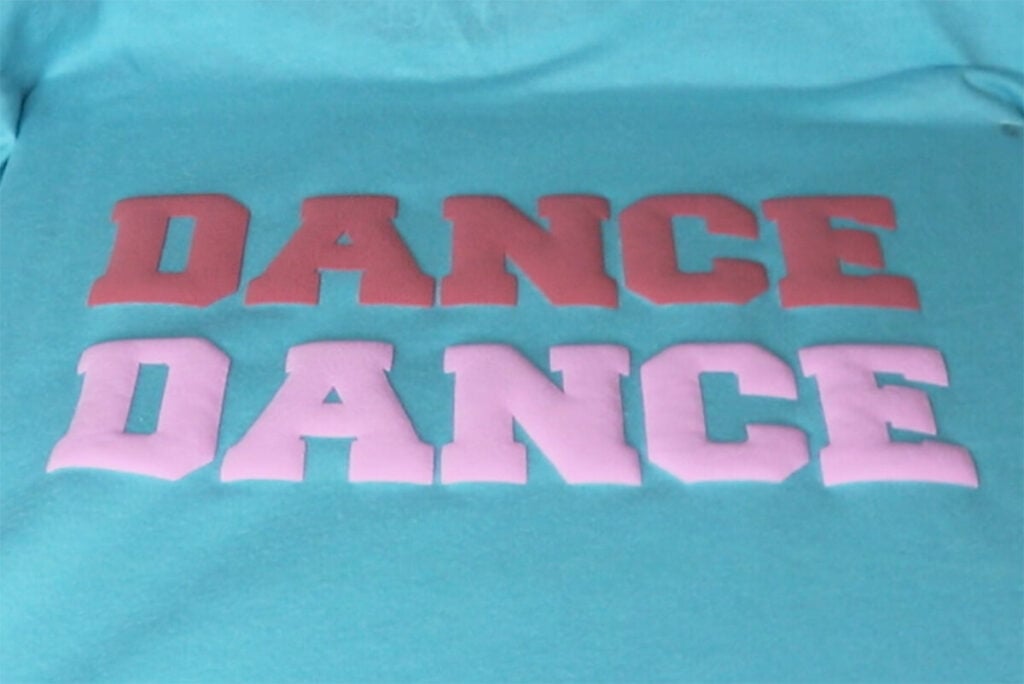
So, you don’t need to press this type of vinyl long at all. When you remove your heat press, the carrier sheet should easily slide right off. If it is still attached or you feel you need to pull it off, then press longer (just a couple seconds at a time). With the correct heat and press, your end result should look smooth and puffy when you remove the carrier sheet like the picture below.
For reference, the top DANCE is the VTS Super Puff Heat Transfer Vinyl and the bottom DANCE is the TransWonder 3D Puff Vinyl.
If your vinyl ends up looking bumpy or textured (like the picture below), then your heat is either too high or you pressed for too long. However, this can be saved! When puffy vinyl is exposed to too much heat, it easily peels off. If it doesn’t peel off easily, apply just a little more heat until it easily peels off and you can start over.

Using Multiple Puff Colors on the Same Shirt
If you want to use multiple puff colors at the same time, this is possible to do. You just have to press them at the same time. Line up each of your designs where they go on the shirt. Make sure to trim the excess from the carrier sheet if needed. You don’t want any of the sheet overlapping over another layer. Then press everything at the same time.
Caring for Your Puff HTV Garments
- Avoid direct heat, which means no ironing on top of your vinyl or on the inside where your vinyl is.
- Use cold water to wash, hang dry or dry on a low heat.
Tips for Using Puff Vinyl
- When layering, this must always be your last layer. You can only apply heat once to get the puffy effect. Too much heat will ruin your design.
- If using multiple puff colors, lay them all on your shirt and press them together in one press.
- This vinyl works best on cotton or cotton/poly blends.
- It’s best to use a heat press and not an iron. The holes in your iron may cause the vinyl to puff inconsistently.
- When in doubt, go with the lower heat setting. You can always press a little longer if the heat is too low.
- If you mess up, apply a little more heat to just that area. With most puff vinyl’s, too much heat will cause the vinyl to melt and you can peel it right off.
- If your vinyl comes out textured and not smooth, turn down the temperature or press for less time.
- Thicker fonts and graphics work better. Thin fonts don’t puff up as much so you won’t get that super puffy effect that you love.

If you need inspiration to start making your own puffy shirts then grab some of these free SVG files for shirts.
This is such a fun project and I absolutely love seeing your results. So feel free to share them on social media and tag me if you’re using Facebook or Instagram!
Make sure to pin this graphic so you can easily refer to this tutorial anytime you want to use puff vinyl!
